Sometimes in my darker moments I forget that not all programmers get to work with computer networks every day, like I do. This means that many of you don’t have a chance to experience some of the tools and debugging experiences that I do on a nearly daily basis. This is a real shame, because some of the tools available to programmers working with computer networks are some of the coolest available to any programmer.
Today I’m going to dive into my go-to debugging tool for network problems: Wireshark. This may be the first in a series of posts where I demonstrate how I use Wireshark to investigate networks and to track down bugs in misbehaving implementations.
Today, I’m going to talk about TLS, and Wireshark’s awesome functionality for trying to understand what happens when TLS goes wrong.
Unhelpful Errors
Lots of us use tools that work with TLS on a regular basis, usually in the form of HTTPS URLs. If those tools work with OpenSSL, and you’ve ever seen them fail, you’ve likely seen one of OpenSSL’s cryptic error strings pop up in your face. These range from wildly overgeneral (“bad handshake”? What is bad about it?) to the accurate but unhelpful (“EOF in violation of protocol”, no duh). But OpenSSL rarely tells you what the actual problem was, usually because TLS has no good mechanism for communicating problems to the remote peer before terminating the handshake.
For this reason, it becomes extremely helpful to see into a TLS handshake and understand what’s going on. It can help you spot problems and come up with ways to work around them. After a while you can get good enough at this that you can use Wireshark to discover bugs in servers that you don’t operate and cannot reach, and so are effectively a black box, purely by examining TLS handshakes (trust me, there are loads of servers that don’t correctly perform TLS handshakes).
In this case, we’re going to look at a healthy TLS connection, and drill down to how it works. As we investigate the TLS protocol, we’ll also take a look at some places problems arise.
Let’s dive in!
Getting Started
I’m going to use the Chrome web browser to investigate this. All the screenshots here are from Wireshark 2.0.1 on OS X El Capitan 10.11.3 Beta. I highly recommend using a Wireshark that’s at least version 2.0.0: the UI changed drastically for version 2 and is much cleaner and easier to work with.
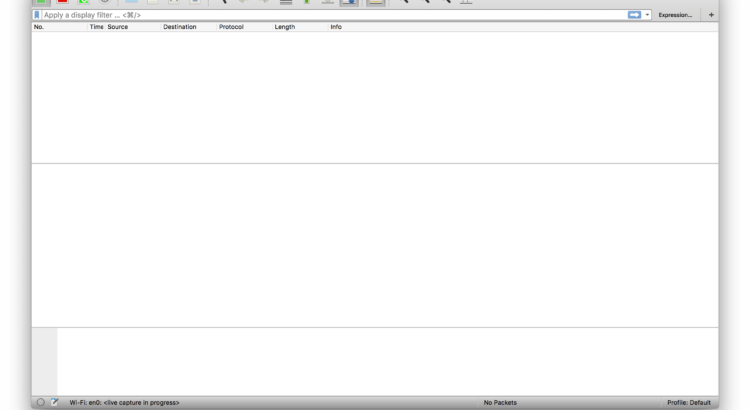
We start by opening up Wireshark. This confronts us with a slightly intimidating white screen, but the things we’re most interested in are in the “Capture” section. Here we have two separate options: we can enter a capture filter, and we can select an interface to capture on.
Let’s talk briefly about capture filters. When you do a packet capture, most of the time you’ll be capturing on your computer’s primary network card. This is likely to include a lot of extraneous data from all of the stuff that’s going on in your computer. For this reason, when you’re debugging you’ll likely want to filter the traffic down to just the things you want.
Confusingly, Wireshark uses two filter languages. The one it puts in this box is the Berkley Packet Filter language, which is very simple. For debugging HTTPS connections, you can usually get away with using host <domain name> and port 443. In this case, as I’ll be investigating the connection between mkcert.org and my machine, I’ll use host mkcert.org and port 443.
We fill that into the capture filter box, then select the interface we want to capture on. This can be tricky on machines with multiple networked interfaces, or when you have VPNs and other connections active, but in this case it’s relatively simple: I want my MacBook Pro’s wireless card, which is correctly identified as Wi-Fi: en0 by Wireshark. Select the interface by double-clicking, and you’ll get Wireshark’s capture interface:
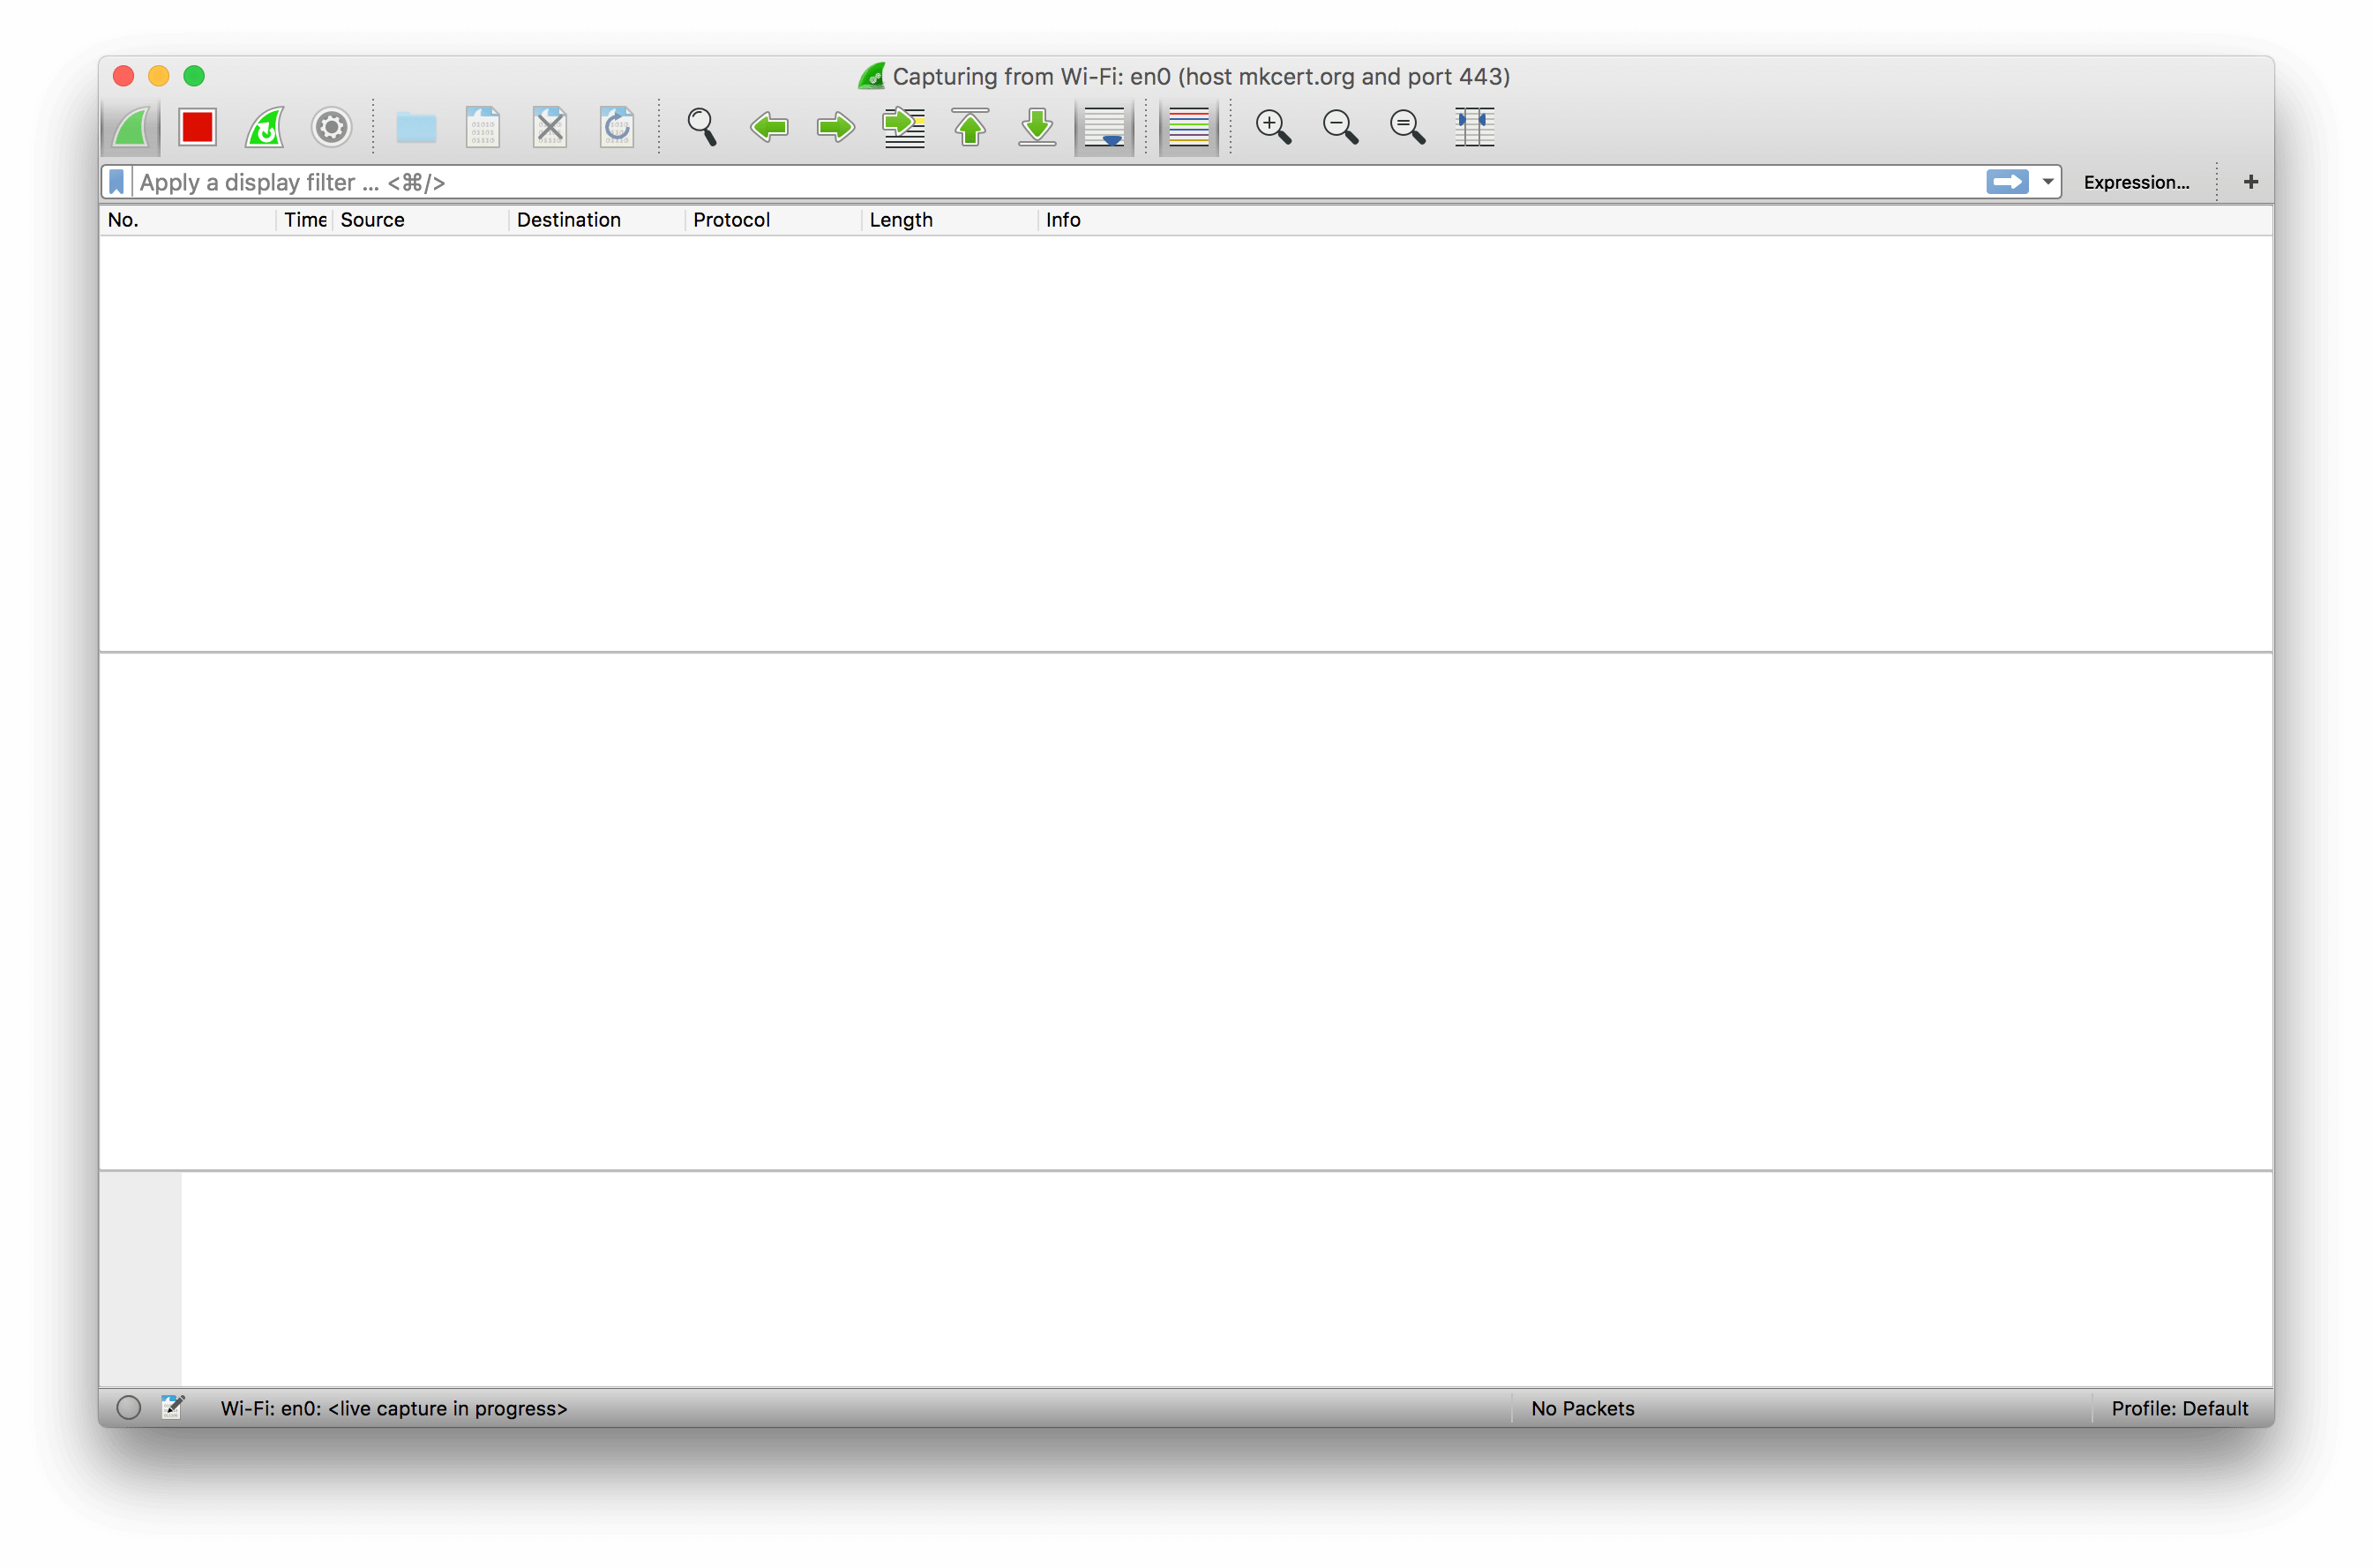
This screen looks intimidating, but it’s not that bad. Up at the top-left you have a few buttons for controlling the capture: specifically, for starting, stopping, and restarting it. These are useful: when you’re done capturing packets you should usually stop the capture, to avoid wasting resources by looking at every packet emitted by your machine!
Right underneath that we have another filter box. This, confusingly, uses a different filter syntax to the one on the landing page, documented here. This syntax is more powerful but harder to use, and so I generally try to use it for very fine-grained work, rather than the general “just give me the host I want” filtering we did earlier.
Digging Into The Capture UI
Otherwise, there’s nothing on this page, so let’s go ahead and make a web request to the page. You can use whatever web browser you’d like: I’m using Chrome. Make the request, then switch back to Wireshark and stop the capture.
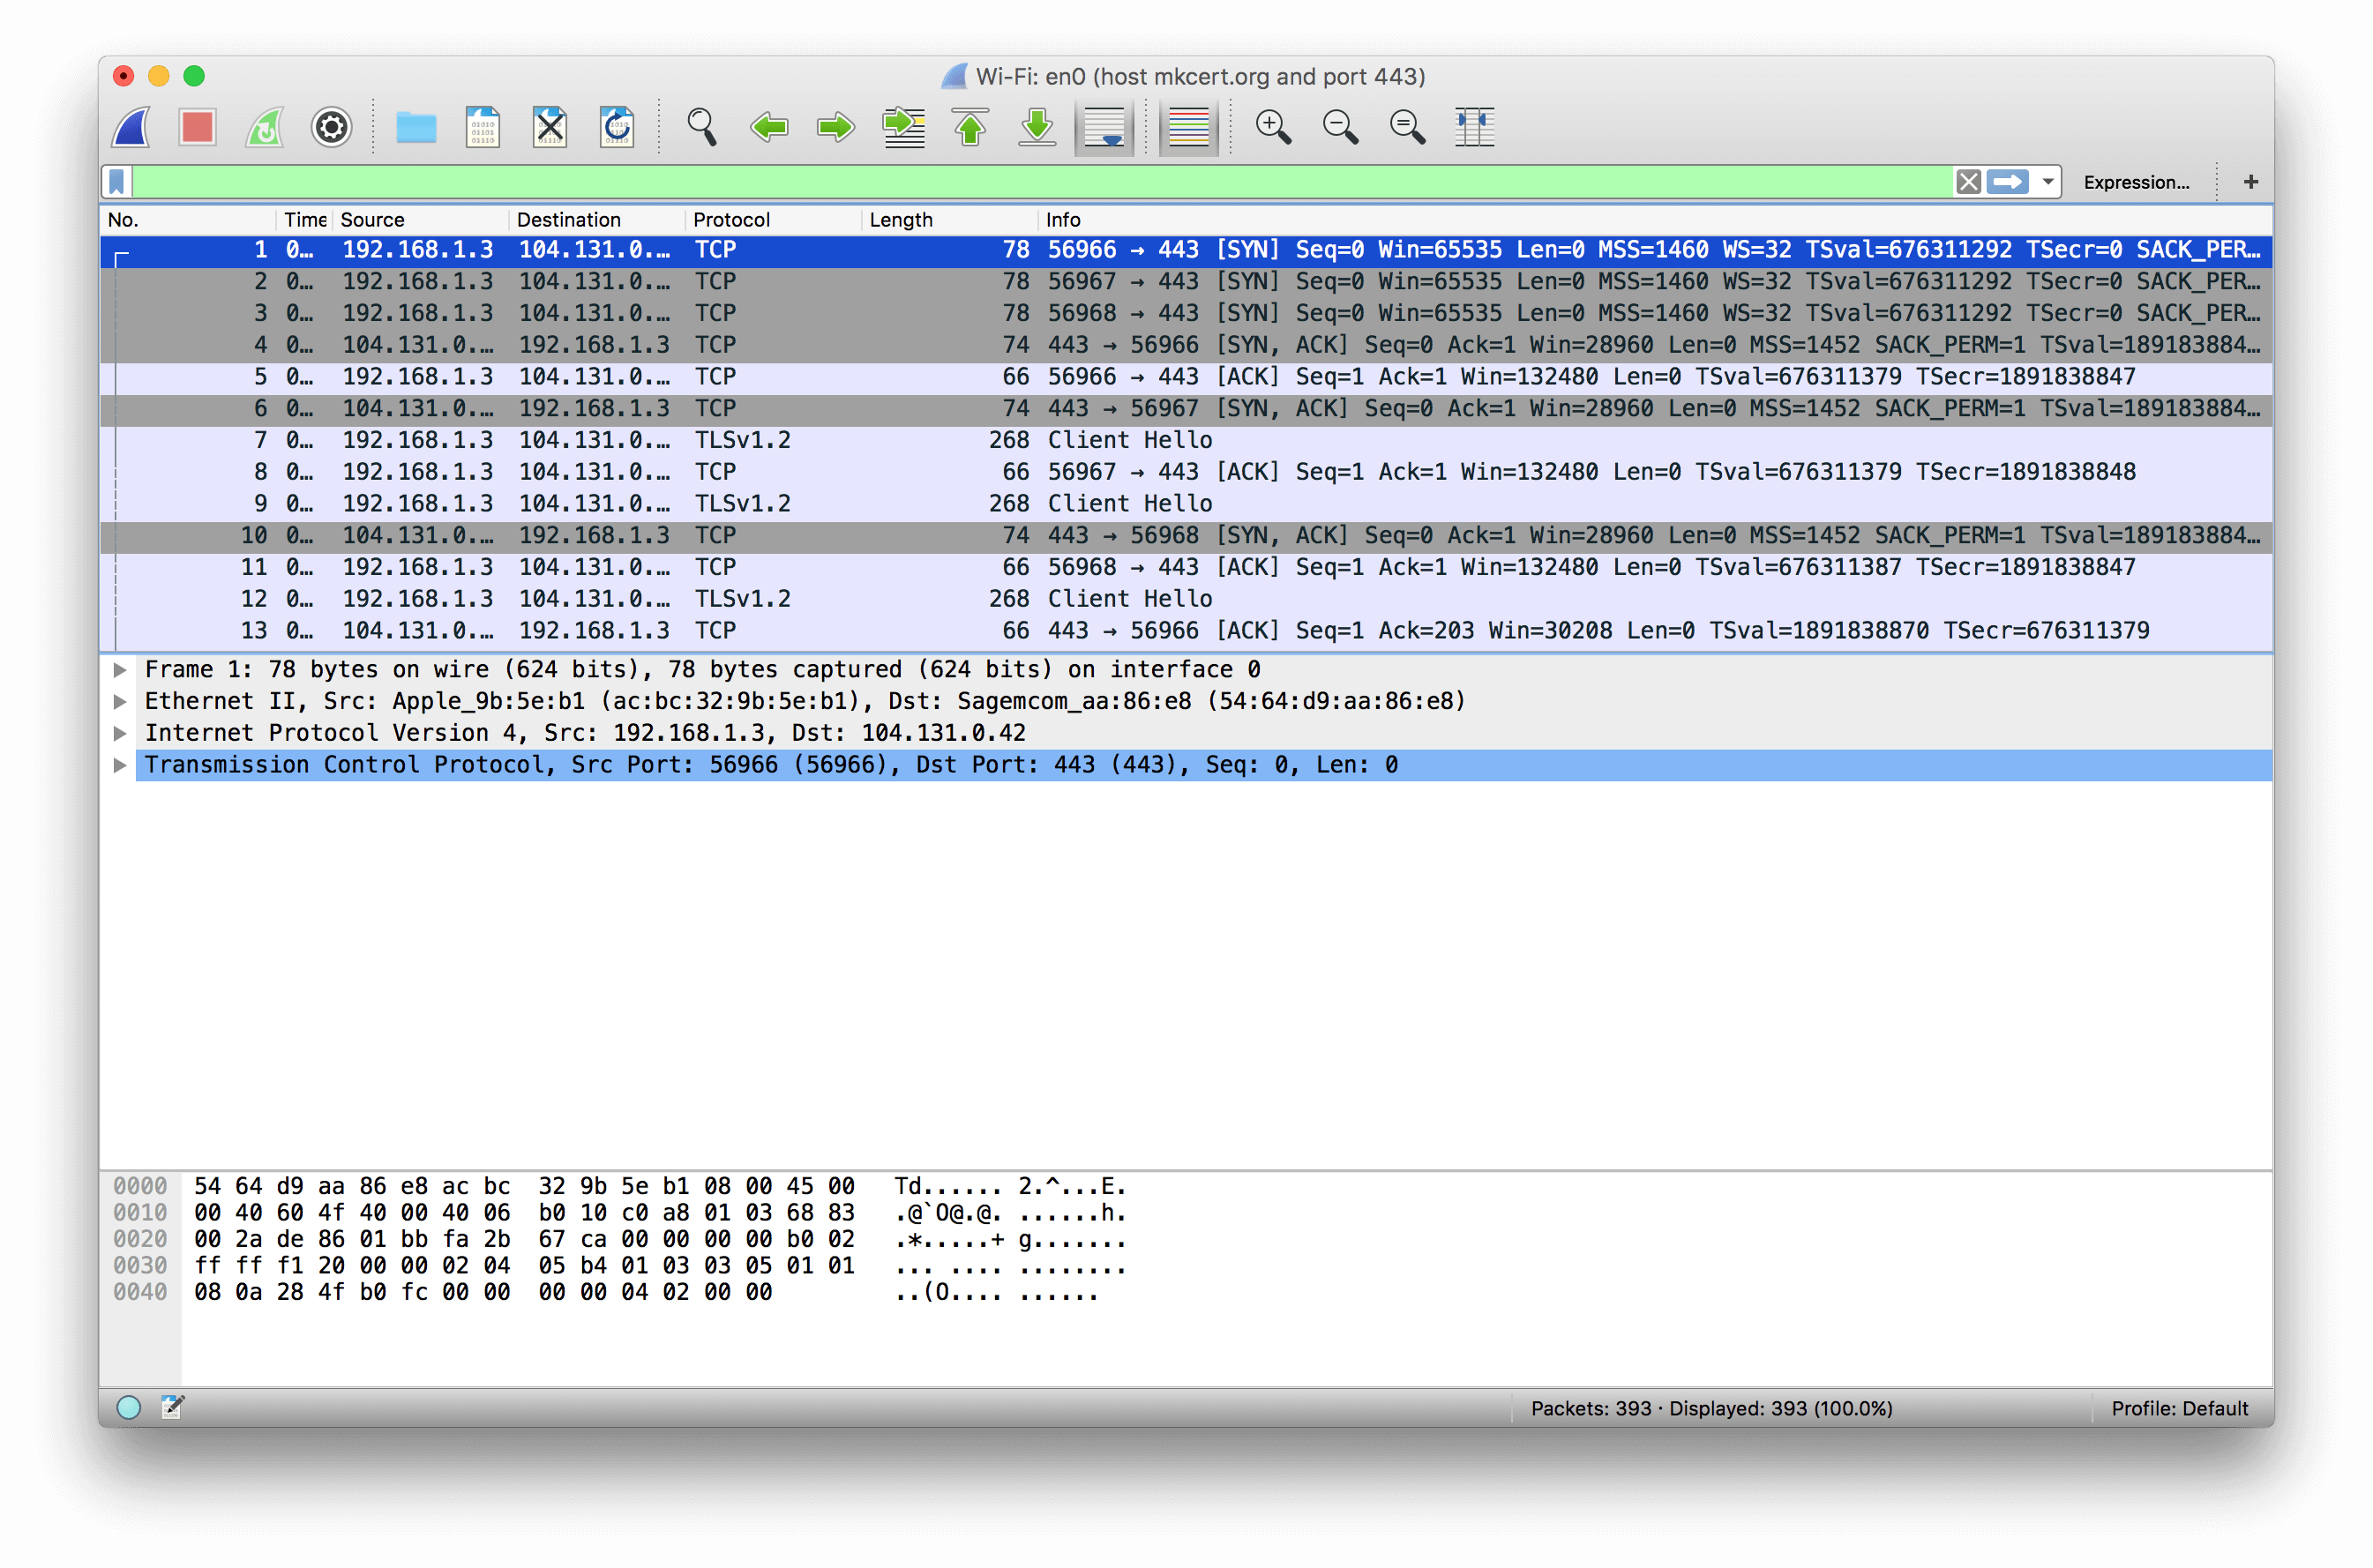
Well, there’s all kinds of stuff going on here! If I tried to explain it all this blog post would be many thousands of words long, so I’m not going to explain the whole thing. Instead, I’m going to explain what the screen shows at a high level.
Each row of the table is a single network packet as recorded by your operating system. In the case of the network transaction we just captured, this means each row is a single Ethernet frame emitted or received by your network card. Ethernet frames themselves aren’t that useful: therefore, Wireshark also shows all the data for each protocol encapsulated within the lower-level one. In this case, there are five protocols involved:
- 802.11, also known as Ethernet, which comes in ‘frames’.
- The Internet Protocol, IP, encapsulated inside each ethernet frame, which comes in ‘packets’.
- The Transmission Control Protocol, TCP, encapsulated inside each IP packet, which comes in ‘segments’.
- Transport Layer Security, TLS, carried over the TCP bytestream, which comes in ‘records’ and ‘messages’.
- The Hypertext Transfer Protocol, HTTP, carried inside the encrypted TLS connection. This is invisible to Wireshark, because it should have been encrypted by TLS! (This isn’t actually entirely true: in a future post I’ll talk about how to view encrypted HTTP traffic.)
Wireshark knows lots about network protocols, using components called ‘dissectors’. These dissectors, many of which ship with Wireshark, tell Wireshark how to translate from the bits and bytes from the network into a structured representation of the data. This is why Wireshark is useful: you can avoid hand-decoding the data on the network, and let Wireshark do it for you instead!
To see how Wireshark displays things, let’s start by looking at packet 1, which in my case is a TCP SYN segment:
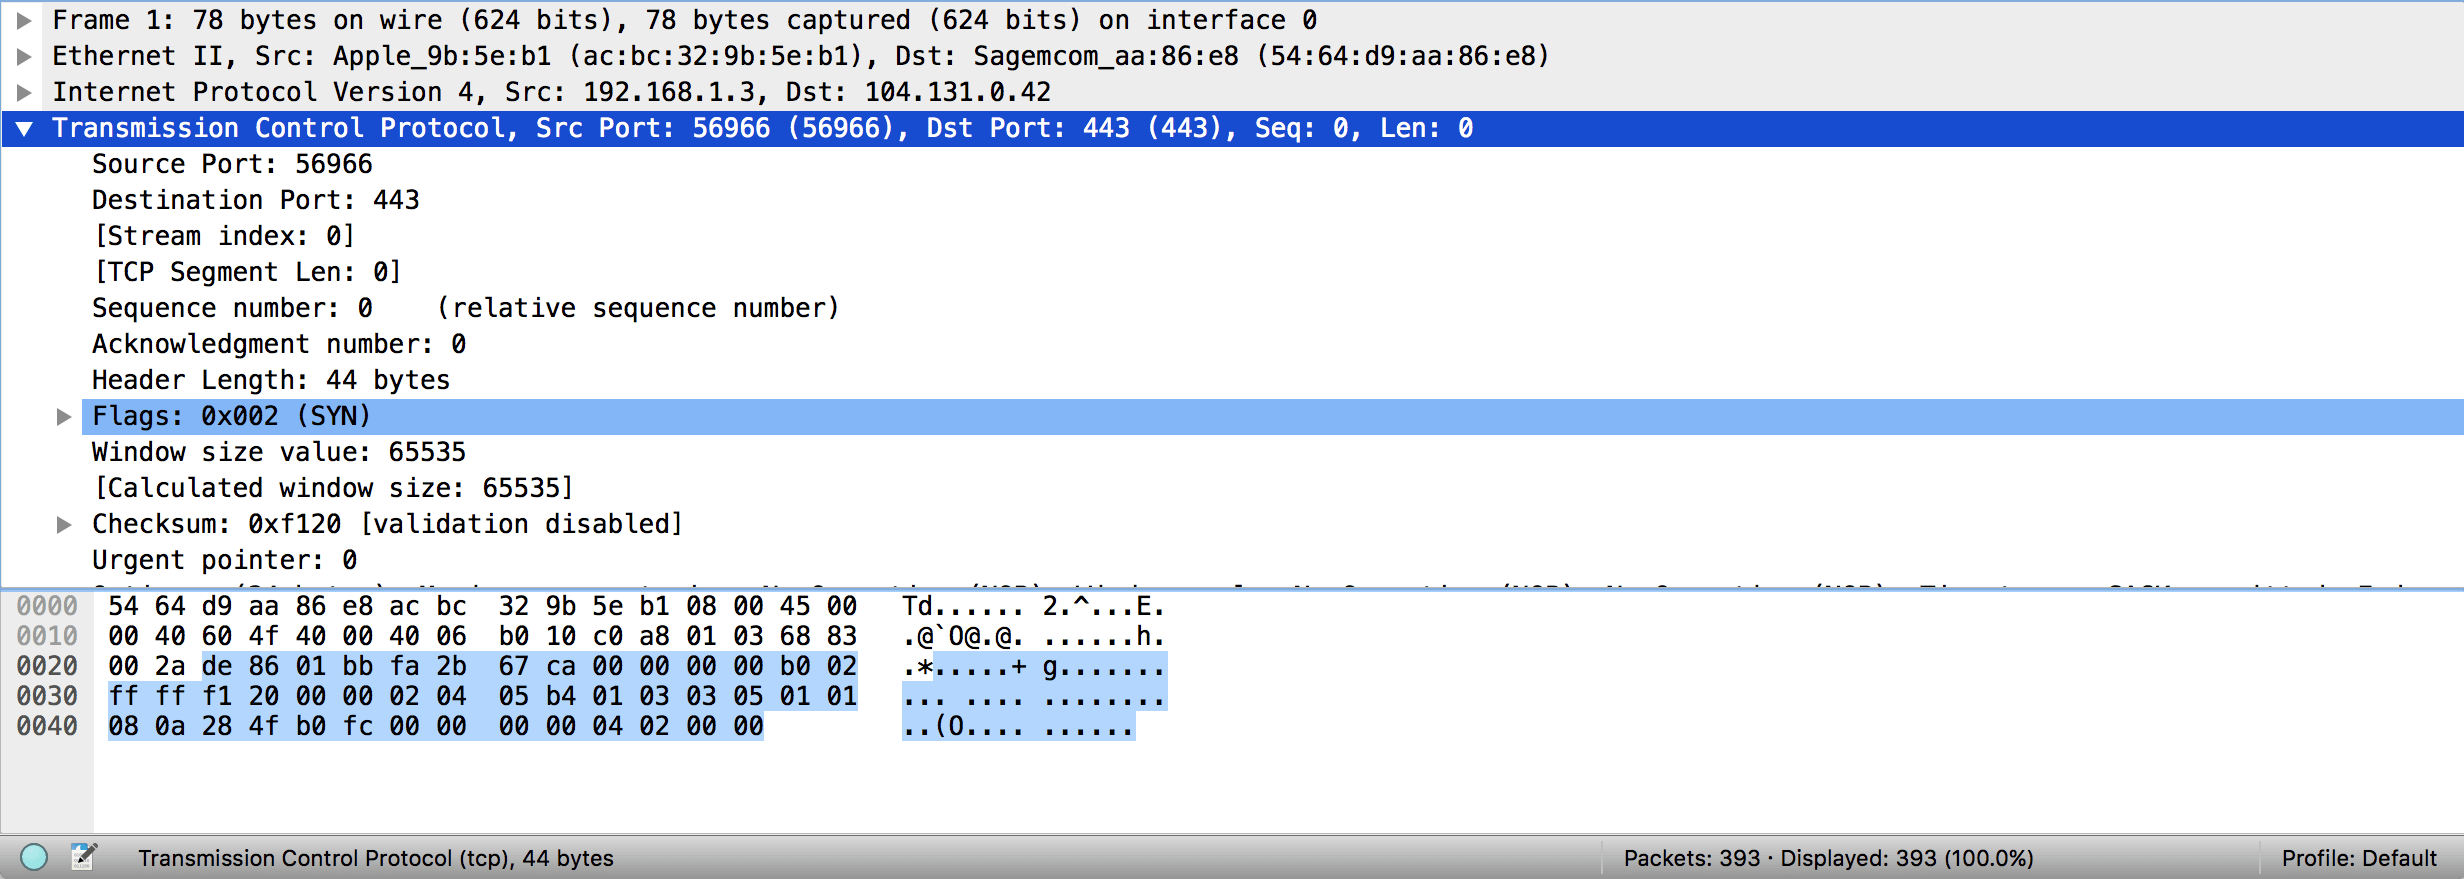
In the bottom pane of Wireshark, selecting a packet brings up a series of expandable fields. Each field represents one step up the logical Wireshark protocol hierarchy. At the bottom is Wireshark’s own notion of “frames”. This is rarely important, but is useful to know when you see it. Next up is the Ethernet frame: Wireshark displays the source and destination MAC addresses on that Ethernet frame in the info block. After that comes the encapsulated IPv4 packet, with Wireshark again showing source and destination IP addresses very clearly. You can expand this to see all the other information Wireshark has about that IP packet. Last, and expanded in my image, is the TCP segment. This shows all the useful information carried on that TCP segment, which in this case is mostly limited to the flags, which shows that the SYN flag is set. This is the first step of TCP’s connection handshake, so looking at this tells us that a TCP connection is being established.
So, with a basic understanding of how to look at things in Wireshark, let’s dive into the TLS handshake. Firstly, though, we need to simplify the view using one of my Wireshark top tips. Because we connected in Chrome, there are a whole lot of TLS handshakes in here as Chrome made many web requests: in fact, I can see three started at once. Let’s look at just one of them for now. If you pick a packet that’s part of the connection you want to look at, you can right click on it and select “Follow -> TCP Stream”. This will do two things: firstly, it’ll pop up a window containing all the data on that TCP stream, in order, colorized appropriately for each party. This can be very useful when you want to view a HTTP request/response completely, rather than split across multiple TCP segments, but we don’t need it here, so close it. The more important thing it does is set a filter (in this case, “tcp.stream eq 0”) that removes all packets from other TCP connections from the window. This lets us see just the one handshake, without getting distracted by different connections.
The TLS Handshake
Let’s start by scrolling down to the first packet Wireshark identifies as having a “TLSv1.2” record in it. Selecting it, you’ll notice that Wireshark has a new level of its expandable selectors: “Secure Sockets Layer”. This is the old name for TLS.
Inside it, Wireshark says there’s one TLS handshake message contained here: a “Client Hello” message. This is, coincidentally, the first message sent as part of a TLS connection, and it’s sent by the client. If you expand this message up, you’ll see that it’s very long (197 bytes in my case), and contains lots of information!
Client Hello
Let’s talk about the Client Hello message for a moment. The purpose of this message is to let the client give the server some information about what it wants to do. There’s loads of data here, but I’ll take you into the things that are most important to understand (in part because they’re the bits that go wrong the most).
Versions
Firstly, you can see that there are actually two TLS version fields here: the first is in the outer TLS wrapper, while the second is inside the Client Hello. The outer TLS field is a lower version than the inner one: in this case, the outer layer is TLSv1.0, while the inner layer is TLSv1.2. This acts essentially to bound the set of TLS versions the client and server support: here, the client is saying that the lowest TLS version it’ll use is TLSv1, while the newest is TLSv1.2. Some servers mistakenly only care about the outer version number, and will shut down connections that don’t advertise themselves as sufficiently new1.
Cipher Suites
The next thing to note is the cipher suites section. You can open that up, and Wireshark will handily show you the names of every cipher suite offered by the client, and the order in which they were sent. A TLS connection can only be established using a cipher suite supported by both client and server, and in principle the order of the cipher suites sent by the client represents a preference order. In practice, many servers ignore the client’s preferences. Here, Chrome has only sent a very small number of cipher suites. One common error is to have misconfigured OpenSSL so that it does not send the correct cipher suites: you can check here whether it’s doing the right thing.
Compression
Moving further down, we have the “Compression Methods” section. The only thing that should be here is the NULL compression method, because TLS compression is known to be broken.
Server Name Indication
The next thing to see is the “server_name” extension. This extension, whose full name is Server Name Indication (SNI), is used to enable virtual hosting. Virtual hosting is where many websites are co-located on the same server, so they all have the same IP address. For plaintext HTTP the server will normally wait for the Host: header to work out what website to use, but for TLS the server needs to present the appropriate TLS certificate before the client sends any HTTP data. For this reason, the Server Name Indication extension tells the server what hostname the client is trying to contact, so that the server can present the correct TLS certificate.
Common problems with this field include:
- not sending it at all
- sending an IP address in it (not allowed!)
Next Protocol Negotiation and Application Layer Protocol Negotiation
Modern TLS requests may have either or both of the Next Protocol Negotiation or Application Layer Protocol Negotiation extensions in them. The purpose of these extensions is to allow the server and client to agree on what protocol to speak inside the encrypted TLS tunnel. The primary use right now is to decide between HTTP/1.1 and HTTP/2.
The two extensions are very similar. The key difference is that, in NPN, the final protocol choice is made by the client, whereas in ALPN the final protocol choice is made by the server. For this reason, if you open up the two extensions you’ll see that the client merely sends the NPN extension with no data, but in ALPN it sends the protocols it can speak. In NPN, the client wants to hear what the server can speak before it chooses (which it’ll be told in the Server Hello), while in ALPN the server needs to know what the client can speak.
Others
There are some other useful fields here that are worth checking out (e.g. the Elliptic Curves extension), but I recommend you look at them independently of this post: they’re rarely the source of problems on the handshake.
Server Hello
The next message is going back the other way, from the server to the client, and it’s called the Server Hello. This message serves a similar purpose to the Client Hello: it lets the server tell the client important information about how the TLS connection will progress and what the server can do.
The key difference between the Server Hello and the Client Hello is that, while the Client Hello is informational, the Server Hello is instructional. In the Client Hello the client says “I can do X”, while in the Server Hello the server says “we will do X”.
If, in your debugging, the connection never gets as far as a Server Hello, this means that the server was unprepared to accept the connection entirely. The most common cause of this is actually connecting to a port that wanted to do unencrypted HTTP, but other problems are usually around TLS versions and cipher suites: see above for how to check those fields.
The following fields of the Server Hello are of interest.
Versions
Like the Client Hello, there are two version numbers in the Server Hello: one in the outer wrapper and one in the message itself. Unlike the Client Hello, these should be the same. This is because the Server should have chosen a TLS version to use. In almost all cases this will be the highest common version between the client and server. In the case of my example, that’s TLSv1.2.
Cipher Suite
This is the cipher suite that will be used for the rest of the connection. In this case, the server has chosen TLS_ECDHE_RSA_WITH_AES_128_GCM_SHA256. This is one of the strongest cipher suites available to TLS, and represents a good choice by the server.
Generally, it’s a red flag to see a cipher suite with either MD5 or RC4 in it, and cipher suites with ECDHE and AES GCM are preferred. Note that AES CBC is not AES GCM: be warned!
Compression Method
As mentioned above, this had better be NULL! Anything else is extremely dangerous.
NPN and ALPN
Here, again, you can see the NPN and ALPN extension fields. They’ll be populated differently, if they’re both present at all. If NPN is used, the server will be sending back a list of protocols it is willing to speak. If ALPN is being used, the server will send back the protocol that will be spoken after the connection.
If ALPN/NPN were offered but the server doesn’t support them, neither extension will be sent back, and the client will fall back to HTTP/1.1.
Here the server doesn’t support ALPN, so sent no response to that. It does support NPN, but only supports HTTP/1.1 traffic.
Certificate
The next message also comes from the server, and is the Certificate message. Here the server sends a serialized representation of the TLS certificates that the client should validate.
These certificates perform a vital role. Firstly, they let a client authenticate a server, so that the client can confirm that the server is allowed to send data for the domain name being reached. Secondly, they provide the client with a public key that is used to help establish the encryption with some cipher suites.
Happily, Wireshark understands the format of these certificates, so you can dig into them and see the certificates in detail. In general the first of these should be the ‘leaf’ certificate, which should correspond to the domain name being requested.
If your TLS client fails to validate the certificate, there could be a number of problems:
- The leaf certificate may not be valid for the domain. A certificate is valid if either it has the correct “dNSName” (not a typo) field in its Subject Alternative Name (subjectAltName, or SAN) extension, or if it has the correct “commonName” (displayed by Wireshark as “id-at-commonName”) field in its Subject field.
- The leaf certificate may not chain up to a trusted root certificate. In general this happens in one of two ways:
- The server may not be sending “intermediate certificates”. In general a leaf certificate is signed by a certificate that is not itself a trusted root certificate. A well-configured server will actually provide that intermediate certificate as part of the Certificate message, to prevent clients needing to have every intermediate certificate in the world in their trust database, but this doesn’t always happen.
- The server may have a cross-signed trust root. This breaks some older TLS stacks. I won’t go into it here, because it’s too complex and makes me sad.
Server Key Exchange (Optional)
Immediately following the Certificate message the server may send a Server Key Exchange message. This is sent only for specific cipher suites: specifically, either DHE or ECDHE cipher suites. This message is used to establish the ephemeral key for the encryption algorithm using Diffie-Hellman (or Elliptic-Curve Diffie-Hellman) key negotiation.
I’m not going to go into the structure of this message too much because if it’s wrong then your server is so totally screwed there’s no saving you. However, in general this will contain the server’s half of the information required for the Diffie Hellman negotiation.
Server Hello Done
The next message should be the Server Hello Done, also sent by the server. This does exactly what it says on the tin: tells the client that the Server Hello is over. This is needed because of some optional messages that I’m not covering here, mostly used with TLS client certificates, that are also part of the Server Hello.
Client Key Exchange
This message may be sent if the server sent a Server Key Exchange message. This is used for the client’s portion of the Diffie-Hellman key negotiation. I’m not going to go into this further here.
Change Cipher Spec
This is an interesting one, because it’s not strictly a part of the handshake protocol. Instead, it tells the remote party that all further messages will be encrypted using the agreed-upon cipher suite. This can only be done at this point because it’s guaranteed that the key exchange will be complete, that the certificates will have been verified, and that everyone is happy to continue with the transaction.
The server will send a Change Cipher Spec message as well.
Done!
At this point, we can no longer see into the rest of the TLS handshake. Happily, the handshake very rarely fails at this point because all that remains is for both sides to send their Finished message, encrypted using the agreed cipher suite.
Side Note: Encrypted Alert
Depending on how screwed up your client and server are, it is possible that an error will occur during the key exchange. This won’t get discovered until after the Change Cipher Spec, which means you won’t see a very clear error. However, Wireshark will note that your client/server received an “Encrypted Alert”. This is very often the result of broken key negotiation, and should be investigated.
Up Next
This represents a very high-level overview of the way the TLS handshake is done. As you can see, it’s already pretty complicated and lengthy, and that is without going into any of the cryptographic signing and negotiation that is happening along the way.
I highly recommend taking 15 or 20 more minutes to look at the handshake in more detail, and to Google anything you don’t understand. You should also consider capturing handshakes from other websites, to see how they differ from the one you’ve looked at here.
Next time, we’ll look at some tips and tricks for debugging HTTP with Wireshark, and I’ll also talk about how to do debug HTTPS requests so you can see the rest of the handshake (and feel like you’re a spy).
-
Actually, there’s some complexity around this field. In the upcoming TLSv1.3 standard, the spec will require that the outer version number always be set to TLSv1.0. This is done with a goal of minimizing the number of mistakes servers and clients can make by paying attention to or incorrectly setting the outer version number. Regardless, this remains a field worth keeping an eye on. ↩