You just wrote a great Python web application. Now, you want to share it with the world. In order to do that, you need a server, and some software to do that for you.
The following is a comprehensive guide on how to accomplish that, on multiple Linux-based operating systems, using nginx and uWSGI Emperor. It doesn’t force you to use any specific web framework — Flask, Django, Pyramid, Bottle will all work. Written for Ubuntu, Fedora and Arch Linux (should be helpful for other systems, too)
Getting Started
In order to deploy your web application, you need a server that gives you root and ssh access — in other words, a VPS (or a dedicated server, or a datacenter lease…). If you’re looking for a great VPS service for a low price, I recommend DigitalOcean (reflink [1]), which offers a $5/mo service [2]. If you want to play along at home, without buying a VPS, you can create a virtual machine on your own, or use a Vagrant with a Vagrant box for Fedora 23 (I recommend disabling SELinux, more on that later).
Your server should also run a modern Linux-based operating system. I tested and wrote this guide for Ubuntu 15.10 [3], Fedora 23 and Arch Linux, but other Linux distributions (and perhaps *BSD) will work (in places where the instructions are split three-way, try coming up with your own, reading documentation and config files). Unfortunately, all Linux distributions have their own ideas when it comes to running and managing nginx and UWSGI.
Note
All the commands in this tutorial are meant to be run as root — run su or sudo su first to get an administrative shell.
Start by installing virtualenv, nginx and uWSGI. I recommend using your operating system packages. For uWSGI, we need the logfile and python3 plugins. (Arch Linux names the python3 plugin python; the logfile plugin may be built-in — check with your system repositories!).
Ubuntu:
aptitude install virtualenv python3 uwsgi uwsgi-emperor uwsgi-plugin-python3 nginx-full
Fedora:
dnf install python3-virtualenv uwsgi uwsgi-plugin-python3 uwsgi-logger-file nginx
Arch Linux:
pacman -S python-virtualenv uwsgi uwsgi-plugin-python nginx
Preparing your application
This tutorial will work for any web framework. I will, use a really basic Flask app that has just one route (/), a static hello.png file and a favicon.ico for demonstration purposes. Note that the app does not use app.run(). While you could add it, it would be used for local development and debugging only, and would be prepended by if __name__ == '__main__': — uWSGI doesn’t work alongside it.
The app will be installed somewhere under the /srv directory, which is a great place to store things like this. I’ll choose /srv/myapp for this tutorial, but for real deployments, you should use sometihing more distinguishable — the domain name is a great idea.
We’ll start by creating a virtualenv:
Ubuntu:
cd srv
virtualenv -p /usr/bin/python3 myapp
Fedora:
cd /srv
virtualenv-3.4 myapp
Arch Linux:
cd /srv
virtualenv3 myapp
(Make sure you create a Python 3 environment!)
Now, we need to get our app there and install requirements. An example for the tutorial demo app (adjust for your clone/download path):
cd myapp
cp -r ~/git/flask-demo-app appdata
bin/pip install -r appdata/requirements.txt
I’m storing my application data in the appdata subdirectory so that it doesn’t clutter the virtualenv (or vice versa). You may also install the uwsgi package in the virtualenv, but it’s optional.
What this directory should be depends on your web framework. For example, for a Django app, you should have an appdata/manage.py file (in other words, appdata is where your app structure starts). I also assumed that the appdata folder should have a static subdirectory with all static files, including favicon.ico if you have one (we will add support for both in nginx).
At this point, you should chown this directory to the user and group your server is going to run as. This is especially important if uwsgi and nginx run as different users (as they do on Fedora). Run one of the following commands:
Ubuntu:
chown -R www-data:www-data /srv/myapp
Fedora:
chown -R uwsgi:nginx /srv/myapp
Arch Linux:
chown -R http:http /srv/myapp
Configuring uWSGI and nginx
Note
Parts of the configuration depend on your operating system. I tried to provide advice for Ubuntu, Fedora and Arch Linux. If you experience any issues, in particular with plugins, please consult the documentation.
We need to write a configuration file for uWSGI and nginx.
uWSGI configuration
Start with this, but read the notes below and change the values accordingly:
[uwsgi]
socket = /srv/myapp/uwsgi.sock
chmod-socket = 775
chdir = /srv/myapp/appdata
master = true
binary-path = /srv/myapp/bin/uwsgi
virtualenv = /srv/myapp
module = flaskapp:app
uid = www-data
gid = www-data
processes = 1
threads = 1
plugins = python3,logfile
logger = file:/srv/myapp/uwsgi.log
Save this file as:
- Ubuntu: /etc/uwsgi-emperor/vassals/myapp.ini
- Fedora: /etc/uwsgi.d/myapp.ini
- Arch Linux: /etc/uwsgi/vassals/myapp.ini (create the directory first and chown it to http: mkdir -p /etc/uwsgi/vassals; chown -R http:http /etc/uwsgi/vassals)
The options are:
- socket — the socket file that will be used by your application. It’s usually a file path (Unix domain socket). You could use a local TCP socket, but it’s not recommended.
- chdir — the app directory.
- binary-path — the uWSGI executable to use. Remove if you didn’t install the (optional) uwsgi package in your virtualenv.
- virtualenv — the virtualenv for your application.
- module — the name of the module that houses your application, and the object that speaks the WSGI interface, separated by colons. This depends on your web framework:
- For Flask: module = filename:app, where filename is the name of your Python file (without the .py part) and app is the Flask object
- For Django: module = project.wsgi:application, where project is the name of your project (directory with settings.py). You should also add an environment variable: env = DJANGO_SETTINGS_MODULE=project.settings
- For Bottle: module = filename:app, where app = bottle.default_app()
- For Pyramid: module = filename:app, where app = config.make_wsgi_app() (make sure it’s not in a if __name__ == '__main__': block — the demo app does that!)
- uid and gid — the names of the user account to use for your server. Use the same values as in the chown command above.
- processes and threads — control the resources devoted to this application. Because this is a simple hello app, I used one process with one thread, but for a real app, you will probably need more (you need to see what works the best; there is no algorithm to decide). Also, remember that if you use multiple processes, they don’t share data, so you need an out-of-process database if you want that.
- plugins — the list of uWSGI plugins to use. For Arch Linux, use plugins = python (the logfile plugin is always active).
- logger — the path to your app-specific logfile. (Other logging facilities are available, but this one is the easiest, especially for multiple applications on the same server)
You can test your configuration by running uwsgi --ini /path/to/myapp.ini (disable the logger for stderr output or run tail -f /srv/myapp/uwsgi.log in another window).
If you’re using Fedora, there are two configuration changes you need to make globally: in /etc/uwsgi.ini, disable the emperor-tyrant option (which seems to be buggy) and set gid = nginx. We’ll need this so that nginx can talk to your socket.
nginx configuration
We need to configure our web server. Here’s a basic configuration that will get us started:
Save this file as:
- Ubuntu: /etc/nginx/sites-enabled/myapp.conf
- Fedora: /etc/nginx/conf.d/myapp.conf
- Arch Linux: add include /etc/nginx/conf.d/*.conf; to your http directive in /etc/nginx/nginx.conf and use /etc/nginx/conf.d/myapp.conf
server {
    listen 8080;
    server_name localhost myapp.local;

    location / {
        include uwsgi_params;
        uwsgi_pass unix:/srv/myapp/uwsgi.sock;
    }

    location /static {
        alias /srv/myapp/appdata/static;
    }

    location /favicon.ico {
        alias /srv/myapp/appdata/static/favicon.ico;
    }
}
Note that this file is a very basic and rudimentary configuration. This configuration is fine for local testing, but for a real deployment, you will need to adjust it:
- set listen to 443 ssl and create a http→https redirect on port 80 (you can get a free SSL certificate from Let’s Encrypt; make sure to configure SSL properly).
- set server_name to your real domain name
- you might also want to add custom error pages, or change anything else that relates to your web server — consult other nginx guides for details
- nginx might have some server already enabled by default — edit /etc/nginx/nginx.conf to disable it
Service setup
After you’ve configured uWSGI and nginx, you need to enable and start the system services.
I’m going to use systemd here. If your system does not support systemd, please consult your OS documentation for instructions.
For Arch Linux
All you need is:
systemctl enable nginx emperor.uwsgi
systemctl start nginx emperor.uwsgi
Verify the service is running with systemctl status emperor.uwsgi
For Fedora
Make sure you followed the extra note about editing /etc/uwsgi.ini and run:
systemctl enable nginx uwsgi
systemctl start nginx uwsgi
Verify the service is running with systemctl status uwsgi
This is enough to get an app working, if you disabled SELinux (if you want to do it, edit /etc/selinux/config and reboot), but if you want to keep SELinux happy, you need to do the following:
setenforce 0
chcon -R system_u:system_r:httpd_t:s0 /srv/myapp/appdata/static
setenforce 1
We now need to install a SELinux policy (that I created for this project). If it doesn’t work, look into audit2allow.
semodule -i nginx-uwsgi.pp
Hopefully, this is enough. In case it isn’t, please read SELinux documentation, and check audit logs.
Also if you’re on Fedora, to make your website accessible from the outside Internet, you need to configure the built-in firewall accordingly — for ports 80/443, use:
firewall-cmd --add-service http
firewall-cmd --add-service https
For Ubuntu
Ubuntu does not ship the uWSGI Emperor service by default. However, you can easily create it. Copy the .service file from the uWSGI systemd documentation to /etc/systemd/system/emperor.uwsgi.service. Change the ExecStart line to:
ExecStart=/usr/bin/uwsgi --ini /etc/uwsgi-emperor/emperor.ini
You can now reload systemd daemons and enable the services:
systemctl daemon-reload
systemctl enable nginx emperor.uwsgi
systemctl start nginx emperor.uwsgi
Verify the service is running with systemctl status emperor.uwsgi
Testing — end result
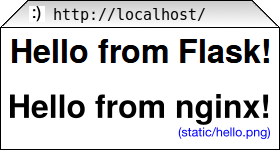
Your web service should now be running at http://localhost:8080/.
If you used the demo application, you should see something like this (complete with the favicon and image greeting):
Hopefully, everything works. If it doesn’t, check nginx and uwsgi logs for details, and make sure you followed all instructions.
For easy linking, I set up some aliases: https://go.chriswarrick.com/pyweb and https://go.chriswarrick.com/uwsgi-tut (powered by a Django web application, deployed with nginx and uwsgi!)
Update 2016-02-10 17:00 UTC: This guide uses nginx and uWSGI, because they
are considered best practices by most people. nginx is a fast, modern web
server, with uWSGI support built in (without resorting to reverse proxying).
uWSGI is similarly aimed at speed. The Emperor mode of uWSGI is recommended for
init system integration by the uWSGI team, and it’s especially useful for
multi-app deployments. (This guide is opinionated.)
| [1] | This reflink gives you $10 in credit, which is enough to run a server for up to two months without paying a thing. I earn $15. |
| [2] | If you’re in the EU (and thus have to pay VAT), or want DO to handle your backups, it will cost you a little more. |
| [3] | Ubuntu 14.04 LTS does not use systemd — you’re on your own (upstart services exist, figure out how to use them yourself). Note that other software might be outdated as well — proceed with care, or just use something more modern. |