This tutorial explores how to create dynamic web applications with Python.
Originally published in Real Python Course 1: Introduction to Python
Web Applications
You know how to write useful Python scripts, and now you want to show them off to the world… but how? Most non-programmers won’t have any use for your .py script files. Programs like PyInstaller and cx_Freeze help turn Python scripts into executable programs that run by themselves on different platforms without the need to use Python to interpret the code. More and more, however, we’re seeing a trend away from “desktop”-based applications and toward web applications that can be accessed and run through Internet browsers.
Historically, websites on the Internet were full of plain webpages that offered the exact same information to every user; you would request a page, and the information from that page would be displayed. These webpages were “static” because their content never changed; a web server would simply respond to a user’s request for a webpage by sending along that page, regardless of who the user was or what other actions the user took.
Today, most websites are actually web applications, which offer “dynamic” webpages that can change their content in any number of ways. For instance, a webmail application allows the user to interact with it, displaying all sorts of different information, often while staying in a single webpage.
The idea behind creating a Python-driven web application is that you can use Python code to determine what content to show a user and what actions to take. The code is actually run by the web server that hosts your website, so your user doesn’t need to install anything to use your application; if the user has a browser and an Internet connection, then everything else will be run online.
Google App Engine
The task of getting Python code to run on a website is a complicated one, but there are a number of different web frameworks available for Python that automatically take care the details.
The first thing that you will need is a web hosting plan that allows and supports the ability to run Python code. Since these usually cost money (and since not everyone even has a website), we’ll stick with a free alternative that is one of the simplest to set up: Google App Engine, which uses a web framework called webapp2.
There are a number of other alternatives (both free and paid) that are more customizable, and you can use webapp2 on its own later without relying on Google App Engine, but getting started with Google App Engine will be the quickest and easiest way to begin learning about web application development in Python.
Download
First, go here to download and install the appropriate Python SDK (Software Development Kit) for Google App Engine. This particular SDK includes two main resources: a “web server” application, which will allow you to run your web applications on your own computer without actually putting them online, and the Google App Engine Launcher, which will help with getting your web applications online.
NOTE: Unfortunately, Google App Engine only works with Python 2.7 and has no immediate plans to support Python 3 code.
Request-Response
Before we dive into writing a web application, let’s get a very broad, generalized overview of what’s about to happen. There are a lot of different pieces involved, and they all have to communicate with each other to function correctly:
- First, your user makes a “request” for a particular webpage on your website (i.e., by typing a URL into a browser).
- This request gets received by the web server that hosts your website.
- The web server uses App Engine to look at the configuration file for your application. App Engine matches the user’s request to a particular portion of your Python script.
- This Python code is called up by App Engine. When your code runs, it writes out a “response” webpage.
- App Engine delivers this response back to your user through the web server.
- The user can then view the web server’s response (i.e., by displaying the resulting webpage in a browser).
Static Web App
The application we’re going to create will rely on a couple different files, so the first thing we need to do is make a project folder to hold all of these files.
Project Setup
Create a new folder named “first_app” anywhere you like (just remember where it is). First we will write a very simple Python script that can “respond” with the content of your webpage:
1 2 3 |
|
Save this code in a script named hello.py inside your “first_app” folder.
So what’s with the first two print statements? Web servers communicate with users (usually browsers) through HTTP by receiving HTTP requests and sending HTTP responses. The HTTP response that our application sends can have both header lines and a body.
We added a header line to our HTTP response in the first line. Header lines contain optional information to let a browser know how to interpret the body of the response. In this case, setting our header’s Content-Type equal to the value text/plain is the way that our HTTP response lets a browser know to expect the body to contain plain text as opposed to HTML code, an image, or some other type of file. Leaving a blank line after this header line is how we told the browser, “the header lines are over now; here comes the actual body to display.”
The body of the response is what we will actually see when we load the page in a browser. In this case, it’s just a simple string of text: “Congratulations, it’s a web app!”
YAML Config
Before we can run our web application, we need to provide App Engine with a configuration file. This is the file that the web server will use to get information about what Python code we want it to run. Open up any text editor and copy the following text into a new file:
1 2 3 4 5 6 7 8 |
|
Now name this file app.yaml and save it in the same “first_app” folder as the Python script.
NOTE: Make sure you get the spacing correct; the last line includes two leading spaces so that “script” lines up under “url”. Just like Python, YAML files rely on precise indentation.
The YAML configuration file gives App Engine all the necessary information it needs to run the web application:
- First,
application: helloprovides a unique identifying name for the application so that we will be able to launch it later; we are giving the namehelloto our web app. - Next, the line
version: 1lets App Engine know that this is version 1 of our application. (If we update this later toversion: 2, App Engine will keep a copy of version 1 in memory so that we can go back to running this previous version if necessary.) - The lines
runtime: python27andapi_version: 1let App Engine know that we want to use Python 2.7 to run our application. - The line
threadsafe: falsemeans that our web application isn’t designed to be able to receive multiple requests at once; if App Engine has multiple requests then it will send them to our application one at a time instead of all at once. - Finally we define our
handlersto handle different webpage requests from our users (i.e., if a user requested the main page at “/” or another page at a different address on our site). These requested paths can each be assigned to a different piece of Python code. In this case, we only have one script, hello.py, so we want to direct user requests for any page on the website to the same script. In these last two lines of the configuration file, we say that any URL matching the regular expression/.*(which is any URL on our site) should be directed to the hello.py script.
Sanity Check!
Okay, now we can finally take a look at our application!
It’s not online yet, but we can view it by running the application through our own “local” web server (that can’t be accessed by other users) using Google App Engine. This will help us simulate what things will look like to a user once our application is online.
Open the Google App Engine Launcher program, then choose File –> Add Existing Application… You can then browse to and select your “first_app” folder that contains the web application. Add the application using port 8080, then select the application in the main window and click the green “Run” button.
NOTE: Linux users – you will need to navigate in your Terminal to the directory just before the “first_app” folder (i.e., its parent directory), then type the following command to launch the web application (which will run on port 8080 by default):
google_appengine/dev_appserver.py first_app/
The console window that appears will track lots of extra information, but your web application is up and running once you see a blinking cursor.
The “port” number can be thought of as selecting a particular channel to use, similar to broadcasting a television or radio channel. We chose to run the web application on port 8080, meaning that the user can essentially “tune in” to this port number and receive communication from our web server. (We could host a completely different web application using a different port number and the two would not interfere with each other.)
Once the web application is running (this might take a little while), we can click “Browse” to view the web application in the default web browser. This will open up the page at the URL “localhost:8080” (which we can also type into a browser manually to load the web application). The web address “localhost” is just a way of saying “the web address of my own computer” (since the application isn’t actually online yet). The “:8080” specifies that we should listen for communication on port number 8080.
If everything has been set up correctly, your browser should load a page that displays the plain text: Congratulations, it’s a web app!
NOTE: If you make any changes to your script, as long as Google App Engine Launcher is still running your application, all you need to do in order to view the newest version of the web application is to save the script and reload the webpage. App Engine will automatically listen for any changes that might have been made.
WSGI Application
Well, that’s a start. As far as an “application” goes, however, the Python script involved was fairly useless. In order to make something with a bit more potential, we need to create a special object in our Python code called a WSGIApplication. WSGI stands for Web Server Gateway Interface and is a way to allow Python to communicate with the web server in a better way than simply “printing” a single chunk of information back as a response.
Our new Python script, which still just displays the same line of text, is considerably more complicated:
1 2 3 4 5 6 7 8 9 10 11 12 |
|
We now had to import webapp2 in order to use WSGI. In the last line of our script, we are using the webapp2 web framework to create a WSGIApplication object named my_app that will allow our code to communicate with the web server.
This time we are creating a new class using the “class” keyword; this means that MainPage is a new type of object (specifically, a type of webapp2.RequestHandler object) that can have its own methods and attributes just like any other object.
Even though it looks like the get() method takes an argument of “self”, this special keyword is automatically created and used internally by the new object as a way to keep track of itself. We have to use this “self” keyword within a new object that we’ve defined, because the object needs to know when it’s referring to its own methods and attributes. For instance, we have to call self.response in order to access the response stored in our MainPage RequestHandler object. For a deeper look into how to make and use a Python class, checkout the ‘OOP Appendix’ in Real Python Course 1. Or you might want to take a look at Codecademy’s Introduction to Classes and my accompanying practice project.
As the first argument of our WSGIApplication, we passed a list of tuples called routes. In this case, routes only contains one tuple, ('/', MainPage). This “route” tells our WSGI application that anyone accessing the main directory of our application should get directed to MainPage. We call MainPage a “request handler” because it is in charge of handling any user requests for that particular webpage.
The “/” is how we represent the main “root” directory of our application (i.e., our website). If we had provided a second tuple, ('/images/', ImagesPage), then anyone who accesses the (hypothetical) “images” directory of our website would be directed to the class ImagesPage in the Python script.
If we make a mistake in the code, our application’s debug=True argument will allow us to see the errors reported by Python in our web application; otherwise, all we would see is a “500 Internal Server Error” message.
Because of how we defined routes, when our web server receives a request to load the page “/”, webapp2 creates a new MainPage object (called a request handler because it responds to the request for a webpage). The get() method of MainPage is automatically called when it is created, which is how our WSGIApplication responds to the web server.
The response is written out with these two lines:
1 2 |
|
Again, we have to write both a header line and a body. The header line gets packed into headers like in a dictionary, setting the value of the Content-Type equal to text/plain. This time, we create the body of the response using the write() method. WSGI takes care of separating the header lines from the body, so this time there’s no need to write() a blank line first.
We now have to update our YAML configuration file as well:
1 2 3 4 5 6 7 8 |
|
The only difference from the previous configuration file is the very last line, where we point the “script” to use hello.my_app instead of hello.py; instead of the entire Python script, we now want the web server to run the WSGIApplication object inside of our script named my_app, which we access using the simple dot notation of hello.my_app. (There’s no new file named hello.my_app – we’re just pointing our configuration file to the my_app object inside the hello.py script.)
Sanity Check (take two)!
If all goes well, you should now be able to save these two files, reload the webpage, and see the exact same thing as before: Congratulations, it’s a web app!
NOTE: If you make a mistake in your Python script, your web application might load a horrendous error page that makes it look as if you broke the Internet for good. Don’t panic! Just look at the last line, which will point you to the specific error (usually a line of your code displayed in red) that caused the entire chain of failure.
If you do end up with an error that your browser refuses to give you further advice about (instead showing a “500 Internal Server Error”, even when you’ve set your WSGIApplication to have debug=True), you can try running the Python script itself in IDLE. Although it won’t run (because Python won’t be able to find the webapp2 module), IDLE can still point out if your code has any syntax errors.
Review Exercises
- Play around with your web application; make small changes to the script and see how App Engine responds
- Use your WSGIApplication to create a basic HTML page by changing the
Content-Typeheader value totext/htmland then usingwrite()multiple times to respond with lines of HTML code; for instance, the firstwrite()statement could beself.response.write('<html>')to begin the HTML webpage
Dynamic Web App
Now that we’ve upgraded our web application to use WSGI, we can create multiple pages that interact with the user. We’ll start by creating an HTML form that takes some text input from the user and displays that text back on a new page:
- The first URL of our web application will be the main “/” page that users see by default.
- Our second page will be located at “/welcome” (i.e., this path will appear after the name of the website).
In order to do this, we need to include two tuples in our routes:
1
|
|
We don’t need to update the configuration file, because we still want any request for a webpage to be directed to our WSGIApplication object my_app inside the hello.py script. From there, my_app is responsible for directing any webpage requests to the correct “request handler” – either MainPage or Greeting.
Our full web application code will look like this:
1 2 3 4 5 6 7 8 9 10 11 12 13 14 15 16 17 18 19 20 21 22 23 24 25 26 27 28 29 30 |
|
This time, we specified the Content-Type to be text/html because we’re writing out webpages in HTML code. We did this using multi-line strings, although we also could have broken the content into multiple write() commands.
As before, our main page (handled by the request handler MainPage) has a get() method so that it can respond to requests to “get” its information. In the content body, we included a title for our webpage and a simple form. Our form has a single text input field called my_name and a submit button labeled “Sign In”. When a user clicks on the “Sign In” button, our form posts) its data (i.e., the value of my_name) to the webpage located at “/welcome”.
Meanwhile, our “/welcome” page (handled by the request handler Greeting) has a post() method so that it can respond when it receives “posted” data. We could have used get() to send the user’s data (and we will in the next example), but information that is sent using get() becomes a part of the URL; this would become a problem if we later decided that we want the user to include sensitive information (like a password).
Within post(), we used self.request.get("my_name") to get the user-supplied value of my_name from the user’s “post” request, which we stored in a string variable called username. We then created a welcome_string, which is a multi-line string representing the full HTML code for our “/welcome” page, including the inserted value of username. As before, we then write() out the header line and content body to display the resulting webpage.
Sanity Check (take three)!
Save your script and reload the browser to view your new web application. Notice how, when you “Sign In” to the web application, you are directed to the new webpage “localhost:8080/welcome” – which should hopefully display back what you typed!
Escaping Form Input
Actually, there’s one important change we need to make to our code. The fact that we take input from a user and display that input back without first investigating what we are about to display is a huge security hole. Sure, maybe you don’t expect to have malicious users who are actively trying to break your application, but never underestimate the potential for users to do unexpected things that cause your application to break in unexpected ways.
For instance, maybe someone decides that an appropriate username to enter into our application is <b>. Our “/welcome” webpage ends up displaying:
1
|
|
Since we’re inserting this text into HTML code, the <b> was interpreted as an HTML tag to begin making text bold – so instead of greeting our user, we only change our explanation point to be displayed bold. (You can imagine how this might present a security problem; any user can now write code that runs on our web server.)
To avoid this, we can use Python’s built-in cgi.escape() function, which converts the special HTML characters <, >, and & into equivalent representations that can be displayed correctly. You will first need to import cgi into your Python script to use this functionality. Then, when you get() the value of my_name from the user’s request, you can convert any special HTML characters by instead saying:
1
|
|
Sanity Check (take four)!
With these changes, try re-running your web application and signing in with a username of <b> again. You should now see it display the username back to you correctly:
1
|
|
Temperature Converter
Okay, so we can now create one webpage that helps the user “post” data to another webpage interactively. What about using the get() method to make a single page interactive? Let’s look at an example with just a little bit more Python code behind it and revisit the “temperature converter” script that we wrote way back in the Functions and Loops chapter and again as a simple GUI application in the Graphical User Interface chapter in Real Python Course 1.
The webpage we want to display will have a simple text field where the user can input a temperature in degrees Celsius. We will also include a “Convert” button to convert the user’s supplied Celsius temperature into degrees Fahrenheit. This converted result will be displayed on the next line and will be updated whenever the user clicks the “Convert” button.
The HTML for this page, with place-holders for the actual temperature values, will look like so:
1 2 3 4 5 6 7 8 9 10 |
|
This time, our form uses the get() method with a form “action” that points back to the main page itself. In other words, when the user submits this form by clicking on the “Convert” button, instead of sending a “post” request to a new webpage, the user will send a “get” request for the same page, providing the page with some input data.
Just as we did before, we will want to put the temperature conversion into a function of its own.
The full code will look as follows:
1 2 3 4 5 6 7 8 9 10 11 12 13 14 15 16 17 18 19 20 21 22 23 24 25 26 27 28 29 30 31 32 33 34 35 36 |
|
As before, our convert_temp() function checks to see if the user supplied a valid value. Since the user won’t have supplied any value when the page first loads (and we don’t want to start out by saying “invalid input”), we check first for this condition and return an empty string if the text field is also blank.
We used self.request.get("cel_temp") to get the user-supplied value of cel_temp from the user’s “get” request (just like we did for the user’s “post” request in the previous example). The HTML code that we write() out as a multi-line string now includes two user-supplied values: the cel_temp, which is the value that the user entered into the text field, and the far_temp, which is the calculated result returned by our function. If we had not written the value of cel_temp into the text box, then this input box would be cleared when the user clicks on the button.
Save this script as temperature.py in the same “first_app” folder, then update the app.yaml configuration file accordingly. Since we renamed our script, we changed the name of the module where the WSGIApplication object my_app should be loaded:
1 2 3 4 5 6 7 8 |
|
We also updated the name of the application just to provide a descriptive name for what the application actually does. Even if you left App Engine running, this name will update automatically in the Launcher. Notice how we used a dash but didn’t use any capitalization in the name; application names for Google App Engine can only include lower-case letters, digits and hyphens.
Sanity Check (take five)!
You should now be able to use your new web application, supplying temperatures and seeing the converted result appear on the same webpage. Since we use a “get” request, we can also now see the user-supplied data appear in the URL. In fact, you can even circumvent the form and provide your own value for cel_temp by supplying an appropriate address. For instance, try typing the URL localhost:8080/?cel_temp=30 directly into your browser and you will see the resulting temperature conversion.
Review exercises:
Modify the “log in” web application example so that it only has a single main webpage that can receive “get” requests from the user; instead of a “Sign In” button under the text field, make a “Greet me!” button that, when clicked, reloads the page to greet the user by name (if a name has been supplied) and display the greeting form again
Assignment
The poet gains a web presence
Recreate the random poem generator from the first Real Python course. You should use a web form like the one at poem-generator.appspot.com to help your user generate poems. You can view the source of this webpage to reverse-engineer most of the necessary HTML code. Your web application should use a single webpage with a single form that accepts “get” requests from the user. Bonus: Learn how to use static files like CSS in your web application to improve its overall appearance and make your HTML code easier to read and maintain.
Deployment
It’s finally time to share your beautiful work with the world. Getting your content online is actually a fairly simple process with Google App Engine.
Google provides a free service at appspot.com to allow you to host up to ten different web applications (as long as you don’t have millions of users accessing them every month, in which case you will need to upgrade to a paid plan). You will first need to go to the Google Developer Console and sign in.
Once you’ve logged in, you can create a new project and give it a unique project name. This name will appear in the URL of your application, which will look like: http://your-application-name.appspot.com. The next three pictures will walk you through the clicks that you need to get this done. In the pictured examples I used “realpython” as my project name.
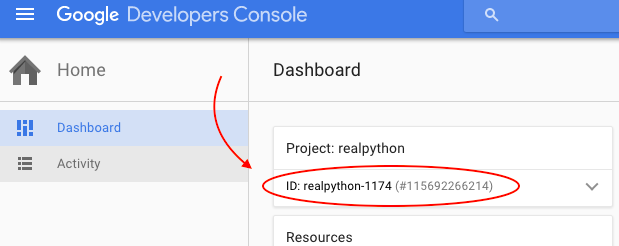
Navigate to the dashboard view and you will see this toolbar. This button on the left side will show you the list of Google projects that you own.

In that list, click “Create a Project”.

Within your dashboard your new project name will be displayed with a unique ID. In my case “realpython-1174”.
Since this is a direct URL that must be unique, Google will help you out by adding some numbers to the end of your chosen name if it is already taken. I’m going to use the temperature conversion application and name mine “temperature-converter”. Whatever you end up using as your project name, be sure to update your configuration file so that the name provided for the “application” in the very first line of the file matches this project ID.
At this point you are ready to launch your app. Be sure to run this next command with your project ID (not ‘realpython-1174’). In the first_app directory run this line:
1
|
|
A window should pop up asking you to verify that you are the owner of this Google account. Conform and now your app is up and running!!! Go to http://YourProjectID.appspot.com/ to have a look.
Linux users: you will need to navigate to the folder just before the “first_app” folder, then use the following command for uploading the application through App Engine: google_appengine/appcfg.py update first_app/
If you see the message “This application does not exist”, then either you have not registered the application correctly or the name of your web application does not match the application identifier that you provided. Congratulations! You now have a live webpage of your own running Python code.
Google has a number of other handy built-in features, including the ability to store “persistent” user data (that lasts even after the user leaves the website) within your application and even a way to integrate your application with your users’ Google accounts. The current tutorials and documentation include functional but outdated example code, although it can still provide an idea of what is possible beyond the basics.
For complex websites, writing out long blocks of HTML is fairly inefficient and hard to manage, which is why a number of frameworks have been developed to help organize and speed up the web development process using templates and pre-built pieces of code. Django is perhaps the most popular web framework. Flask and web2py are other popular options; web2py is especially good at integrating with databases. All of these web frameworks can be run on their own or set up through Google App Engine instead of using webapp2. In fact, App Engine supports Django templates within webapp2 by default.
Again, for more web development with Python, check out the second and third Real Python courses, Web Development with Python and Advanced Web Development with Django, which detail how to develop powerful web application in Flask, web2py, and Django, among others.