In this short post I will show you a quick fix for the error “unsupported operand type(s) for +: ‘float’ and ‘NoneType’” with Pyvttbl. In earlier posts I have showed how to carry out ANOVA using Pyvttbl (among other packages. See posts 1, 2, 3, and 3 for ANOVA using pyvttbl). However, Pyvttbl is not compatible with Python versions greater 1.11 (e.g., 1.12.0, that I am running). This may, of course, be due to that Pyvttbl have not been updated in quite some time. My solution to this problem involves setting up a Python virtual environment (the set up of the virtual environment it is based on the Hitchikers Guide to Python). You will learn how to set up the virtual environment in Linux and Windows.
Linux set-up
First, we will need to install the package virtualenv:
pip install virtualenv
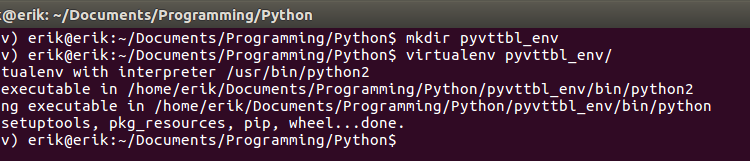
Next we continue with opening up a terminal window. Here, we change directory to the where we typically have our Python projects and create a directory for our new Pyvttbl environment:

The next step is to activate the virtual environment:
source pyvttbl_env/bin/activate
Now we should have a virtual environment set up and we can start installing numpy 1.1.0 and pyvttbl:
pip install numpy==1.11.0 pyvttbl
In the code snippet above, it is important that you set the version of Numpy (e.g., 1.11.0) that we want to install. Thus, we get the version that have been previously working with Pyvttbl.
 Remember, if we want to use any other Python packages (e.g., jupyter notebooks, Seaborn, matplotlib) we need to install them in our virtual environment. We can, of course, just add any package to the pip install snippet above:
pip install numpy==1.11.0 pyvttbl jupyter matplotlib seaborn
Now, lets check the version of Numpy using ipython:

Finally, if we want to do our ANOVA in a jupyter notebook we need to install a new kernel that uses the one in the virtual environment. If we don’t do this we will run the notebook from the global environment and, thus, we will import whatever version of Numpy we have installed on the system:
ipython kernel install --name "pyvttbl_env" --user

If we follow the image above, we also start up a Jupyter notebook. When creating a new notebook to run our python ANOVAs using pyvttbl in we need to select our new core (i.e., pyvttbl_env”). In the notebook below (after Windows set-up) you can see that we don’t get the error “unsupported operand type(s) for +: ‘float’ and ‘NoneType’”. Note, we do get a warning that in the future what pvttbl is trying to do is not going to work.
Windows set-up
For Windows, the set-up is basically the same. First, we will need to install virtualenv:
pip install virtualenv
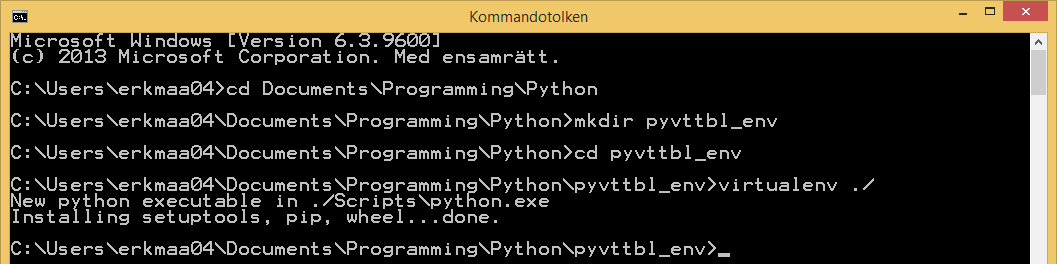
Next step for Windows user is, of course, similar but we need to start the Command Prompt (here is how). Lets change the directory to where our Python project are intended to be stored and create the new Pyvttbl environment. First, we create a directory and then we create the virtual environment in this directory:

We continue by activating our virtual environment for running Numpy 1.11.0 and Pyvttbl:
Next step is to activate our virtual environment. Here, it is a bit different for Windows users compared to Linux users:
source pyvttbl_env/Scripts/activate
Now that we have a virtual environment set up we can install an older version of Numpy. Here we will also depart on how this is done in Linux. I had a bit of a problem with installing Scipy (Pyvttbl depends on Scipy, for instance) using Pip.
Fortunately, there are Windows binaries for both Numpy and Scipy. Download the version you need and put it in the directory for the virtual environment and use pip to install:
pip install numpy-1.11.3+mkl-cp27-cp27m-win32.whl scipy-0-19.1-cp27-cp27m-win32.whl
Any additional packages that we may need in our data analysis will, of course, also have to be installed in the virtual environment. Luckily us, we can just use pip again (no external downloading, that is!):
pip install jupyter matplotlib seaborn
Since we plan to run our ANOVA in a notebook we have one final step that need to be done. To get Jupyter to run WITHIN the virtual environment (or else it will use whatever Numpy version we had problems with earlier). Thus, we need to install a new kernel for the virtual environment. This is easy done using the command prompt, again:
ipython kernel install --name "pyvttbl_env" --user

Jupyter notebook
In this notebook, we can run our ANOVA using pyvttbl without the “unsupported operand type(s) for +: ‘float’ and ‘NoneType’ error! Note, Windows user will have a different Numpy versions (we installed 1.11.3) and if you run Linux you can of course install this version to. Of course, we do get the warning (the future is now!)
That was it, now we can use Pyvttbl on both Linux and Windows computers without the problem with float/NoneType. This is of course not an optimal solution but it does the trick. If anyone have another ideas on how to solve this problem, please let me know.
The post Step-by-step guide for solving the Pyvttbl Float and NoneType error appeared first on Erik Marsja.