When writing Python applications, caching is important. Using a cache to avoid recomputing data or accessing a slow database can provide you with a great performance boost.
Python offers built-in possibilities for caching, from a simple dictionary to a more complete data structure such as functools.lru_cache. The latter can cache any item using a Least-Recently Used algorithm to limit the cache size.
Those data structures are, however, by definition local to your Python process. When several copies of your application run across a large platform, using a in-memory data structure disallows sharing the cached content. This can be a problem for large-scale and distributed applications.

Therefore, when a system is distributed across a network, it also needs a cache that is distributed across a network. Nowadays, there are plenty of network servers that offer caching capability—we already covered how to use Redis for caching with Django.
As you’re going to see in this tutorial, memcached is another great option for distributed caching. After a quick introduction to basic memcached usage, you’ll learn about advanced patterns such as “cache and set” and using fallback caches to avoid cold cache performance issues.
Installing memcached
Memcached is available for many platforms:
- If you run Linux, you can install it using
apt-get install memcachedoryum install memcached. This will install memcached from a pre-built package but you can alse build memcached from source, as explained here. - For macOS, using Homebrew is the simplest option. Just run
brew install memcachedafter you’ve installed the Homebrew package manager. - On Windows, you would have to compile memcached yourself or find pre-compiled binaries.
Once installed, memcached can simply be launched by calling the memcached command:
$ memcached
Before you can interact with memcached from Python-land you’ll need to install a memcached client library. You’ll see how to do this in the next section, along with some basic cache access operations.
Storing and Retrieving Cached Values Using Python
If you never used memcached, it is pretty easy to understand. It basically provides a giant network-available dictionary. This dictionary has a few properties that are different from a classical Python dictionnary, mainly:
- Keys and values have to be bytes
- Keys and values are automatically deleted after an expiration time
Therefore, the two basic operations for interacting with memcached are set and get. As you might have guessed, they’re used to assign a value to a key or to get a value from a key, respectively.
My preferred Python library for interacting with memcached is pymemcache—I recommend using it. You can simply install it using pip:
$ pip install pymemcache
The following code shows how you can connect to memcached and use it as a network-distributed cache in your Python applications:
>>> from pymemcache.client import base

# Don't forget to run `memcached' before running this next line:
>>> client = base.Client(('localhost', 11211))

# Once the client is instantiated, you can access the cache:
>>> client.set('some_key', 'some value')

# Retrieve previously set data again:
>>> client.get('some_key')
'some value'
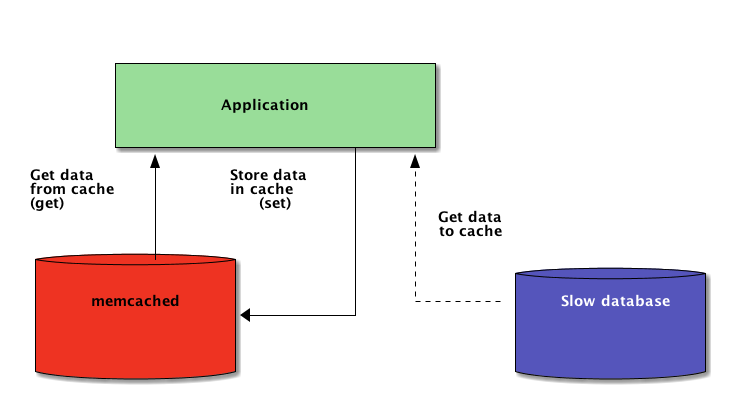
memcached network protocol is really simple an its implementation extremely fast, which makes it useful to store data that would be otherwise slow to retrieve from the canonical source of data or to compute again:
While straightforward enough, this example allows storing key/value tuples across the network and accessing them through multiple, distributed, running copies of your application. This is simplistic, yet powerful. And it’s a great first step towards optimizing your application.
Automatically Expiring Cached Data
When storing data into memcached, you can set an expiration time—a maximum number of seconds for memcached to keep the key and value around. After that delay, memcached automatically removes the key from its cache.
What should you set this cache time to? There is no magic number for this delay, and it will entirely depend on the type of data and application that you are working with. It could be a few seconds, or it might be a few hours.
Cache invalidation, which defines when to remove the cache because it is out of sync with the current data, is also something that your application will have to handle. Especially if presenting data that is too old or or stale is to be avoided.
Here again, there is no magical recipe; it depends on the type of application you are building. However, there are several outlying cases that should be handled—which we haven’t yet covered in the above example.
A caching server cannot grow infinitely—memory is a finite resource. Therefore, keys will be flushed out by the caching server as soon as it needs more space to store other things.
Some keys might also be expired because they reached their expiration time (also sometimes called the “time-to-live” or TTL.) In those cases the data is lost, and the canonical data source must be queried again.
This sounds more complicated than it really is. You can generally work with the following pattern when working with memcached in Python:
from pymemcache.client import base


def do_some_query():
    # Replace with actual querying code to a database,
    # a remote REST API, etc.
    return 42


# Don't forget to run `memcached' before running this code
client = base.Client(('localhost', 11211))
result = client.get('some_key')

if result is None:
    # The cache is empty, need to get the value
    # from the canonical source:
    result = do_some_query()

    # Cache the result for next time:
    client.set('some_key', result)

# Whether we needed to update the cache or not,
# at this point you can work with the data
# stored in the `result` variable:
print(result)
Note: Handling missing keys is mandatory because of normal flush-out operations. It is also obligatory to handle the cold cache scenario, i.e. when memcached has
just been started. In that case, the cache will be entirely empty and the cache needs to be fully repopulated, one request at a time.
This means you should view any cached data as ephemeral. And you should never expect the cache to contain a value you previously wrote to it.
Warming Up a Cold Cache
Some of the cold cache scenarios cannot be prevented, for example a memcached crash. But some can, for example migrating to a new memcached server.
When it is possible to predict that a cold cache scenario will happen, it is better to avoid it. A cache that needs to be refilled means that all of the sudden, the canonical storage of the cached data will be massively hit by all cache users who lack a cache data (also known as the thundering herd problem.)
pymemcache provides a class named FallbackClient that helps in implementing this scenario as demonstrated here:
from pymemcache.client import base
from pymemcache import fallback


def do_some_query():
    # Replace with actual querying code to a database,
    # a remote REST API, etc.
    return 42


# Set `ignore_exc=True` so it is possible to shut down
# the old cache before removing its usage from
# the program, if ever necessary.
old_cache = base.Client(('localhost', 11211), ignore_exc=True)
new_cache = base.Client(('localhost', 11212))

client = fallback.FallbackClient((new_cache, old_cache))

result = client.get('some_key')

if result is None:
    # The cache is empty, need to get the value
    # from the canonical source:
    result = do_some_query()

    # Cache the result for next time:
    client.set('some_key', result)

print(result)
The FallbackClient queries the old cache passed to its constructor, respecting the order. In this case, the new cache server will always be queried first, and in case of a cache miss, the old one will be queried—avoiding a possible return-trip to the primary source of data.
If any key is set, it will only be set to the new cache. After some time, the old cache can be decommissioned and the FallbackClient can be replaced directed with the new_cache client.
Check And Set
When communicating with a remote cache, the usual concurrency problem comes back: there might be several clients trying to access the same key at the same time. memcached provides a check and set operation, shortened to CAS, which helps to solve this problem.
The simplest example is an application that wants to count the number of users it has. Each time a visitor connects, a counter is incremented by 1. Using memcached, a simple implementation would be:
def on_visit(client):
    result = client.get('visitors')
    if result is None:
        result = 1
    else:
        result += 1
    client.set('visitors', result)
However, what happens if two instances of the application try to update this counter at the same time?
The first call client.get('visitors') will return the same number of visitors for both of them, let’s say it’s 42. Then both will add 1, compute 43, and set the number of visitors to 43. That number is wrong, and the result should be 44, i.e. 42 + 1 + 1.
To solve this concurrency issue, the CAS operation of memcached is handy. The following snippet implements a correct solution:
def on_visit(client):
    while True:
        result, cas = client.gets('visitors')
        if result is None:
            result = 1
        else:
            result += 1
        if client.cas('visitors', result, cas):
            break
The gets method returns the value, just like the get method, but it also returns a CAS value.
What is in this value is not relevant, but it is used for the next method cas call. This method is equivalent to the set operation, except that it fails if the value has changed since the gets operation. In case of success, the loop is broken. Otherwise, the operation is restarted from the beginning.
In the scenario where two instances of the application try to update the counter at the same time, only one succeeds to move the counter from 42 to 43. The second instance gets a False value returned by the client.cas call, and have to retry the loop. It will retrieve 43 as value this time, will increment it to 44, and its cas call will succeed, thus solving our problem.
Incrementing a counter is interesting as an example to explain how CAS works because it is simplistic. However, memcached also provides the incr and decr methods to increment or decrement an integer in a single request, rather than doing multiple gets/cas calls. In real-world applications gets and cas are used for more complex data type or operations
Most remote caching server and data store provide such a mechanism to prevent concurrency issues. It is critical to be aware of those cases to make proper use of their features.
Beyond Caching
The simple techniques illustrated in this article showed you how easy it is to leverage memcached to speed up the performances of your Python application.
Just by using the two basic “set” and “get” operations you can often accelerate data retrieval or avoid recomputing results over and over again. With memcached you can share the cache accross a large number of distributed nodes.
Other, more advanced patterns you saw in this tutorial, like the Check And Set (CAS) operation allow you to update data stored in the cache concurrently across multiple Python threads or processes while avoiding data corruption.
If you are interested into learning more about advanced techniques to write faster and more scalable Python applications, check out Scaling Python. It covers many advanced topics such as network distribution, queuing systems, distributed hashing, and code profiling.