
Sockets and the socket API are used to send messages across a network. They provide a form of inter-process communication (IPC). The network can be a logical, local network to the computer, or one that’s physically connected to an external network, with its own connections to other networks. The obvious example is the Internet, which you connect to via your ISP.
This tutorial has three different iterations of building a socket server and client with Python:
- We’ll start the tutorial by looking at a simple socket server and client.
- Once you’ve seen the API and how things work in this initial example, we’ll look at an improved version that handles multiple connections simultaneously.
- Finally, we’ll progress to building an example server and client that functions like a full-fledged socket application, complete with its own custom header and content.
By the end of this tutorial, you’ll understand how to use the main functions and methods in Python’s socket module to write your own client-server applications. This includes showing you how to use a custom class to send messages and data between endpoints that you can build upon and utilize for your own applications.
The examples in this tutorial use Python 3.6. You can find the source code on GitHub.
Networking and sockets are large subjects. Literal volumes have been written about them. If you’re new to sockets or networking, it’s completely normal if you feel overwhelmed with all of the terms and pieces. I know I did!
Don’t be discouraged though. I’ve written this tutorial for you. As we did with Python, we can learn a little bit at a time. Use your browser’s bookmark feature and come back when you’re ready for the next section.
Let’s get started!
Background
Sockets have a long history. Their use originated with ARPANET in 1971 and later became an API in the Berkeley Software Distribution (BSD) operating system released in 1983 called Berkeley sockets.
When the Internet took off in the 1990s with the World Wide Web, so did network programming. Web servers and browsers weren’t the only applications taking advantage of newly connected networks and using sockets. Client-server applications of all types and sizes came into widespread use.
Today, although the underlying protocols used by the socket API have evolved over the years, and we’ve seen new ones, the low-level API has remained the same.
The most common type of socket applications are client-server applications, where one side acts as the server and waits for connections from clients. This is the type of application that I’ll be covering in this tutorial. More specifically, we’ll look at the socket API for Internet sockets, sometimes called Berkeley or BSD sockets. There are also Unix domain sockets, which can only be used to communicate between processes on the same host.
Socket API Overview
Python’s socket module provides an interface to the Berkeley sockets API. This is the module that we’ll use and discuss in this tutorial.
The primary socket API functions and methods in this module are:
socket()bind()listen()accept()connect()connect_ex()send()recv()close()
Python provides a convenient and consistent API that maps directly to these system calls, their C counterparts. We’ll look at how these are used together in the next section.
As part of its standard library, Python also has classes that make using these low-level socket functions easier. Although it’s not covered in this tutorial, see the socketserver module, a framework for network servers. There are also many modules available that implement higher-level Internet protocols like HTTP and SMTP. For an overview, see Internet Protocols and Support.
TCP Sockets
As you’ll see shortly, we’ll create a socket object using socket.socket() and specify the socket type as socket.SOCK_STREAM. When you do that, the default protocol that’s used is the Transmission Control Protocol (TCP). This is a good default and probably what you want.
Why should you use TCP? The Transmission Control Protocol (TCP):
- Is reliable: packets dropped in the network are detected and retransmitted by the sender.
- Has in-order data delivery: data is read by your application in the order it was written by the sender.
In contrast, User Datagram Protocol (UDP) sockets created with socket.SOCK_DGRAM aren’t reliable, and data read by the receiver can be out-of-order from the sender’s writes.
Why is this important? Networks are a best-effort delivery system. There’s no guarantee that your data will reach its destination or that you’ll receive what’s been sent to you.
Network devices (for example, routers and switches), have finite bandwidth available and their own inherent system limitations. They have CPUs, memory, buses, and interface packet buffers, just like our clients and servers. TCP relieves you from having to worry about packet loss, data arriving out-of-order, and many other things that invariably happen when you’re communicating across a network.
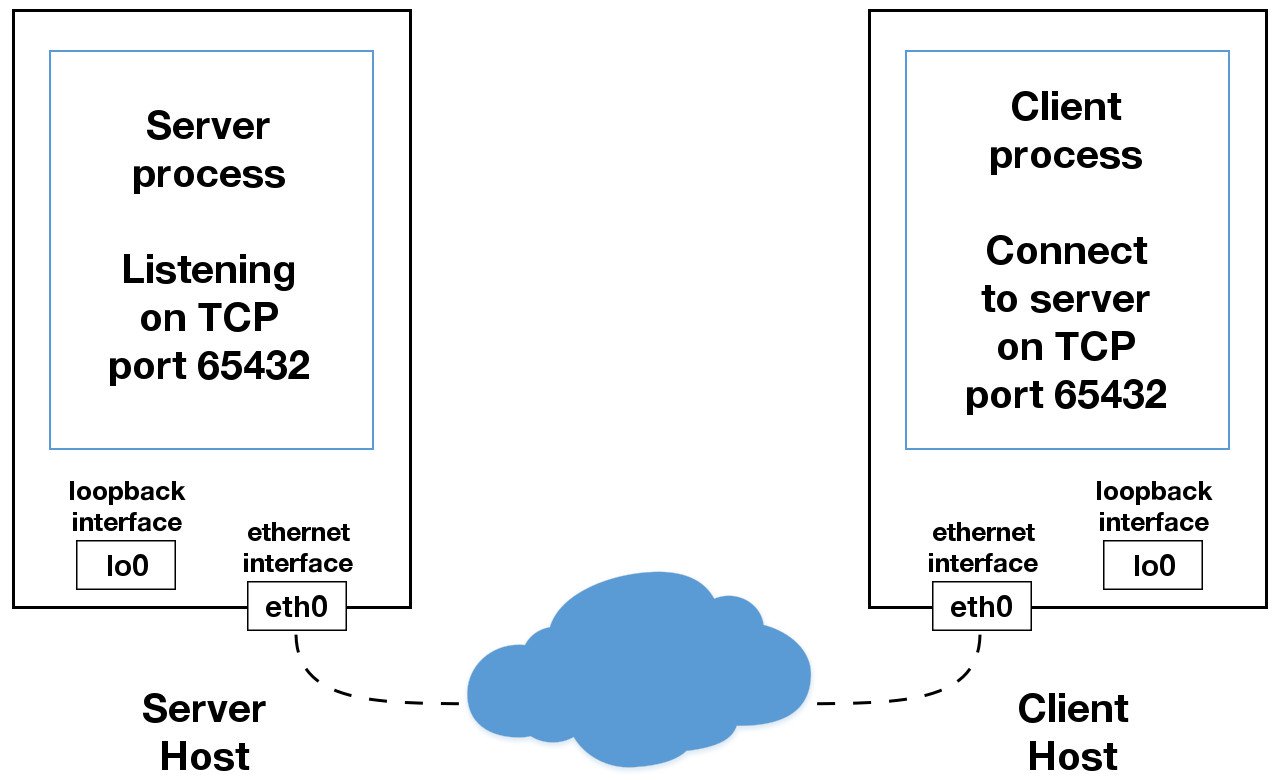
In the diagram below, let’s look at the sequence of socket API calls and data flow for TCP:

The left-hand column represents the server. On the right-hand side is the client.
Starting in the top left-hand column, note the API calls the server makes to setup a “listening” socket:
socket()bind()listen()accept()
A listening socket does just what it sounds like. It listens for connections from clients. When a client connects, the server calls accept() to accept, or complete, the connection.
The client calls connect() to establish a connection to the server and initiate the three-way handshake. The handshake step is important since it ensures that each side of the connection is reachable in the network, in other words that the client can reach the server and vice-versa. It may be that only one host, client or server, can reach the other.
In the middle is the round-trip section, where data is exchanged between the client and server using calls to send() and recv().
At the bottom, the client and server close() their respective sockets.
Echo Client and Server
Now that you’ve seen an overview of the socket API and how the client and server communicate, let’s create our first client and server. We’ll begin with a simple implementation. The server will simply echo whatever it receives back to the client.
Echo Server
Here’s the server, echo-server.py:
#!/usr/bin/env python3

import socket

HOST = '127.0.0.1'  # Standard loopback interface address (localhost)
PORT = 65432        # Port to listen on (non-privileged ports are > 1023)

with socket.socket(socket.AF_INET, socket.SOCK_STREAM) as s:
    s.bind((HOST, PORT))
    s.listen()
    conn, addr = s.accept()
    with conn:
        print('Connected by', addr)
        while True:
            data = conn.recv(1024)
            if not data:
                break
            conn.sendall(data)
Note: Don’t worry about understanding everything above right now. There’s a lot going on in these few lines of code. This is just a starting point so you can see a basic server in action.
There’s a reference section at the end of this tutorial that has more information and links to additional resources. I’ll link to these and other resources throughout the tutorial.
Let’s walk through each API call and see what’s happening.
socket.socket() creates a socket object that supports the context manager type, so you can use it in a with statement. There’s no need to call s.close():
with socket.socket(socket.AF_INET, socket.SOCK_STREAM) as s:
    pass  # Use the socket object without calling s.close().
The arguments passed to socket() specify the address family and socket type. AF_INET is the Internet address family for IPv4. SOCK_STREAM is the socket type for TCP, the protocol that will be used to transport our messages in the network.
bind() is used to associate the socket with a specific network interface and port number:
HOST = '127.0.0.1'  # Standard loopback interface address (localhost)
PORT = 65432        # Port to listen on (non-privileged ports are > 1023)

# ...

s.bind((HOST, PORT))
The values passed to bind() depend on the address family of the socket. In this example, we’re using socket.AF_INET (IPv4). So it expects a 2-tuple: (host, port).
host can be a hostname, IP address, or empty string. If an IP address is used, host should be an IPv4-formatted address string. The IP address 127.0.0.1 is the standard IPv4 address for the loopback interface, so only processes on the host will be able to connect to the server. If you pass an empty string, the server will accept connections on all available IPv4 interfaces.
port should be an integer from 1–65535 (0 is reserved). It’s the TCP port number to accept connections on from clients. Some systems may require superuser privileges if the port is < 1024.
Here’s a note on using hostnames with bind():
“If you use a hostname in the host portion of IPv4/v6 socket address, the program may show a non-deterministic behavior, as Python uses the first address returned from the DNS resolution. The socket address will be resolved differently into an actual IPv4/v6 address, depending on the results from DNS resolution and/or the host configuration. For deterministic behavior use a numeric address in host portion.” (Source)
I’ll discuss this more later in Using Hostnames, but it’s worth mentioning here. For now, just understand that when using a hostname, you could see different results depending on what’s returned from the name resolution process.
It could be anything. The first time you run your application, it might be the address 10.1.2.3. The next time it’s a different address, 192.168.0.1. The third time, it could be 172.16.7.8, and so on.
Continuing with the server example, listen() enables a server to accept() connections. It makes it a “listening” socket:
s.listen()
conn, addr = s.accept()
listen() has a backlog parameter. It specifies the number of unaccepted connections that the system will allow before refusing new connections. Starting in Python 3.5, it’s optional. If not specified, a default backlog value is chosen.
If your server receives a lot of connection requests simultaneously, increasing the backlog value may help by setting the maximum length of the queue for pending connections. The maximum value is system dependent. For example, on Linux, see /proc/sys/net/ipv4/tcp_max_syn_backlog.
accept() blocks and waits for an incoming connection. When a client connects, it returns a new socket object representing the connection and a tuple holding the address of the client. The tuple will contain (host, port) for IPv4 connections or (host, port, flowinfo, scopeid) for IPv6. See Socket Address Families in the reference section for details on the tuple values.
One thing that’s imperative to understand is that we now have a new socket object from accept(). This is important since it’s the socket that you’ll use to communicate with the client. It’s distinct from the listening socket that the server is using to accept new connections:
conn, addr = s.accept()
with conn:
    print('Connected by', addr)
    while True:
        data = conn.recv(1024)
        if not data:
            break
        conn.sendall(data)
After getting the client socket object conn from accept(), an infinite while loop is used to loop over blocking calls to conn.recv(). This reads whatever data the client sends and echoes it back using conn.sendall().
If conn.recv() returns an empty bytes object, b'', then the client closed the connection and the loop is terminated. The with statement is used with conn to automatically close the socket at the end of the block.
Echo Client
Now let’s look at the client, echo-client.py:
#!/usr/bin/env python3

import socket

HOST = '127.0.0.1'  # The server's hostname or IP address
PORT = 65432        # The port used by the server

with socket.socket(socket.AF_INET, socket.SOCK_STREAM) as s:
    s.connect((HOST, PORT))
    s.sendall(b'Hello, world')
    data = s.recv(1024)

print('Received', repr(data))
In comparison to the server, the client is pretty simple. It creates a socket object, connects to the server and calls s.sendall() to send its message. Lastly, it calls s.recv() to read the server’s reply and then prints it.
Running the Echo Client and Server
Let’s run the client and server to see how they behave and inspect what’s happening.
Note: If you’re having trouble getting the examples or your own code to run from the command line, read How Do I Make My Own Command-Line Commands Using Python? If you’re on Windows, check the Python Windows FAQ.
Open a terminal or command prompt, navigate to the directory that contains your scripts, and run the server:
$ ./echo-server.py
Your terminal will appear to hang. That’s because the server is blocked (suspended) in a call:
conn, addr = s.accept()
It’s waiting for a client connection. Now open another terminal window or command prompt and run the client:
$ ./echo-client.py
Received b'Hello, world'
In the server window, you should see:
$ ./echo-server.py
Connected by ('127.0.0.1', 64623)
In the output above, the server printed the addr tuple returned from s.accept(). This is the client’s IP address and TCP port number. The port number, 64623, will most likely be different when you run it on your machine.
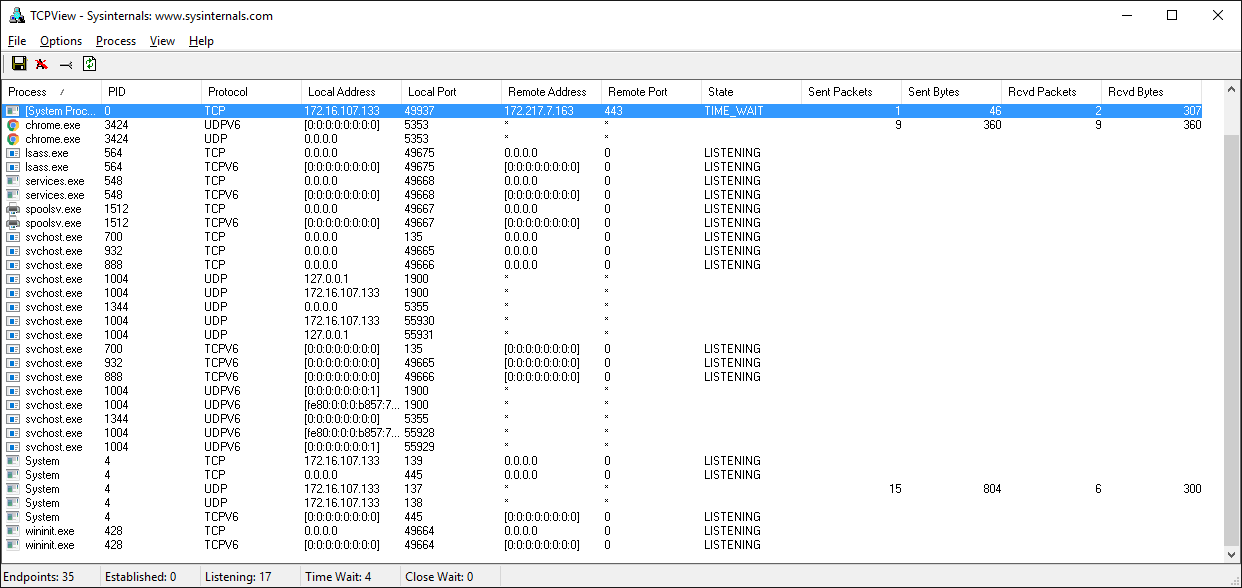
Viewing Socket State
To see the current state of sockets on your host, use netstat. It’s available by default on macOS, Linux, and Windows.
Here’s the netstat output from macOS after starting the server:
$ netstat -an
Active Internet connections (including servers)
Proto Recv-Q Send-Q  Local Address          Foreign Address        (state)
tcp4       0      0  127.0.0.1.65432        *.*                    LISTEN
Notice that Local Address is 127.0.0.1.65432. If echo-server.py had used HOST = '' instead of HOST = '127.0.0.1', netstat would show this:
$ netstat -an
Active Internet connections (including servers)
Proto Recv-Q Send-Q  Local Address          Foreign Address        (state)
tcp4       0      0  *.65432                *.*                    LISTEN
Local Address is *.65432, which means all available host interfaces that support the address family will be used to accept incoming connections. In this example, in the call to socket(), socket.AF_INET was used (IPv4). You can see this in the Proto column: tcp4.
I’ve trimmed the output above to show the echo server only. You’ll likely see much more output, depending on the system you’re running it on. The things to notice are the columns Proto, Local Address, and (state). In the last example above, netstat shows the echo server is using an IPv4 TCP socket (tcp4), on port 65432 on all interfaces (*.65432), and it’s in the listening state (LISTEN).
Another way to see this, along with additional helpful information, is to use lsof (list open files). It’s available by default on macOS and can be installed on Linux using your package manager, if it’s not already:
$ lsof -i -n
COMMAND     PID   USER   FD   TYPE   DEVICE SIZE/OFF NODE NAME
Python    67982 nathan    3u  IPv4 0xecf272      0t0  TCP *:65432 (LISTEN)
lsof gives you the COMMAND, PID (process id), and USER (user id) of open Internet sockets when used with the -i option. Above is the echo server process.
netstat and lsof have a lot of options available and differ depending on the OS you’re running them on. Check the man page or documentation for both. They’re definitely worth spending a little time with and getting to know. You’ll be rewarded. On macOS and Linux, use man netstat and man lsof. For Windows, use netstat /?.
Here’s a common error you’ll see when a connection attempt is made to a port with no listening socket:
$ ./echo-client.py
Traceback (most recent call last):
  File "./echo-client.py", line 9, in <module>
    s.connect((HOST, PORT))
ConnectionRefusedError: [Errno 61] Connection refused
Either the specified port number is wrong or the server isn’t running. Or maybe there’s a firewall in the path that’s blocking the connection, which can be easy to forget about. You may also see the error Connection timed out. Get a firewall rule added that allows the client to connect to the TCP port!
There’s a list of common errors in the reference section.
Communication Breakdown
Let’s take a closer look at how the client and server communicated with each other:

When using the loopback interface (IPv4 address 127.0.0.1 or IPv6 address ::1), data never leaves the host or touches the external network. In the diagram above, the loopback interface is contained inside the host. This represents the internal nature of the loopback interface and that connections and data that transit it are local to the host. This is why you’ll also hear the loopback interface and IP address 127.0.0.1 or ::1 referred to as “localhost.”
Applications use the loopback interface to communicate with other processes running on the host and for security and isolation from the external network. Since it’s internal and accessible only from within the host, it’s not exposed.
You can see this in action if you have an application server that uses its own private database. If it’s not a database used by other servers, it’s probably configured to listen for connections on the loopback interface only. If this is the case, other hosts on the network can’t connect to it.
When you use an IP address other than 127.0.0.1 or ::1 in your applications, it’s probably bound to an Ethernet interface that’s connected to an external network. This is your gateway to other hosts outside of your “localhost” kingdom:
Be careful out there. It’s a nasty, cruel world. Be sure to read the section Using Hostnames before venturing from the safe confines of “localhost.” There’s a security note that applies even if you’re not using hostnames and using IP addresses only.
Handling Multiple Connections
The echo server definitely has its limitations. The biggest being that it serves only one client and then exits. The echo client has this limitation too, but there’s an additional problem. When the client makes the following call, it’s possible that s.recv() will return only one byte, b'H' from b'Hello, world':
data = s.recv(1024)
The bufsize argument of 1024 used above is the maximum amount of data to be received at once. It doesn’t mean that recv() will return 1024 bytes.
send() also behaves this way. send() returns the number of bytes sent, which may be less than the size of the data passed in. You’re responsible for checking this and calling send() as many times as needed to send all of the data:
“Applications are responsible for checking that all data has been sent; if only some of the data was transmitted, the application needs to attempt delivery of the remaining data.” (Source)
We avoided having to do this by using sendall():
“Unlike send(), this method continues to send data from bytes until either all data has been sent or an error occurs. None is returned on success.” (Source)
We have two problems at this point:
- How do we handle multiple connections concurrently?
- We need to call
send()andrecv()until all data is sent or received.
What do we do? There are many approaches to concurrency. More recently, a popular approach is to use Asynchronous I/O. asyncio was introduced into the standard library in Python 3.4. The traditional choice is to use threads.
The trouble with concurrency is it’s hard to get right. There are many subtleties to consider and guard against. All it takes is for one of these to manifest itself and your application may suddenly fail in not-so-subtle ways.
I don’t say this to scare you away from learning and using concurrent programming. If your application needs to scale, it’s a necessity if you want to use more than one processor or one core. However, for this tutorial, we’ll use something that’s more traditional than threads and easier to reason about. We’re going to use the granddaddy of system calls: select().
select() allows you to check for I/O completion on more than one socket. So you can call select() to see which sockets have I/O ready for reading and/or writing. But this is Python, so there’s more. We’re going to use the selectors module in the standard library so the most efficient implementation is used, regardless of the operating system we happen to be running on:
“This module allows high-level and efficient I/O multiplexing, built upon the select module primitives. Users are encouraged to use this module instead, unless they want precise control over the OS-level primitives used.” (Source)
Even though, by using select(), we’re not able to run concurrently, depending on your workload, this approach may still be plenty fast. It depends on what your application needs to do when it services a request and the number of clients it needs to support.
asyncio uses single-threaded cooperative multitasking and an event loop to manage tasks. With select(), we’ll be writing our own version of an event loop, albeit more simply and synchronously. When using multiple threads, even though you have concurrency, we currently have to use the GIL with CPython and PyPy. This effectively limits the amount of work we can do in parallel anyway.
I say all of this to explain that using select() may be a perfectly fine choice. Don’t feel like you have to use asyncio, threads, or the latest asynchronous library. Typically, in a network application, your application is I/O bound: it could waiting on the local network, endpoints on the other side of the network, on a disk, and so forth.
If you’re getting requests from clients that initiate CPU bound work, look at the concurrent.futures module. It contains the class ProcessPoolExecutor that uses a pool of processes to execute calls asynchronously.
If you use multiple processes, the operating system is able to schedule your Python code to run in parallel on multiple processors or cores, without the GIL. For ideas and inspiration, see the PyCon talk John Reese – Thinking Outside the GIL with AsyncIO and Multiprocessing – PyCon 2018.
In the next section, we’ll look at examples of a server and client that address these problems. They use select() to handle multiple connections simultaneously and call send() and recv() as many times as needed.
Multi-Connection Client and Server
In the next two sections, we’ll create a server and client that handles multiple connections using a selector object created from the selectors module.
Multi-Connection Server
First, let’s look at the multi-connection server, multiconn-server.py. Here’s the first part that sets up the listening socket:
import selectors
sel = selectors.DefaultSelector()
# ...
lsock = socket.socket(socket.AF_INET, socket.SOCK_STREAM)
lsock.bind((HOST, PORT))
lsock.listen()
print('listening on', (host, port))
lsock.setblocking(False)
sel.register(lsock, selectors.EVENT_READ, data=None)
The biggest difference between this server and the echo server is the call to lsock.setblocking(False) to configure the socket in non-blocking mode. Calls made to this socket will no longer block. When it’s used with sel.select(), as you’ll see below, we can wait for events on one or more sockets and then read and write data when it’s ready.
sel.register() registers the socket to be monitored with sel.select() for the events you’re interested in. For the listening socket, we want read events: selectors.EVENT_READ.
data is used to store whatever arbitrary data you’d like along with the socket. It’s returned when select() returns. We’ll use data to keep track of what’s been sent and received on the socket.
Next is the event loop:
import selectors
sel = selectors.DefaultSelector()

# ...

while True:
    events = sel.select(timeout=None)
    for key, mask in events:
        if key.data is None:
            accept_wrapper(key.fileobj)
        else:
            service_connection(key, mask)
sel.select(timeout=None) blocks until there are sockets ready for I/O. It returns a list of (key, events) tuples, one for each socket. key is a SelectorKey namedtuple that contains a fileobj attribute. key.fileobj is the socket object, and mask is an event mask of the operations that are ready.
If key.data is None, then we know it’s from the listening socket and we need to accept() the connection. We’ll call our own accept() wrapper function to get the new socket object and register it with the selector. We’ll look at it in a moment.
If key.data is not None, then we know it’s a client socket that’s already been accepted, and we need to service it. service_connection() is then called and passed key and mask, which contains everything we need to operate on the socket.
Let’s look at what our accept_wrapper() function does:
def accept_wrapper(sock):
    conn, addr = sock.accept()  # Should be ready to read
    print('accepted connection from', addr)
    conn.setblocking(False)
    data = types.SimpleNamespace(addr=addr, inb=b'', outb=b'')
    events = selectors.EVENT_READ | selectors.EVENT_WRITE
    sel.register(conn, events, data=data)
Since the listening socket was registered for the event selectors.EVENT_READ, it should be ready to read. We call sock.accept() and then immediately call conn.setblocking(False) to put the socket in non-blocking mode.
Remember, this is the main objective in this version of the server since we don’t want it to block. If it blocks, then the entire server is stalled until it returns. Which means other sockets are left waiting. This is the dreaded “hang” state that you don’t want your server to be in.
Next, we create an object to hold the data we want included along with the socket using the class types.SimpleNamespace. Since we want to know when the client connection is ready for reading and writing, both of those events are set using the following:
events = selectors.EVENT_READ | selectors.EVENT_WRITE
The events mask, socket, and data objects are then passed to sel.register().
Now let’s look at service_connection() to see how a client connection is handled when it’s ready:
def service_connection(key, mask):
    sock = key.fileobj
    data = key.data
    if mask & selectors.EVENT_READ:
        recv_data = sock.recv(1024)  # Should be ready to read
        if recv_data:
            data.outb += recv_data
        else:
            print('closing connection to', data.addr)
            sel.unregister(sock)
            sock.close()
    if mask & selectors.EVENT_WRITE:
        if data.outb:
            print('echoing', repr(data.outb), 'to', data.addr)
            sent = sock.send(data.outb)  # Should be ready to write
            data.outb = data.outb[sent:]
This is the heart of the simple multi-connection server. key is the namedtuple returned from select() that contains the socket object (fileobj) and data object. mask contains the events that are ready.
If the socket is ready for reading, then mask & selectors.EVENT_READ is true, and sock.recv() is called. Any data that’s read is appended to data.outb so it can be sent later.
Note the else: block if no data is received:
if recv_data:
    data.outb += recv_data
else:
    print('closing connection to', data.addr)
    sel.unregister(sock)
    sock.close()
This means that the client has closed their socket, so the server should too. But don’t forget to first call sel.unregister() so it’s no longer monitored by select().
When the socket is ready for writing, which should always be the case for a healthy socket, any received data stored in data.outb is echoed to the client using sock.send(). The bytes sent are then removed from the send buffer:
data.outb = data.outb[sent:]
Multi-Connection Client
Now let’s look at the multi-connection client, multiconn-client.py. It’s very similar to the server, but instead of listening for connections, it starts by initiating connections via start_connections():
messages = [b'Message 1 from client.', b'Message 2 from client.']


def start_connections(host, port, num_conns):
    server_addr = (host, port)
    for i in range(0, num_conns):
        connid = i + 1
        print('starting connection', connid, 'to', server_addr)
        sock = socket.socket(socket.AF_INET, socket.SOCK_STREAM)
        sock.setblocking(False)
        sock.connect_ex(server_addr)
        events = selectors.EVENT_READ | selectors.EVENT_WRITE
        data = types.SimpleNamespace(connid=connid,
                                     msg_total=sum(len(m) for m in messages),
                                     recv_total=0,
                                     messages=list(messages),
                                     outb=b'')
        sel.register(sock, events, data=data)
num_conns is read from the command-line, which is the number of connections to create to the server. Just like the server, each socket is set to non-blocking mode.
connect_ex() is used instead of connect() since connect() would immediately raise a BlockingIOError exception. connect_ex() initially returns an error indicator, errno.EINPROGRESS, instead of raising an exception while the connection is in progress. Once the connection is completed, the socket is ready for reading and writing and is returned as such by select().
After the socket is setup, the data we want stored with the socket is created using the class types.SimpleNamespace. The messages the client will send to the server are copied using list(messages) since each connection will call socket.send() and modify the list. Everything needed to keep track of what the client needs to send, has sent and received, and the total number of bytes in the messages is stored in the object data.
Let’s look at service_connection(). It’s fundamentally the same as the server:
def service_connection(key, mask):
    sock = key.fileobj
    data = key.data
    if mask & selectors.EVENT_READ:
        recv_data = sock.recv(1024)  # Should be ready to read
        if recv_data:
            print('received', repr(recv_data), 'from connection', data.connid)
            data.recv_total += len(recv_data)
        if not recv_data or data.recv_total == data.msg_total:
            print('closing connection', data.connid)
            sel.unregister(sock)
            sock.close()
    if mask & selectors.EVENT_WRITE:
        if not data.outb and data.messages:
            data.outb = data.messages.pop(0)
        if data.outb:
            print('sending', repr(data.outb), 'to connection', data.connid)
            sent = sock.send(data.outb)  # Should be ready to write
            data.outb = data.outb[sent:]
There’s one important difference. It keeps track of the number of bytes it’s received from the server so it can close its side of the connection. When the server detects this, it closes its side of the connection too.
Note that by doing this, the server depends on the client being well behaved: the server expects the client to close its side of the connection when it’s done sending messages. If the client doesn’t close, the server will leave the connection open. In a real application, you may want to guard against this in your server and prevent client connections from accumulating if they don’t send a request after a certain amount of time.
Running the Multi-Connection Client and Server
Now let’s run multiconn-server.py and multiconn-client.py. They both use command-line arguments. You can run them without arguments to see the options.
For the server, pass a host and port number:
$ ./multiconn-server.py
usage: ./multiconn-server.py <host> <port>
For the client, also pass the number of connections to create to the server, num_connections:
$ ./multiconn-client.py
usage: ./multiconn-client.py <host> <port> <num_connections>
Below is the server output when listening on the loopback interface on port 65432:
$ ./multiconn-server.py 127.0.0.1 65432
listening on ('127.0.0.1', 65432)
accepted connection from ('127.0.0.1', 61354)
accepted connection from ('127.0.0.1', 61355)
echoing b'Message 1 from client.Message 2 from client.' to ('127.0.0.1', 61354)
echoing b'Message 1 from client.Message 2 from client.' to ('127.0.0.1', 61355)
closing connection to ('127.0.0.1', 61354)
closing connection to ('127.0.0.1', 61355)
Below is the client output when it creates two connections to the server above:
$ ./multiconn-client.py 127.0.0.1 65432 2
starting connection 1 to ('127.0.0.1', 65432)
starting connection 2 to ('127.0.0.1', 65432)
sending b'Message 1 from client.' to connection 1
sending b'Message 2 from client.' to connection 1
sending b'Message 1 from client.' to connection 2
sending b'Message 2 from client.' to connection 2
received b'Message 1 from client.Message 2 from client.' from connection 1
closing connection 1
received b'Message 1 from client.Message 2 from client.' from connection 2
closing connection 2
Application Client and Server
The multi-connection client and server example is definitely an improvement compared with where we started. However, let’s take one more step and address the shortcomings of the previous “multiconn” example in a final implementation: the application client and server.
We want a client and server that handles errors appropriately so other connections aren’t affected. Obviously, our client or server shouldn’t come crashing down in a ball of fury if an exception isn’t caught. This is something we haven’t discussed up until now. I’ve intentionally left out error handling for brevity and clarity in the examples.
Now that you’re familiar with the basic API, non-blocking sockets, and select(), we can add some error handling and discuss the “elephant in the room” that I’ve kept hidden from you behind that large curtain over there. Yes, I’m talking about the custom class I mentioned way back in the introduction. I knew you wouldn’t forget.
First, let’s address the errors:
“All errors raise exceptions. The normal exceptions for invalid argument types and out-of-memory conditions can be raised; starting from Python 3.3, errors related to socket or address semantics raise
OSErroror one of its subclasses.” (Source)
We need to catch OSError. Another thing I haven’t mentioned in relation to errors is timeouts. You’ll see them discussed in many places in the documentation. Timeouts happen and are a “normal” error. Hosts and routers are rebooted, switch ports go bad, cables go bad, cables get unplugged, you name it. You should be prepared for these and other errors and handle them in your code.
What about the “elephant in the room?” As hinted by the socket type socket.SOCK_STREAM, when using TCP, you’re reading from a continuous stream of bytes. It’s like reading from a file on disk, but instead you’re reading bytes from the network.
However, unlike reading a file, there’s no f.seek(). In other words, you can’t reposition the socket pointer, if there was one, and move randomly around the data reading whatever, whenever you’d like.
When bytes arrive at your socket, there are network buffers involved. Once you’ve read them, they need to be saved somewhere. Calling recv() again reads the next stream of bytes available from the socket.
What this means is that you’ll be reading from the socket in chunks. You need to call recv() and save the data in a buffer until you’ve read enough bytes to have a complete message that makes sense to your application.
It’s up to you to define and keep track of where the message boundaries are. As far as the TCP socket is concerned, it’s just sending and receiving raw bytes to and from the network. It knows nothing about what those raw bytes mean.
This bring us to defining an application-layer protocol. What’s an application-layer protocol? Put simply, your application will send and receive messages. These messages are your application’s protocol.
In other words, the length and format you choose for these messages define the semantics and behavior of your application. This is directly related to what I explained in the previous paragraph regarding reading bytes from the socket. When you’re reading bytes with recv(), you need to keep up with how many bytes were read and figure out where the message boundaries are.
How is this done? One way is to always send fixed-length messages. If they’re always the same size, then it’s easy. When you’ve read that number of bytes into a buffer, then you know you have one complete message.
However, using fixed-length messages is inefficient for small messages where you’d need to use padding to fill them out. Also, you’re still left with the problem of what to do about data that doesn’t fit into one message.
In this tutorial, we’ll take a generic approach. An approach that’s used by many protocols, including HTTP. We’ll prefix messages with a header that includes the content length as well as any other fields we need. By doing this, we’ll only need to keep up with the header. Once we’ve read the header, we can process it to determine the length of the message’s content and then read that number of bytes to consume it.
We’ll implement this by creating a custom class that can send and receive messages that contain text or binary data. You can improve and extend it for your own applications. The most important thing is that you’ll be able to see an example of how this is done.
I need to mention something regarding sockets and bytes that may affect you. As we talked about earlier, when sending and receiving data via sockets, you’re sending and receiving raw bytes.
If you receive data and want to use it in a context where it’s interpreted as multiple bytes, for example a 4-byte integer, you’ll need to take into account that it could be in a format that’s not native to your machine’s CPU. The client or server on the other end could have a CPU that uses a different byte order than your own. If this is the case, you’ll need to convert it to your host’s native byte order before using it.
This byte order is referred to as a CPU’s endianness. See Byte Endianness in the reference section for details. We’ll avoid this issue by taking advantage of Unicode for our message header and using the encoding UTF-8. Since UTF-8 uses an 8-bit encoding, there are no byte ordering issues.
You can find an explanation in Python’s Encodings and Unicode documentation. Note that this applies to the text header only. We’ll use an explicit type and encoding defined in the header for the content that’s being sent, the message payload. This will allow us to transfer any data we’d like (text or binary), in any format.
You can easily determine the byte order of your machine by using sys.byteorder. For example, on my Intel laptop, this happens:
$ python3 -c 'import sys; print(repr(sys.byteorder))'
'little'
If I run this in a virtual machine that emulates a big-endian CPU (PowerPC), then this happens:
$ python3 -c 'import sys; print(repr(sys.byteorder))'
'big'
In this example application, our application-layer protocol defines the header as Unicode text with a UTF-8 encoding. For the actual content in the message, the message payload, you’ll still have to swap the byte order manually if needed.
This will depend on your application and whether or not it needs to process multi-byte binary data from a machine with a different endianness. You can help your client or server implement binary support by adding additional headers and using them to pass parameters, similar to HTTP.
Don’t worry if this doesn’t make sense yet. In the next section, you’ll see how all of this works and fits together.
Application Protocol Header
Let’s fully define the protocol header. The protocol header is:
- Variable-length text
- Unicode with the encoding UTF-8
- A Python dictionary serialized using JSON
The required headers, or sub-headers, in the protocol header’s dictionary are as follows:
| Name | Description |
|---|---|
byteorder |
The byte order of the machine (uses sys.byteorder). This may not be required for your application. |
content-length |
The length of the content in bytes. |
content-type |
The type of content in the payload, for example, text/json or binary/my-binary-type. |
content-encoding |
The encoding used by the content, for example, utf-8 for Unicode text or binary for binary data. |
These headers inform the receiver about the content in the payload of the message. This allows you to send arbitrary data while providing enough information so the content can be decoded and interpreted correctly by the receiver. Since the headers are in a dictionary, it’s easy to add additional headers by inserting key/value pairs as needed.
Sending an Application Message
There’s still a bit of a problem. We have a variable-length header, which is nice and flexible, but how do you know the length of the header when reading it with recv()?
When we previously talked about using recv() and message boundaries, I mentioned that fixed-length headers can be inefficient. That’s true, but we’re going to use a small, 2-byte, fixed-length header to prefix the JSON header that contains its length.
You can think of this as a hybrid approach to sending messages. In effect, we’re bootstrapping the message receive process by sending the length of the header first. This makes it easy for our receiver to deconstruct the message.
To give you a better idea of the message format, let’s look at a message in its entirety:

A message starts with a fixed-length header of 2 bytes that’s an integer in network byte order. This is the length of the next header, the variable-length JSON header. Once we’ve read 2 bytes with recv(), then we know we can process the 2 bytes as an integer and then read that number of bytes before decoding the UTF-8 JSON header.
The JSON header contains a dictionary of additional headers. One of those is content-length, which is the number of bytes of the message’s content (not including the JSON header). Once we’ve called recv() and read content-length bytes, we’ve reached a message boundary and read an entire message.
Application Message Class
Finally, the payoff! Let’s look at the Message class and see how it’s used with select() when read and write events happen on the socket.
For this example application, I had to come up with an idea for what types of messages the client and server would use. We’re far beyond toy echo clients and servers at this point.
To keep things simple and still demonstrate how things would work in a real application, I created an application protocol that implements a basic search feature. The client sends a search request and the server does a lookup for a match. If the request sent by the client isn’t recognized as a search, the server assumes it’s a binary request and returns a binary response.
After reading the following sections, running the examples, and experimenting with the code, you’ll see how things work. You can then use the Message class as a starting point and modify it for you own use.
We’re really not that far off from the “multiconn” client and server example. The event loop code stays the same in app-client.py and app-server.py. What I’ve done is move the message code into a class named Message and added methods to support reading, writing, and processing of the headers and content. This is a great example for using a class.
As we discussed before and you’ll see below, working with sockets involves keeping state. By using a class, we keep all of the state, data, and code bundled together in an organized unit. An instance of the class is created for each socket in the client and server when a connection is started or accepted.
The class is mostly the same for both the client and the server for the wrapper and utility methods. They start with an underscore, like Message._json_encode(). These methods simplify working with the class. They help other methods by allowing them to stay shorter and support the DRY principle.
The server’s Message class works in essentially the same way as the client’s and vice-versa. The difference being that the client initiates the connection and sends a request message, followed by processing the server’s response message. Conversely, the server waits for a connection, processes the client’s request message, and then sends a response message.
It looks like this:
| Step | Endpoint | Action / Message Content |
|---|---|---|
| 1 | Client | Sends a Message containing request content |
| 2 | Server | Receives and processes client request Message |
| 3 | Server | Sends a Message containing response content |
| 4 | Client | Receives and processes server response Message |
Here’s the file and code layout:
| Application | File | Code |
|---|---|---|
| Server | app-server.py |
The server’s main script |
| Server | libserver.py |
The server’s Message class |
| Client | app-client.py |
The client’s main script |
| Client | libclient.py |
The client’s Message class |
Message Entry Point
I’d like to discuss how the Message class works by first mentioning an aspect of its design that wasn’t immediately obvious to me. Only after refactoring it at least five times did I arrive at what it is currently. Why? Managing state.
After a Message object is created, it’s associated with a socket that’s monitored for events using selector.register():
message = libserver.Message(sel, conn, addr)
sel.register(conn, selectors.EVENT_READ, data=message)
Note: Some of the code examples in this section are from the server’s main script and Message class, but this section and discussion applies equally to the client as well. I’ll show and explain the client’s version when it differs.
When events are ready on the socket, they’re returned by selector.select(). We can then get a reference back to the message object using the data attribute on the key object and call a method in Message:
while True:
    events = sel.select(timeout=None)
    for key, mask in events:
        # ...
        message = key.data
        message.process_events(mask)
Looking at the event loop above, you’ll see that sel.select() is in the driver’s seat. It’s blocking, waiting at the top of the loop for events. It’s responsible for waking up when read and write events are ready to be processed on the socket. Which means, indirectly, it’s also responsible for calling the method process_events(). This is what I mean when I say the method process_events() is the entry point.
Let’s see what the process_events() method does:
def process_events(self, mask):
    if mask & selectors.EVENT_READ:
        self.read()
    if mask & selectors.EVENT_WRITE:
        self.write()
That’s good: process_events() is simple. It can only do two things: call read() and write().
This brings us back to managing state. After a few refactorings, I decided that if another method depended on state variables having a certain value, then they would only be called from read() and write(). This keeps the logic as simple as possible as events come in on the socket for processing.
This may seem obvious, but the first few iterations of the class were a mix of some methods that checked the current state and, depending on their value, called other methods to process data outside read() or write(). In the end, this proved too complex to manage and keep up with.
You should definitely modify the class to suit your own needs so it works best for you, but I’d recommend that you keep the state checks and the calls to methods that depend on that state to the read() and write() methods if possible.
Let’s look at read(). This is the server’s version, but the client’s is the same. It just uses a different method name, process_response() instead of process_request():
def read(self):
    self._read()

    if self._jsonheader_len is None:
        self.process_protoheader()

    if self._jsonheader_len is not None:
        if self.jsonheader is None:
            self.process_jsonheader()

    if self.jsonheader:
        if self.request is None:
            self.process_request()
The _read() method is called first. It calls socket.recv() to read data from the socket and store it in a receive buffer.
Remember that when socket.recv() is called, all of the data that makes up a complete message may not have arrived yet. socket.recv() may need to be called again. This is why there are state checks for each part of the message before calling the appropriate method to process it.
Before a method processes its part of the message, it first checks to make sure enough bytes have been read into the receive buffer. If there are, it processes its respective bytes, removes them from the buffer and writes its output to a variable that’s used by the next processing stage. Since there are three components to a message, there are three state checks and process method calls:
| Message Component | Method | Output |
|---|---|---|
| Fixed-length header | process_protoheader() |
self._jsonheader_len |
| JSON header | process_jsonheader() |
self.jsonheader |
| Content | process_request() |
self.request |
Next, let’s look at write(). This is the server’s version:
def write(self):
    if self.request:
        if not self.response_created:
            self.create_response()

    self._write()
write() checks first for a request. If one exists and a response hasn’t been created, create_response() is called. create_response() sets the state variable response_created and writes the response to the send buffer.
The _write() method calls socket.send() if there’s data in the send buffer.
Remember that when socket.send() is called, all of the data in the send buffer may not have been queued for transmission. The network buffers for the socket may be full, and socket.send() may need to be called again. This is why there are state checks. create_response() should only be called once, but it’s expected that _write() will need to be called multiple times.
The client version of write() is similar:
def write(self):
    if not self._request_queued:
        self.queue_request()

    self._write()

    if self._request_queued:
        if not self._send_buffer:
            # Set selector to listen for read events, we're done writing.
            self._set_selector_events_mask('r')
Since the client initiates a connection to the server and sends a request first, the state variable _request_queued is checked. If a request hasn’t been queued, it calls queue_request(). queue_request() creates the request and writes it to the send buffer. It also sets the state variable _request_queued so it’s only called once.
Just like the server, _write() calls socket.send() if there’s data in the send buffer.
The notable difference in the client’s version of write() is the last check to see if the request has been queued. This will be explained more in the section Client Main Script, but the reason for this is to tell selector.select() to stop monitoring the socket for write events. If the request has been queued and the send buffer is empty, then we’re done writing and we’re only interested in read events. There’s no reason to be notified that the socket is writable.
I’ll wrap up this section by leaving you with one thought. The main purpose of this section was to explain that selector.select() is calling into the Message class via the method process_events() and to describe how state is managed.
This is important because process_events() will be called many times over the life of the connection. Therefore, make sure that any methods that should only be called once are either checking a state variable themselves, or the state variable set by the method is checked by the caller.
Server Main Script
In the server’s main script app-server.py, arguments are read from the command line that specify the interface and port to listen on:
$ ./app-server.py
usage: ./app-server.py <host> <port>
For example, to listen on the loopback interface on port 65432, enter:
$ ./app-server.py 127.0.0.1 65432
listening on ('127.0.0.1', 65432)
Use an empty string for <host> to listen on all interfaces.
After creating the socket, a call is made to socket.setsockopt() with the option socket.SO_REUSEADDR:
# Avoid bind() exception: OSError: [Errno 48] Address already in use
lsock.setsockopt(socket.SOL_SOCKET, socket.SO_REUSEADDR, 1)
Setting this socket option avoids the error Address already in use. You’ll see this when starting the server and a previously used TCP socket on the same port has connections in the TIME_WAIT state.
For example, if the server actively closed a connection, it will remain in the TIME_WAIT state for two minutes or more, depending on the operating system. If you try to start the server again before the TIME_WAIT state expires, you’ll get an OSError exception of Address already in use. This is a safeguard to make sure that any delayed packets in the network aren’t delivered to the wrong application.
The event loop catches any errors so the server can stay up and continue to run:
while True:
    events = sel.select(timeout=None)
    for key, mask in events:
        if key.data is None:
            accept_wrapper(key.fileobj)
        else:
            message = key.data
            try:
                message.process_events(mask)
            except Exception:
                print('main: error: exception for',
                      f'{message.addr}:n{traceback.format_exc()}')
                message.close()
When a client connection is accepted, a Message object is created:
def accept_wrapper(sock):
    conn, addr = sock.accept()  # Should be ready to read
    print('accepted connection from', addr)
    conn.setblocking(False)
    message = libserver.Message(sel, conn, addr)
    sel.register(conn, selectors.EVENT_READ, data=message)
The Message object is associated with the socket in the call to sel.register() and is initially set to be monitored for read events only. Once the request has been read, we’ll modify it to listen for write events only.
An advantage of taking this approach in the server is that in most cases, when a socket is healthy and there are no network issues, it will always be writable.
If we told sel.register() to also monitor EVENT_WRITE, the event loop would immediately wakeup and notify us that this is the case. However, at this point, there’s no reason to wake up and call send() on the socket. There’s no response to send since a request hasn’t been processed yet. This would consume and waste valuable CPU cycles.
Server Message Class
In the section Message Entry Point, we looked at how the Message object was called into action when socket events were ready via process_events(). Now let’s look at what happens as data is read on the socket and a component, or piece, of the message is ready to be processed by the server.
The server’s message class is in libserver.py. You can find the source code on GitHub.
The methods appear in the class in the order in which processing takes place for a message.
When the server has read at least 2 bytes, the fixed-length header can be processed:
def process_protoheader(self):
    hdrlen = 2
    if len(self._recv_buffer) >= hdrlen:
        self._jsonheader_len = struct.unpack('>H',
                                             self._recv_buffer[:hdrlen])[0]
        self._recv_buffer = self._recv_buffer[hdrlen:]
The fixed-length header is a 2-byte integer in network (big-endian) byte order that contains the length of the JSON header. struct.unpack() is used to read the value, decode it, and store it in self._jsonheader_len. After processing the piece of the message it’s responsible for, process_protoheader() removes it from the receive buffer.
Just like the fixed-length header, when there’s enough data in the receive buffer to contain the JSON header, it can be processed as well:
def process_jsonheader(self):
    hdrlen = self._jsonheader_len
    if len(self._recv_buffer) >= hdrlen:
        self.jsonheader = self._json_decode(self._recv_buffer[:hdrlen],
                                            'utf-8')
        self._recv_buffer = self._recv_buffer[hdrlen:]
        for reqhdr in ('byteorder', 'content-length', 'content-type',
                       'content-encoding'):
            if reqhdr not in self.jsonheader:
                raise ValueError(f'Missing required header "{reqhdr}".')
The method self._json_decode() is called to decode and deserialize the JSON header into a dictionary. Since the JSON header is defined as Unicode with a UTF-8 encoding, utf-8 is hardcoded in the call. The result is saved to self.jsonheader. After processing the piece of the message it’s responsible for, process_jsonheader() removes it from the receive buffer.
Next is the actual content, or payload, of the message. It’s described by the JSON header in self.jsonheader. When content-length bytes are available in the receive buffer, the request can be processed:
def process_request(self):
    content_len = self.jsonheader['content-length']
    if not len(self._recv_buffer) >= content_len:
        return
    data = self._recv_buffer[:content_len]
    self._recv_buffer = self._recv_buffer[content_len:]
    if self.jsonheader['content-type'] == 'text/json':
        encoding = self.jsonheader['content-encoding']
        self.request = self._json_decode(data, encoding)
        print('received request', repr(self.request), 'from', self.addr)
    else:
        # Binary or unknown content-type
        self.request = data
        print(f'received {self.jsonheader["content-type"]} request from',
              self.addr)
    # Set selector to listen for write events, we're done reading.
    self._set_selector_events_mask('w')
After saving the message content to the data variable, process_request() removes it from the receive buffer. Then, if the content type is JSON, it decodes and deserializes it. If it’s not, for this example application, it assumes it’s a binary request and simply prints the content type.
The last thing process_request() does is modify the selector to monitor write events only. In the server’s main script, app-server.py, the socket is initially set to monitor read events only. Now that the request has been fully processed, we’re no longer interested in reading.
A response can now be created and written to the socket. When the socket is writable, create_response() is called from write():
def create_response(self):
    if self.jsonheader['content-type'] == 'text/json':
        response = self._create_response_json_content()
    else:
        # Binary or unknown content-type
        response = self._create_response_binary_content()
    message = self._create_message(**response)
    self.response_created = True
    self._send_buffer += message
A response is created by calling other methods, depending on the content type. In this example application, a simple dictionary lookup is done for JSON requests when action == 'search'. You can define other methods for your own applications that get called here.
After creating the response message, the state variable self.response_created is set so write() doesn’t call create_response() again. Finally, the response is appended to the send buffer. This is seen by and sent via _write().
One tricky bit to figure out was how to close the connection after the response is written. I put the call to close() in the method _write():
def _write(self):
    if self._send_buffer:
        print('sending', repr(self._send_buffer), 'to', self.addr)
        try:
            # Should be ready to write
            sent = self.sock.send(self._send_buffer)
        except BlockingIOError:
            # Resource temporarily unavailable (errno EWOULDBLOCK)
            pass
        else:
            self._send_buffer = self._send_buffer[sent:]
            # Close when the buffer is drained. The response has been sent.
            if sent and not self._send_buffer:
                self.close()
Although it’s somewhat “hidden,” I think it’s an acceptable trade-off given that the Message class only handles one message per connection. After the response is written, there’s nothing left for the server to do. It’s completed its work.
Client Main Script
In the client’s main script app-client.py, arguments are read from the command line and used to create requests and start connections to the server:
$ ./app-client.py
usage: ./app-client.py <host> <port> <action> <value>
Here’s an example:
$ ./app-client.py 127.0.0.1 65432 search needle
After creating a dictionary representing the request from the command-line arguments, the host, port, and request dictionary are passed to start_connection():
def start_connection(host, port, request):
    addr = (host, port)
    print('starting connection to', addr)
    sock = socket.socket(socket.AF_INET, socket.SOCK_STREAM)
    sock.setblocking(False)
    sock.connect_ex(addr)
    events = selectors.EVENT_READ | selectors.EVENT_WRITE
    message = libclient.Message(sel, sock, addr, request)
    sel.register(sock, events, data=message)
A socket is created for the server connection as well as a Message object using the request dictionary.
Like the server, the Message object is associated with the socket in the call to sel.register(). However, for the client, the socket is initially set to be monitored for both read and write events. Once the request has been written, we’ll modify it to listen for read events only.
This approach gives us the same advantage as the server: not wasting CPU cycles. After the request has been sent, we’re no longer interested in write events, so there’s no reason to wake up and process them.
Client Message Class
In the section Message Entry Point, we looked at how the message object was called into action when socket events were ready via process_events(). Now let’s look at what happens after data is read and written on the socket and a message is ready to be processed by the client.
The client’s message class is in libclient.py. You can find the source code on GitHub.
The methods appear in the class in the order in which processing takes place for a message.
The first task for the client is to queue the request:
def queue_request(self):
    content = self.request['content']
    content_type = self.request['type']
    content_encoding = self.request['encoding']
    if content_type == 'text/json':
        req = {
            'content_bytes': self._json_encode(content, content_encoding),
            'content_type': content_type,
            'content_encoding': content_encoding
        }
    else:
        req = {
            'content_bytes': content,
            'content_type': content_type,
            'content_encoding': content_encoding
        }
    message = self._create_message(**req)
    self._send_buffer += message
    self._request_queued = True
The dictionaries used to create the request, depending on what was passed on the command line, are in the client’s main script, app-client.py. The request dictionary is passed as an argument to the class when a Message object is created.
The request message is created and appended to the send buffer, which is then seen by and sent via _write(). The state variable self._request_queued is set so queue_request() isn’t called again.
After the request has been sent, the client waits for a response from the server.
The methods for reading and processing a message in the client are the same as the server. As response data is read from the socket, the process header methods are called: process_protoheader() and process_jsonheader().
The difference is in the naming of the final process methods and the fact that they’re processing a response, not creating one: process_response(), _process_response_json_content(), and _process_response_binary_content().
Last, but certainly not least, is the final call for process_response():
def process_response(self):
    # ...
    # Close when response has been processed
    self.close()
Message Class Wrapup
I’ll conclude the Message class discussion by mentioning a couple of things that are important to notice with a few of the supporting methods.
Any exceptions raised by the class are caught by the main script in its except clause:
try:
    message.process_events(mask)
except Exception:
    print('main: error: exception for',
          f'{message.addr}:n{traceback.format_exc()}')
    message.close()
Note the last line: message.close().
This is a really important line, for more than one reason! Not only does it make sure that the socket is closed, but message.close() also removes the socket from being monitored by select(). This greatly simplifies the code in the class and reduces complexity. If there’s an exception or we explicitly raise one ourselves, we know close() will take care of the cleanup.
The methods Message._read() and Message._write() also contain something interesting:
def _read(self):
    try:
        # Should be ready to read
        data = self.sock.recv(4096)
    except BlockingIOError:
        # Resource temporarily unavailable (errno EWOULDBLOCK)
        pass
    else:
        if data:
            self._recv_buffer += data
        else:
            raise RuntimeError('Peer closed.')
Note the except line: except BlockingIOError:.
_write() has one too. These lines are important because they catch a temporary error and skip over it using pass. The temporary error is when the socket would block, for example if it’s waiting on the network or the other end of the connection (its peer).
By catching and skipping over the exception with pass, select() will eventually call us again, and we’ll get another chance to read or write the data.
Running the Application Client and Server
After all of this hard work, let’s have some fun and run some searches!
In these examples, I’ll run the server so it listens on all interfaces by passing an empty string for the host argument. This will allow me to run the client and connect from a virtual machine that’s on another network. It emulates a big-endian PowerPC machine.
First, let’s start the server:
$ ./app-server.py '' 65432
listening on ('', 65432)
Now let’s run the client and enter a search. Let’s see if we can find him:
$ ./app-client.py 10.0.1.1 65432 search morpheus
starting connection to ('10.0.1.1', 65432)
sending b'x00d{"byteorder": "big", "content-type": "text/json", "content-encoding": "utf-8", "content-length": 41}{"action": "search", "value": "morpheus"}' to ('10.0.1.1', 65432)
received response {'result': 'Follow the white rabbit. 🐰'} from ('10.0.1.1', 65432)
got result: Follow the white rabbit. 🐰
closing connection to ('10.0.1.1', 65432)
My terminal is running a shell that’s using a text encoding of Unicode (UTF-8), so the output above prints nicely with emojis.
Let’s see if we can find the puppies:
$ ./app-client.py 10.0.1.1 65432 search 🐶
starting connection to ('10.0.1.1', 65432)
sending b'x00d{"byteorder": "big", "content-type": "text/json", "content-encoding": "utf-8", "content-length": 37}{"action": "search", "value": "xf0x9fx90xb6"}' to ('10.0.1.1', 65432)
received response {'result': '🐾 Playing ball! 🏐'} from ('10.0.1.1', 65432)
got result: 🐾 Playing ball! 🏐
closing connection to ('10.0.1.1', 65432)
Notice the byte string sent over the network for the request in the sending line. It’s easier to see if you look for the bytes printed in hex that represent the puppy emoji: xf0x9fx90xb6. I was able to enter the emoji for the search since my terminal is using Unicode with the encoding UTF-8.
This demonstrates that we’re sending raw bytes over the network and they need to be decoded by the receiver to be interpreted correctly. This is why we went to all of the trouble to create a header that contains the content type and encoding.
Here’s the server output from both client connections above:
accepted connection from ('10.0.2.2', 55340)
received request {'action': 'search', 'value': 'morpheus'} from ('10.0.2.2', 55340)
sending b'x00g{"byteorder": "little", "content-type": "text/json", "content-encoding": "utf-8", "content-length": 43}{"result": "Follow the white rabbit. xf0x9fx90xb0"}' to ('10.0.2.2', 55340)
closing connection to ('10.0.2.2', 55340)

accepted connection from ('10.0.2.2', 55338)
received request {'action': 'search', 'value': '🐶'} from ('10.0.2.2', 55338)
sending b'x00g{"byteorder": "little", "content-type": "text/json", "content-encoding": "utf-8", "content-length": 37}{"result": "xf0x9fx90xbe Playing ball! xf0x9fx8fx90"}' to ('10.0.2.2', 55338)
closing connection to ('10.0.2.2', 55338)
Look at the sending line to see the bytes that were written to the client’s socket. This is the server’s response message.
You can also test sending binary requests to the server if the action argument is anything other than search:
$ ./app-client.py 10.0.1.1 65432 binary 😃
starting connection to ('10.0.1.1', 65432)
sending b'x00|{"byteorder": "big", "content-type": "binary/custom-client-binary-type", "content-encoding": "binary", "content-length": 10}binaryxf0x9fx98x83' to ('10.0.1.1', 65432)
received binary/custom-server-binary-type response from ('10.0.1.1', 65432)
got response: b'First 10 bytes of request: binaryxf0x9fx98x83'
closing connection to ('10.0.1.1', 65432)
Since the request’s content-type is not text/json, the server treats it as a custom binary type and doesn’t perform JSON decoding. It simply prints the content-type and returns the first 10 bytes to the client:
$ ./app-server.py '' 65432
listening on ('', 65432)
accepted connection from ('10.0.2.2', 55320)
received binary/custom-client-binary-type request from ('10.0.2.2', 55320)
sending b'x00x7f{"byteorder": "little", "content-type": "binary/custom-server-binary-type", "content-encoding": "binary", "content-length": 37}First 10 bytes of request: binaryxf0x9fx98x83' to ('10.0.2.2', 55320)
closing connection to ('10.0.2.2', 55320)
Troubleshooting
Inevitably, something won’t work, and you’ll be wondering what to do. Don’t worry, it happens to all of us. Hopefully, with the help of this tutorial, your debugger, and favorite search engine, you’ll be able to get going again with the source code part.
If not, your first stop should be Python’s socket module documentation. Make sure you read all of the documentation for each function or method you’re calling. Also, read through the Reference section for ideas. In particular, check the Errors section.
Sometimes, it’s not all about the source code. The source code might be correct, and it’s just the other host, the client or server. Or it could be the network, for example, a router, firewall, or some other networking device that’s playing man-in-the-middle.
For these types of issues, additional tools are essential. Below are a few tools and utilities that might help or at least provide some clues.
ping
ping will check if a host is alive and connected to the network by sending an ICMP echo request. It communicates directly with the operating system’s TCP/IP protocol stack, so it works independently from any application running on the host.
Below is an example of running ping on macOS:
$ ping -c 3 127.0.0.1
PING 127.0.0.1 (127.0.0.1): 56 data bytes
64 bytes from 127.0.0.1: icmp_seq=0 ttl=64 time=0.058 ms
64 bytes from 127.0.0.1: icmp_seq=1 ttl=64 time=0.165 ms
64 bytes from 127.0.0.1: icmp_seq=2 ttl=64 time=0.164 ms

--- 127.0.0.1 ping statistics ---
3 packets transmitted, 3 packets received, 0.0% packet loss
round-trip min/avg/max/stddev = 0.058/0.129/0.165/0.050 ms
Note the statistics at the end of the output. This can be helpful when you’re trying to discover intermittent connectivity problems. For example, is there any packet loss? How much latency is there (see the round-trip times)?
If there’s a firewall between you and the other host, a ping’s echo request may not be allowed. Some firewall administrators implement policies that enforce this. The idea being that they don’t want their hosts to be discoverable. If this is the case and you have firewall rules added to allow the hosts to communicate, make sure that the rules also allow ICMP to pass between them.
ICMP is the protocol used by ping, but it’s also the protocol TCP and other lower-level protocols use to communicate error messages. If you’re experiencing strange behavior or slow connections, this could be the reason.
ICMP messages are identified by type and code. To give you an idea of the important information they carry, here are a few:
| ICMP Type | ICMP Code | Description |
|---|---|---|
| 8 | 0 | Echo request |
| 0 | 0 | Echo reply |
| 3 | 0 | Destination network unreachable |
| 3 | 1 | Destination host unreachable |
| 3 | 2 | Destination protocol unreachable |
| 3 | 3 | Destination port unreachable |
| 3 | 4 | Fragmentation required, and DF flag set |
| 11 | 0 | TTL expired in transit |
See the article Path MTU Discovery for information regarding fragmentation and ICMP messages. This is an example of something that can cause strange behavior that I mentioned previously.
netstat
In the section Viewing Socket State, we looked at how netstat can be used to display information about sockets and their current state. This utility is available on macOS, Linux, and Windows.
I didn’t mention the columns Recv-Q and Send-Q in the example output. These columns will show you the number of bytes that are held in network buffers that are queued for transmission or receipt, but for some reason haven’t been read or written by the remote or local application.
In other words, the bytes are waiting in network buffers in the operating system’s queues. One reason could be the application is CPU bound or is otherwise unable to call socket.recv() or socket.send() and process the bytes. Or there could be network issues affecting communications like congestion or failing network hardware or cabling.
To demonstrate this and see how much data I could send before seeing an error, I wrote a test client that connects to a test server and repeatedly calls socket.send(). The test server never calls socket.recv(). It just accepts the connection. This causes the network buffers on the server to fill, which eventually raises an error on the client.
First, I started the server:
$ ./app-server-test.py 127.0.0.1 65432
listening on ('127.0.0.1', 65432)
Then I ran the client. Let’s see what the error is:
$ ./app-client-test.py 127.0.0.1 65432 binary test
error: socket.send() blocking io exception for ('127.0.0.1', 65432):
BlockingIOError(35, 'Resource temporarily unavailable')
Here’s the netstat output while the client and server were still running, with the client printing out the error message above multiple times:
$ netstat -an | grep 65432
Proto Recv-Q Send-Q  Local Address          Foreign Address        (state)
tcp4  408300      0  127.0.0.1.65432        127.0.0.1.53225        ESTABLISHED
tcp4       0 269868  127.0.0.1.53225        127.0.0.1.65432        ESTABLISHED
tcp4       0      0  127.0.0.1.65432        *.*                    LISTEN
The first entry is the server (Local Address has port 65432):
Proto Recv-Q Send-Q  Local Address          Foreign Address        (state)
tcp4  408300      0  127.0.0.1.65432        127.0.0.1.53225        ESTABLISHED
Notice the Recv-Q: 408300.
The second entry is the client (Foreign Address has port 65432):
Proto Recv-Q Send-Q  Local Address          Foreign Address        (state)
tcp4       0 269868  127.0.0.1.53225        127.0.0.1.65432        ESTABLISHED
Notice the Send-Q: 269868.
The client sure was trying to write bytes, but the server wasn’t reading them. This caused the server’s network buffer queue to fill on the receive side and the client’s network buffer queue to fill on the send side.
Windows
If you work with Windows, there’s a suite of utilities that you should definitely check out if you haven’t already: Windows Sysinternals.
One of them is TCPView.exe. TCPView is a graphical netstat for Windows. In addition to addresses, port numbers, and socket state, it will show you running totals for the number of packets and bytes, sent and received. Like the Unix utility lsof, you also get the process name and ID. Check the menus for other display options.
Wireshark
Sometimes you need to see what’s happening on the wire. Forget about what the application log says or what the value is that’s being returned from a library call. You want to see what’s actually being sent or received on the network. Just like debuggers, when you need to see it, there’s no substitute.
Wireshark is a network protocol analyzer and traffic capture application that runs on macOS, Linux, and Windows, among others. There’s a GUI version named wireshark, and also a terminal, text-based version named tshark.
Running a traffic capture is a great way to watch how an application behaves on the network and gather evidence about what it sends and receives, and how often and how much. You’ll also be able to see when a client or server closes or aborts a connection or stops responding. This information can be extremely helpful when you are troubleshooting.
There are many good tutorials and other resources on the web that will walk you through the basics of using Wireshark and TShark.
Here’s an example of a traffic capture using Wireshark on the loopback interface:
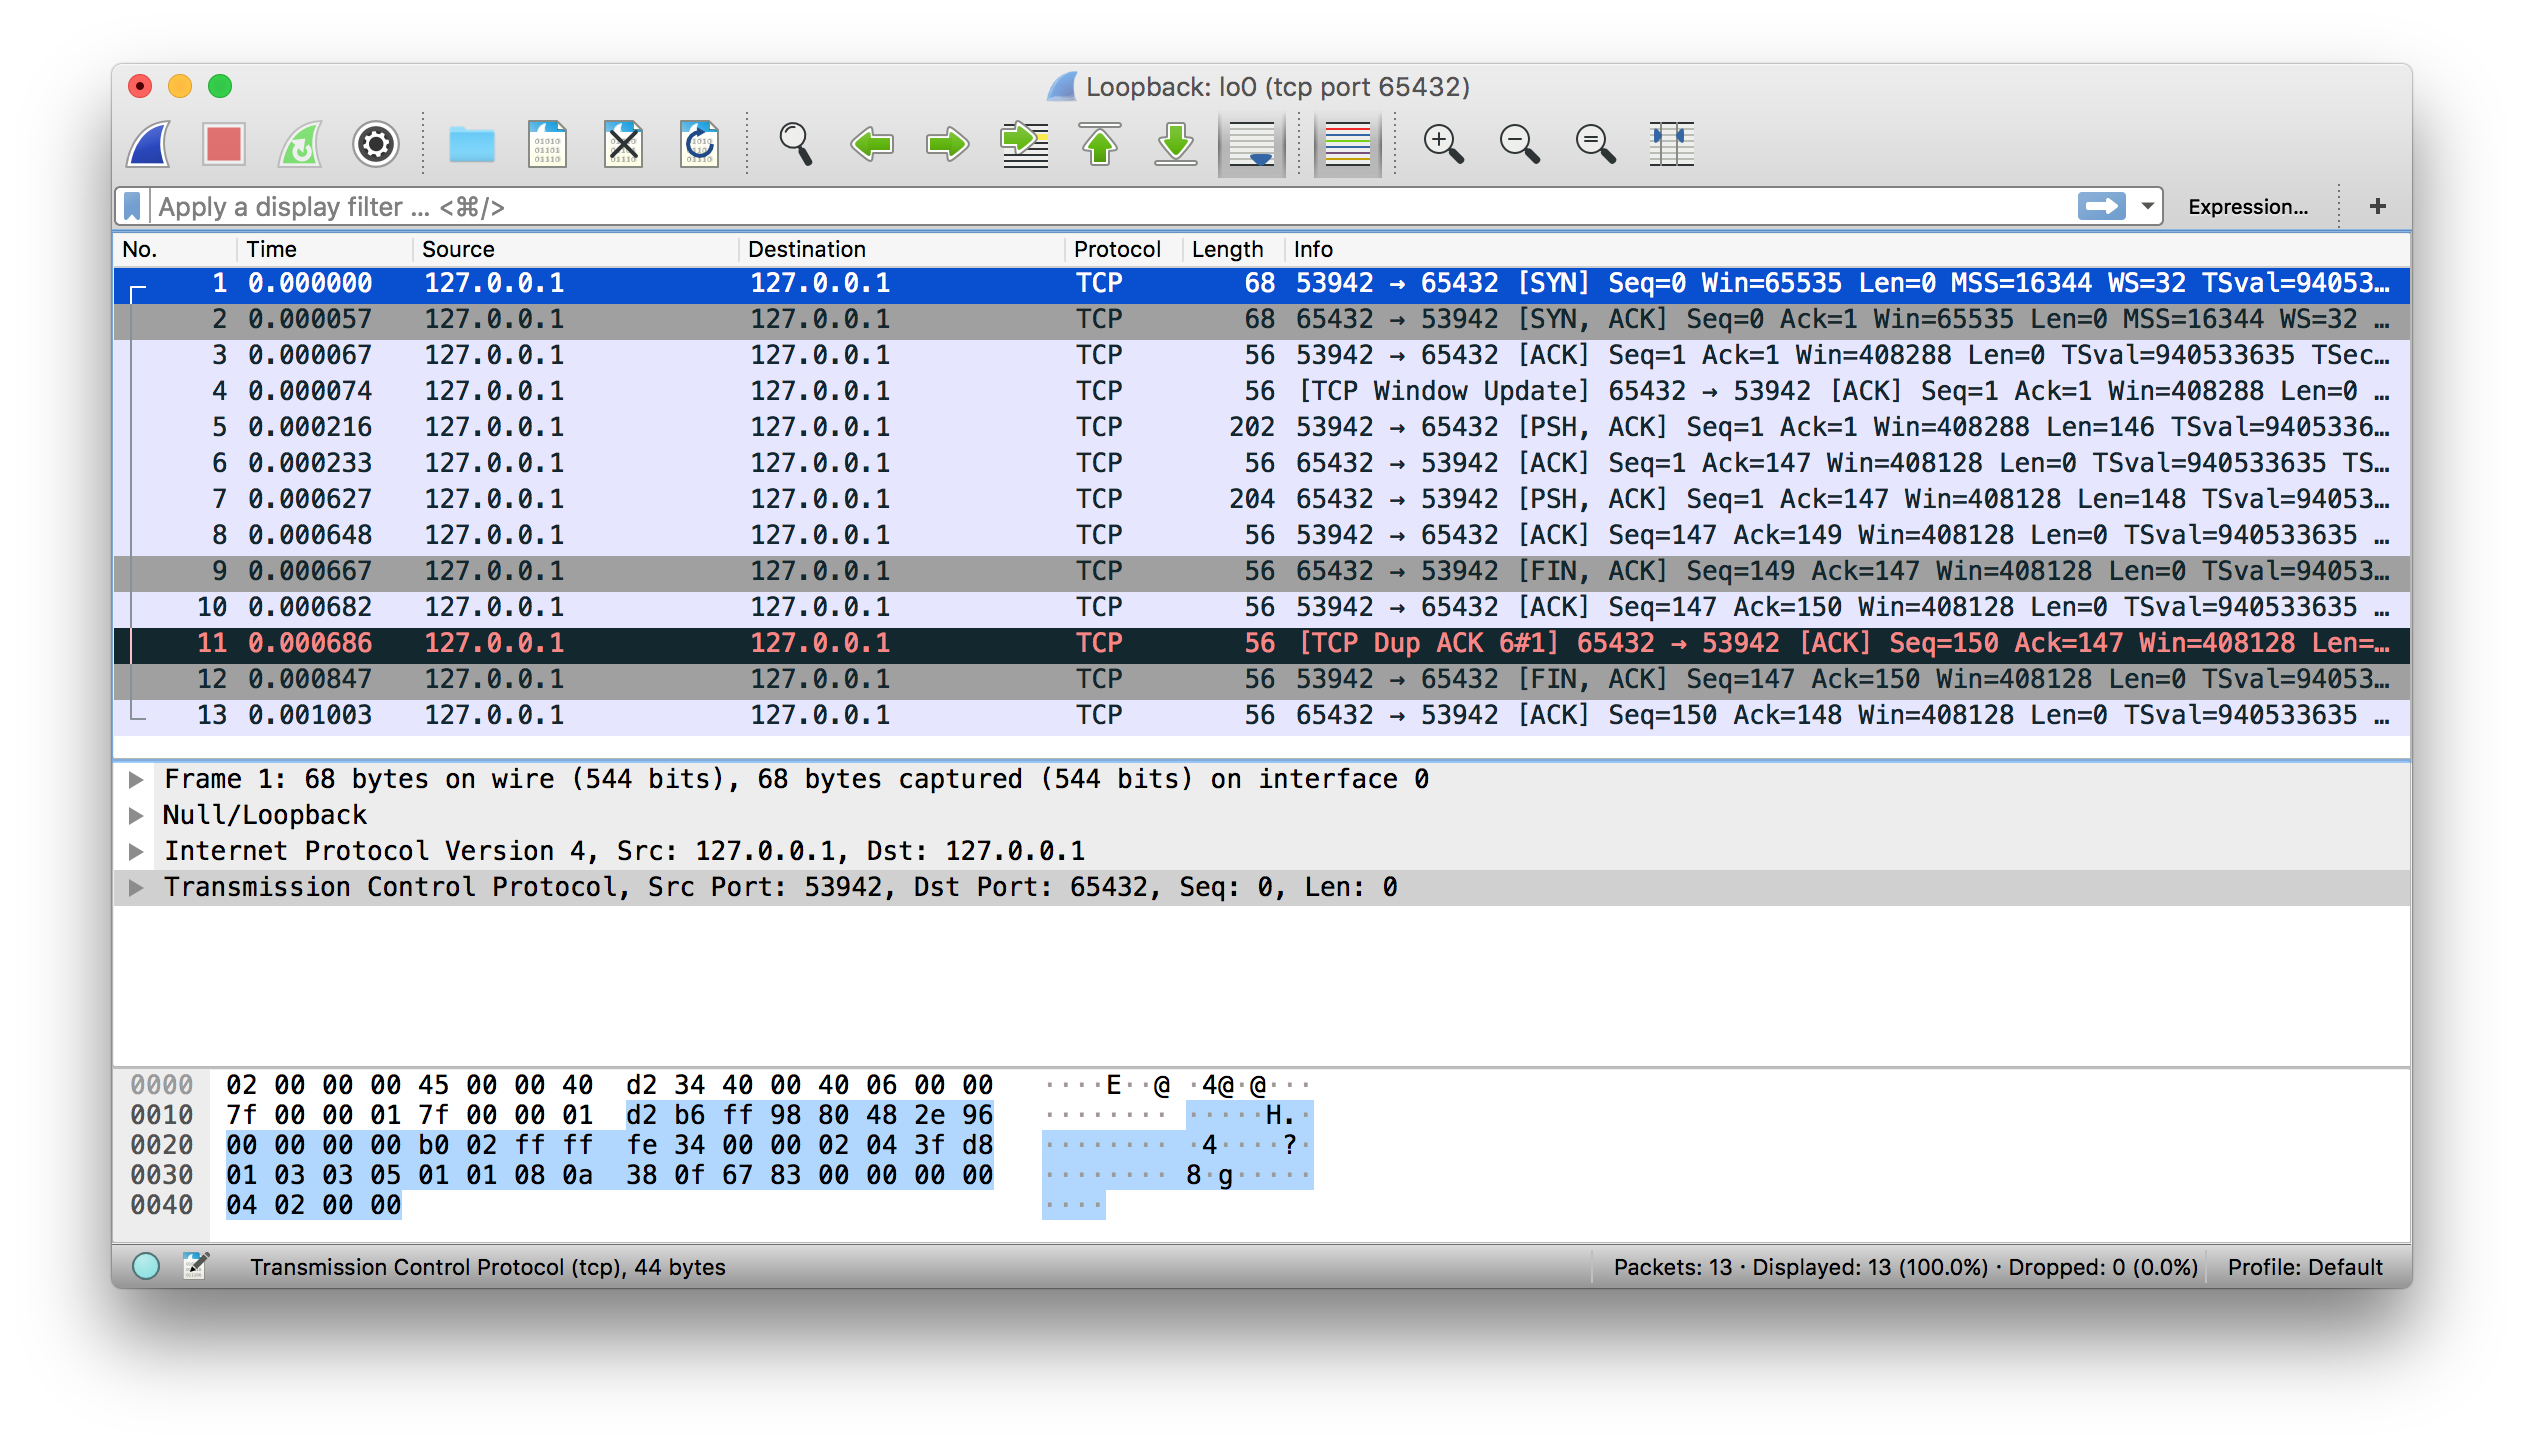
Here’s the same example shown above using tshark:
$ tshark -i lo0 'tcp port 65432'
Capturing on 'Loopback'
    1   0.000000    127.0.0.1 → 127.0.0.1    TCP 68 53942 → 65432 [SYN] Seq=0 Win=65535 Len=0 MSS=16344 WS=32 TSval=940533635 TSecr=0 SACK_PERM=1
    2   0.000057    127.0.0.1 → 127.0.0.1    TCP 68 65432 → 53942 [SYN, ACK] Seq=0 Ack=1 Win=65535 Len=0 MSS=16344 WS=32 TSval=940533635 TSecr=940533635 SACK_PERM=1
    3   0.000068    127.0.0.1 → 127.0.0.1    TCP 56 53942 → 65432 [ACK] Seq=1 Ack=1 Win=408288 Len=0 TSval=940533635 TSecr=940533635
    4   0.000075    127.0.0.1 → 127.0.0.1    TCP 56 [TCP Window Update] 65432 → 53942 [ACK] Seq=1 Ack=1 Win=408288 Len=0 TSval=940533635 TSecr=940533635
    5   0.000216    127.0.0.1 → 127.0.0.1    TCP 202 53942 → 65432 [PSH, ACK] Seq=1 Ack=1 Win=408288 Len=146 TSval=940533635 TSecr=940533635
    6   0.000234    127.0.0.1 → 127.0.0.1    TCP 56 65432 → 53942 [ACK] Seq=1 Ack=147 Win=408128 Len=0 TSval=940533635 TSecr=940533635
    7   0.000627    127.0.0.1 → 127.0.0.1    TCP 204 65432 → 53942 [PSH, ACK] Seq=1 Ack=147 Win=408128 Len=148 TSval=940533635 TSecr=940533635
    8   0.000649    127.0.0.1 → 127.0.0.1    TCP 56 53942 → 65432 [ACK] Seq=147 Ack=149 Win=408128 Len=0 TSval=940533635 TSecr=940533635
    9   0.000668    127.0.0.1 → 127.0.0.1    TCP 56 65432 → 53942 [FIN, ACK] Seq=149 Ack=147 Win=408128 Len=0 TSval=940533635 TSecr=940533635
   10   0.000682    127.0.0.1 → 127.0.0.1    TCP 56 53942 → 65432 [ACK] Seq=147 Ack=150 Win=408128 Len=0 TSval=940533635 TSecr=940533635
   11   0.000687    127.0.0.1 → 127.0.0.1    TCP 56 [TCP Dup ACK 6#1] 65432 → 53942 [ACK] Seq=150 Ack=147 Win=408128 Len=0 TSval=940533635 TSecr=940533635
   12   0.000848    127.0.0.1 → 127.0.0.1    TCP 56 53942 → 65432 [FIN, ACK] Seq=147 Ack=150 Win=408128 Len=0 TSval=940533635 TSecr=940533635
   13   0.001004    127.0.0.1 → 127.0.0.1    TCP 56 65432 → 53942 [ACK] Seq=150 Ack=148 Win=408128 Len=0 TSval=940533635 TSecr=940533635
^C13 packets captured
Reference
This section serves as a general reference with additional information and links to external resources.
Python Documentation
- Python’s socket module
- Python’s Socket Programming HOWTO
Errors
The following is from Python’s socket module documentation:
“All errors raise exceptions. The normal exceptions for invalid argument types and out-of-memory conditions can be raised; starting from Python 3.3, errors related to socket or address semantics raise
OSErroror one of its subclasses.” (Source)
Here are some common errors you’ll probably encounter when working with sockets:
| Exception | errno Constant |
Description |
|---|---|---|
| BlockingIOError | EWOULDBLOCK | Resource temporarily unavailable. For example, in non-blocking mode, when calling send() and the peer is busy and not reading, the send queue (network buffer) is full. Or there are issues with the network. Hopefully this is a temporary condition. |
| OSError | EADDRINUSE | Address already in use. Make sure there’s not another process running that’s using the same port number and your server is setting the socket option SO_REUSEADDR: socket.setsockopt(socket.SOL_SOCKET, socket.SO_REUSEADDR, 1). |
| ConnectionResetError | ECONNRESET | Connection reset by peer. The remote process crashed or did not close its socket properly (unclean shutdown). Or there’s a firewall or other device in the network path that’s missing rules or misbehaving. |
| TimeoutError | ETIMEDOUT | Operation timed out. No response from peer. |
| ConnectionRefusedError | ECONNREFUSED | Connection refused. No application listening on specified port. |
Socket Address Families
socket.AF_INET and socket.AF_INET6 represent the address and protocol families used for the first argument to socket.socket(). APIs that use an address expect it to be in a certain format, depending on whether the socket was created with socket.AF_INET or socket.AF_INET6.
| Address Family | Protocol | Address Tuple | Description |
|---|---|---|---|
socket.AF_INET |
IPv4 | (host, port) |
host is a string with a hostname like 'www.example.com' or an IPv4 address like '10.1.2.3'. port is an integer. |
socket.AF_INET6 |
IPv6 | (host, port, flowinfo, scopeid) |
host is a string with a hostname like 'www.example.com' or an IPv6 address like 'fe80::6203:7ab:fe88:9c23'. port is an integer. flowinfo and scopeid represent the sin6_flowinfo and sin6_scope_id members in the C struct sockaddr_in6. |
Note the excerpt below from Python’s socket module documentation regarding the host value of the address tuple:
“For IPv4 addresses, two special forms are accepted instead of a host address: the empty string represents
INADDR_ANY, and the string'<broadcast>'representsINADDR_BROADCAST. This behavior is not compatible with IPv6, therefore, you may want to avoid these if you intend to support IPv6 with your Python programs.” (Source)
See Python’s Socket families documentation for more information.
I’ve used IPv4 sockets in this tutorial, but if your network supports it, try testing and using IPv6 if possible. One way to support this easily is by using the function socket.getaddrinfo(). It translates the host and port arguments into a sequence of 5-tuples that contains all of the necessary arguments for creating a socket connected to that service. socket.getaddrinfo() will understand and interpret passed-in IPv6 addresses and hostnames that resolve to IPv6 addresses, in addition to IPv4.
The following example returns address information for a TCP connection to example.org on port 80:
>>> socket.getaddrinfo("example.org", 80, proto=socket.IPPROTO_TCP)
[(<AddressFamily.AF_INET6: 10>, <SocketType.SOCK_STREAM: 1>,
 6, '', ('2606:2800:220:1:248:1893:25c8:1946', 80, 0, 0)),
 (<AddressFamily.AF_INET: 2>, <SocketType.SOCK_STREAM: 1>,
 6, '', ('93.184.216.34', 80))]
Results may differ on your system if IPv6 isn’t enabled. The values returned above can be used by passing them to socket.socket() and socket.connect(). There’s a client and server example in the Example section of Python’s socket module documentation.
Using Hostnames
For context, this section applies mostly to using hostnames with bind() and connect(), or connect_ex(), when you intend to use the loopback interface, “localhost.” However, it applies any time you’re using a hostname and there’s an expectation of it resolving to a certain address and having a special meaning to your application that affects its behavior or assumptions. This is in contrast to the typical scenario of a client using a hostname to connect to a server that’s resolved by DNS, like www.example.com.
The following is from Python’s socket module documentation:
“If you use a hostname in the host portion of IPv4/v6 socket address, the program may show a non-deterministic behavior, as Python uses the first address returned from the DNS resolution. The socket address will be resolved differently into an actual IPv4/v6 address, depending on the results from DNS resolution and/or the host configuration. For deterministic behavior use a numeric address in host portion.” (Source)
The standard convention for the name “localhost” is for it to resolve to 127.0.0.1 or ::1, the loopback interface. This will more than likely be the case for you on your system, but maybe not. It depends on how your system is configured for name resolution. As with all things IT, there are always exceptions, and there are no guarantees that using the name “localhost” will connect to the loopback interface.
For example, on Linux, see man nsswitch.conf, the Name Service Switch configuration file. Another place to check on macOS and Linux is the file /etc/hosts. On Windows, see C:WindowsSystem32driversetchosts. The hosts file contains a static table of name to address mappings in a simple text format. DNS is another piece of the puzzle altogether.
Interestingly enough, as of this writing (June 2018), there’s an RFC draft Let ‘localhost’ be localhost that discusses the conventions, assumptions and security around using the name “localhost.”
What’s important to understand is that when you use hostnames in your application, the returned address(es) could literally be anything. Don’t make assumptions regarding a name if you have a security-sensitive application. Depending on your application and environment, this may or may not be a concern for you.
Note: Security precautions and best practices still apply, even if your application isn’t “security-sensitive.” If your application accesses the network, it should be secured and maintained. This means, at a minimum:
-
System software updates and security patches are applied regularly, including Python. Are you using any third party libraries? If so, make sure those are checked and updated too.
-
If possible, use a dedicated or host-based firewall to restrict connections to trusted systems only.
-
What DNS servers are configured? Do you trust them and their administrators?
-
Make sure that request data is sanitized and validated as much as possible prior to calling other code that processes it. Use (fuzz) tests for this and run them regularly.
Regardless of whether or not you’re using hostnames, if your application needs to support secure connections (encryption and authentication), you’ll probably want to look into using TLS. This is its own separate topic and beyond the scope of this tutorial. See Python’s ssl module documentation to get started. This is the same protocol that your web browser uses to connect securely to web sites.
With interfaces, IP addresses, and name resolution to consider, there are many variables. What should you do? Here are some recommendations that you can use if you don’t have a network application review process:
| Application | Usage | Recommendation |
|---|---|---|
| Server | loopback interface | Use an IP address, for example, 127.0.0.1 or ::1. |
| Server | ethernet interface | Use an IP address, for example, 10.1.2.3. To support more than one interface, use an empty string for all interfaces/addresses. See the security note above. |
| Client | loopback interface | Use an IP address, for example, 127.0.0.1 or ::1. |
| Client | ethernet interface | Use an IP address for consistency and non-reliance on name resolution. For the typical case, use a hostname. See the security note above. |
For clients or servers, if you need to authenticate the host you’re connecting to, look into using TLS.
Blocking Calls
A socket function or method that temporarily suspends your application is a blocking call. For example, accept(), connect(), send(), and recv() “block.” They don’t return immediately. Blocking calls have to wait on system calls (I/O) to complete before they can return a value. So you, the caller, are blocked until they’re done or a timeout or other error occurs.
Blocking socket calls can be set to non-blocking mode so they return immediately. If you do this, you’ll need to at least refactor or redesign your application to handle the socket operation when it’s ready.
Since the call returns immediately, data may not be ready. The callee is waiting on the network and hasn’t had time to complete its work. If this is the case, the current status is the errno value socket.EWOULDBLOCK. Non-blocking mode is supported with setblocking().
By default, sockets are always created in blocking mode. See Notes on socket timeouts for a description of the three modes.
Closing Connections
An interesting thing to note with TCP is it’s completely legal for the client or server to close their side of the connection while the other side remains open. This is referred to as a “half-open” connection. It’s the application’s decision whether or not this is desirable. In general, it’s not. In this state, the side that’s closed their end of the connection can no longer send data. They can only receive it.
I’m not advocating that you take this approach, but as an example, HTTP uses a header named “Connection” that’s used to standardize how applications should close or persist open connections. For details, see section 6.3 in RFC 7230, Hypertext Transfer Protocol (HTTP/1.1): Message Syntax and Routing.
When designing and writing your application and its application-layer protocol, it’s a good idea to go ahead and work out how you expect connections to be closed. Sometimes this is obvious and simple, or it’s something that can take some initial prototyping and testing. It depends on the application and how the message loop is processed with its expected data. Just make sure that sockets are always closed in a timely manner after they complete their work.
Byte Endianness
See Wikipedia’s article on endianness for details on how different CPUs store byte orderings in memory. When interpreting individual bytes, this isn’t a problem. However, when handling multiple bytes that are read and processed as a single value, for example a 4-byte integer, the byte order needs to be reversed if you’re communicating with a machine that uses a different endianness.
Byte order is also important for text strings that are represented as multi-byte sequences, like Unicode. Unless you’re always using “true,” strict ASCII and control the client and server implementations, you’re probably better off using Unicode with an encoding like UTF-8 or one that supports a byte order mark (BOM).
It’s important to explicitly define the encoding used in your application-layer protocol. You can do this by mandating that all text is UTF-8 or using a “content-encoding” header that specifies the encoding. This prevents your application from having to detect the encoding, which you should avoid if possible.
This becomes problematic when there is data involved that’s stored in files or a database and there’s no metadata available that specifies its encoding. When the data is transferred to another endpoint, it will have to try to detect the encoding. For a discussion, see Wikipedia’s Unicode article that references RFC 3629: UTF-8, a transformation format of ISO 10646:
“However RFC 3629, the UTF-8 standard, recommends that byte order marks be forbidden in protocols using UTF-8, but discusses the cases where this may not be possible. In addition, the large restriction on possible patterns in UTF-8 (for instance there cannot be any lone bytes with the high bit set) means that it should be possible to distinguish UTF-8 from other character encodings without relying on the BOM.” (Source)
The takeaway from this is to always store the encoding used for data that’s handled by your application if it can vary. In other words, try to somehow store the encoding as metadata if it’s not always UTF-8 or some other encoding with a BOM. Then you can send that encoding in a header along with the data to tell the receiver what it is.
The byte ordering used in TCP/IP is big-endian and is referred to as network order. Network order is used to represent integers in lower layers of the protocol stack, like IP addresses and port numbers. Python’s socket module includes functions that convert integers to and from network and host byte order:
| Function | Description |
|---|---|
socket.ntohl(x) |
Convert 32-bit positive integers from network to host byte order. On machines where the host byte order is the same as network byte order, this is a no-op; otherwise, it performs a 4-byte swap operation. |
socket.ntohs(x) |
Convert 16-bit positive integers from network to host byte order. On machines where the host byte order is the same as network byte order, this is a no-op; otherwise, it performs a 2-byte swap operation. |
socket.htonl(x) |
Convert 32-bit positive integers from host to network byte order. On machines where the host byte order is the same as network byte order, this is a no-op; otherwise, it performs a 4-byte swap operation. |
socket.htons(x) |
Convert 16-bit positive integers from host to network byte order. On machines where the host byte order is the same as network byte order, this is a no-op; otherwise, it performs a 2-byte swap operation. |
You can also use the struct module to pack and unpack binary data using format strings:
import struct
network_byteorder_int = struct.pack('>H', 256)
python_int = struct.unpack('>H', network_byteorder_int)[0]
Conclusion
We covered a lot of ground in this tutorial. Networking and sockets are large subjects. If you’re new to networking or sockets, don’t be discouraged by all of the terms and acronyms.
There are a lot of pieces to become familiar with in order to understand how everything works together. However, just like Python, it will start to make more sense as you get to know the individual pieces and spend more time with them.
We looked at the low-level socket API in Python’s socket module and saw how it can be used to create client-server applications. We also created our own custom class and used it as an application-layer protocol to exchange messages and data between endpoints. You can use this class and build upon it to learn and help make creating your own socket applications easier and faster.
You can find the source code on GitHub.
Congratulations on making it to the end! You are now well on your way to using sockets in your own applications.
I hope this tutorial has given you the information, examples, and inspiration needed to start you on your sockets development journey.
[ Improve Your Python With 🐍 Python Tricks 💌 – Get a short & sweet Python Trick delivered to your inbox every couple of days. >> Click here to learn more and see examples ]