Jupyter Notebook uses kernels to execute code interactively. The Jupyter Notebook server runs kernels as separate processes on the same host by default. However, there are scenarios where it would be necessary or beneficial to have the Notebook server use kernels that run remotely.
A good example is when you want to use notebooks to explore and analyze large data sets on an Apache Spark cluster that runs in the cloud. In this case, the notebook kernel becomes the Spark driver program, and the Spark architecture dictates that drivers run as close as possible to the cluster, preferably on the same local area network [1].
To run Jupyter Notebook with remote kernels, first you need a kernel server that exposes an API to manage and communicate with kernels. Second, you need to modify the default behavior of the Notebook server, which is to spawn kernels as local processes on the same host.
The Jupyter Kernel Gateway satisifies the first need. It allows clients to provision and communicate with kernels using HTTP and web socket protocols.
Jupyter Notebook 4.2 introduced server extensions to make it possible to extend (or modify) the Notebook server behavior. I leveraged this new capabilitiy and created a demo server extension to modify the Notebook server to use remote kernels hosted by the Kernel Gateway. For lack of a better name, I called it nb2kg.
We can visualize the Jupyter Notebook components in the diagram below, which was taken from the Jupyter documentation.
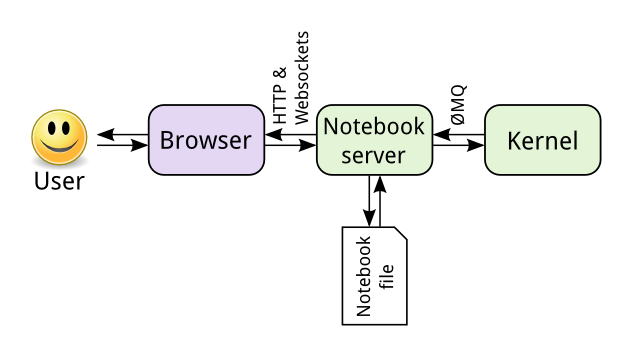
The key points are:
- The Notebook web UI (browser) and the Notebook server communicate using HTTP and web socket protocols.
- By default, the Notebook server spawns kernels on the same host as the server.
- The server and kernel processes communicate using ZeroMQ.
The nb2kg extension essentially proxies all kernel requests and web socket communication from the notebook web UI to a Kernel Gateway. Using the extension, the browser to server to kernel communication looks like this:

Try It
This section provides an example of running a Jupyter Kernel Gateway and the Jupyter Notebook server with the nb2kg extension in a conda environment. (The nb2kg Kernel Gateway demo also includes Dockerfiles and a docker-compose recipe if you care to try it using Docker).
First, open a terminal and create and activate a new conda environment. Install Jupyter Notebook version 4.2 or later.
|
conda create —yes —name nb2kg notebook==4.2 source activate nb2kg |
Use pip to install the Kernel Gateway, and start it on port 8889.
|
pip install jupyter_kernel_gateway==0.6.0 jupyter kernelgateway —KernelGatewayApp.port=8889 |
Open a second terminal and attach to the nb2kg conda environment.
|
1 |
source activate nb2kg |
Install and enable the nb2kg Jupyter Notebook server extension.
|
pip install “git+https://github.com/jupyter/kernel_gateway_demos.git#egg=nb2kg&subdirectory=nb2kg” jupyter serverextension enable —py nb2kg —sys–prefix |
You can ensure that the extension is enabled using:
|
1 2 3 4 5 6 |
jupyter serverextension list config dir: /Users/jtyberg/anaconda3/envs/nb2kg/etc/jupyter nb2kg enabled – Validating... nb2kg OK |
Finally, start the notebook server. The nb2kg extension requires that you set the KG_URL environment variable to the URL of the Kernel Gateway. It also requires that you override the default session, kernel, and kernel spec managers when you start the notebook.
|
export KG_URL=http://127.0.0.1:8889 jupyter notebook —NotebookApp.session_manager_class=nb2kg.managers.SessionManager —NotebookApp.kernel_manager_class=nb2kg.managers.RemoteKernelManager —NotebookApp.kernel_spec_manager_class=nb2kg.managers.RemoteKernelSpecManager |
If things are working properly, you should see output similar to:
|
1 2 3 4 5 6 7 8 9 10 11 12 13 |
[W 20:09:18.462 NotebookApp] Unrecognized JSON config file version, assuming version 1 [W 20:09:18.463 NotebookApp] Unrecognized JSON config file version, assuming version 1 [I 20:09:18.897 NotebookApp] Loaded nb2kg extension [I 20:09:18.898 NotebookApp] Overriding handler URLSpec(‘/api/kernelspecs/(?P[w.-]+)$’, , kwargs={}, name=None) [I 20:09:18.898 NotebookApp] Overriding handler URLSpec(‘/api/kernelspecs$’, , kwargs={}, name=None) [I 20:09:18.898 NotebookApp] Overriding handler URLSpec(‘/api/kernels/(?Pw+-w+-w+-w+-w+)/channels$’, , kwargs={}, name=None) [I 20:09:18.898 NotebookApp] Overriding handler URLSpec(‘/api/kernels/(?Pw+-w+-w+-w+-w+)/(?Prestart|interrupt)$’, , kwargs={}, name=None) [I 20:09:18.898 NotebookApp] Overriding handler URLSpec(‘/api/kernels/(?Pw+-w+-w+-w+-w+)$’, , kwargs={}, name=None) [I 20:09:18.898 NotebookApp] Overriding handler URLSpec(‘/api/kernels$’, , kwargs={}, name=None) [I 20:09:18.902 NotebookApp] Serving notebooks from local directory: /Users/jtyberg [I 20:09:18.902 NotebookApp] 0 active kernels [I 20:09:18.902 NotebookApp] The Jupyter Notebook is running at: http://localhost:8888/ [I 20:09:18.902 NotebookApp] Use Control–C to stop this server and shut down all kernels (twice to skip confirmation). |
A web browser window should open to the notebook server home page (in this case http://localhost:8888/tree). You should be able to create and use notebooks as normal, with the following caveats:
- When you enable the nb2kg extension, all kernels run on the configured Kernel Gateway, instead of on the Notebook server host. (The extension does not support local kernels).
- Keep in mind that notebooks and other files reside on the Notebook server, and remote kernels may not be able to access them.
[1] Apache Spark cluster documentation