The speed of modern electronic devices allows us to crunch large amounts of data at home. However, these devices require the right software in order to reach peak performance. Luckily, it’s now easier than ever to set up your own data science environment.
One of the most popular stacks for data science is PyData, a collection of software packages within Python. Python is one of the most common languages in data science, largely thanks to its wide selection of user-made packages.

In this tutorial, we’ll show you how to set up a fully functional PyData stack on your local Windows machine. This will give you full control over your installed environment and give you a first taste of what you’ll need to know when setting up more advanced configurations in the cloud. To install the stack, we’ll be making use of Anaconda, a popular Python distribution released by Continuum Analytics. It contains all the packages and tools to get started with data science, including Python packages and editors.

By default, Anaconda includes over 100 packages with over 600 additional packages available through the included package manager. Some of the most notable packages are the following:
- NumPy: A popular linear algebra package that greatly facilitates and accelerates numerical computations in Python.
- SciPy: Includes functions for common mathematical operations, such as integration, derivation and numerical optimization, which can be used with NumPy objects.
- Pandas: Builds on NumPy to work flexibly with labeled data and provides easy access to various analysis and visualization routines.
- Scikit-learn: The most popular Python machine learning library, includes many popular models to perform predictive analytics, as well as pre- and post-processing of data.
- StatsModels: Similar to scikit-learn, aimed at performing classical descriptive statistics.
- Matplotlib: A popular generic plotting library including line, bar, and scatter plots. Can be accessed through pandas.
- Seaborn: A statistical visualization library building on matplotlib, including plotting of distributions and heatmaps.
- Basemap: A library enabling the plotting of geographical data (i.e. to plot data on maps); also built on matplotlib.
A full list of included packages can be found here.
Besides Python packages, various desktop applications are also included. Others, such as RStudio, can be installed with a single click. The currently preinstalled programs are:
- Jupyter Notebook: A web server application that allows you to interactively run Python and visualize your data within your browser.
- Jupyter Qt console: Similar to jupyter notebook, allows you to run python interactively and visualize your data, but from a command-line window.
- Spyder: A more advanced Python editor that includes features such as interactive testing, debugging, and introspection.
Installing the PyData stack with Anaconda
Setting up PyData with Anaconda is usually a painless process. The standard distribution contains the most commonly-used packages and requires little custom configuration. Other packages can be easily added using the package manager. In the following sections, we’ll walk you through the installation process.
Choosing your installer
First, you’ll have to download the appropriate version of Anaconda from their download page. Installers are available for Windows, macOS and Linux. While we’ll focus on the installation procedure on Windows, much of the information found in this article will work on other operating systems. Different installers are also available for different Python versions. In this tutorial, we’ll be using the recommended latest version of Python: 3.6.
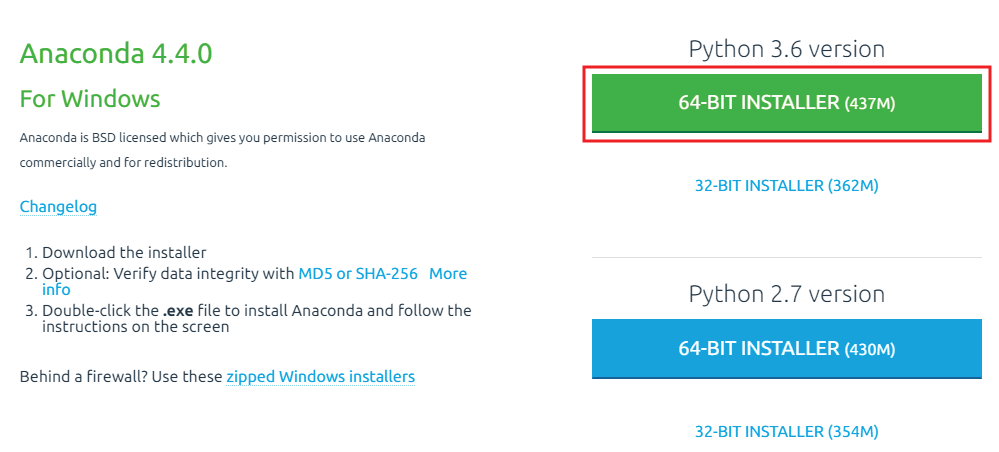
You can also choose between a 32-bit and 64-bit version of the distribution. Typically 64-bit is recommended as this will allow you to use more than 3.5 GB of memory, an amount commonly consumed when working with big data. You should only download the 32-bit package if you’re running an old computer that doesn’t support 64-bit.
The installation process
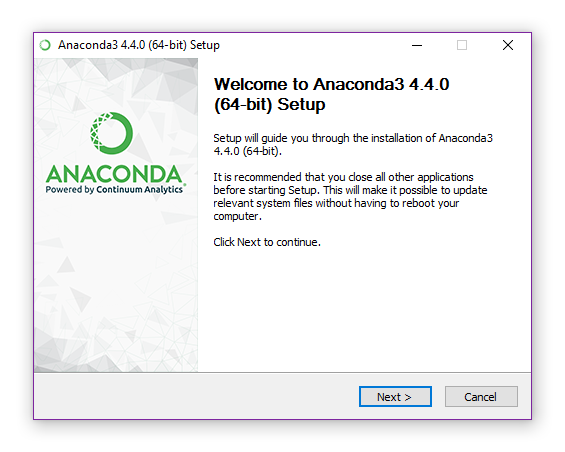
- Once the installer is downloaded, simply run it by double-clicking. The installer will open the window shown in the image below; click Next.
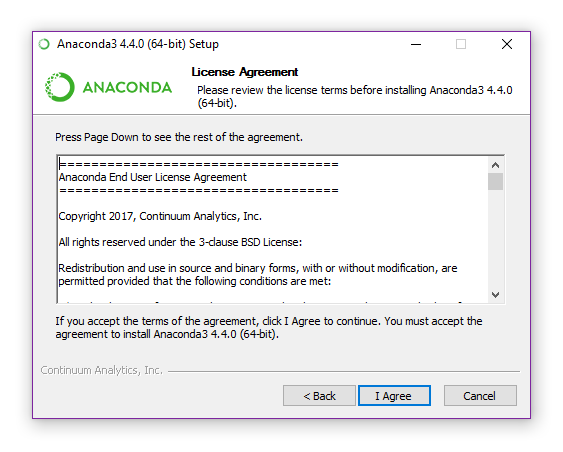
- A welcome screen will appear with the license agreement for Anaconda. Once you’re comfortable, accept the license by clicking I Agree.
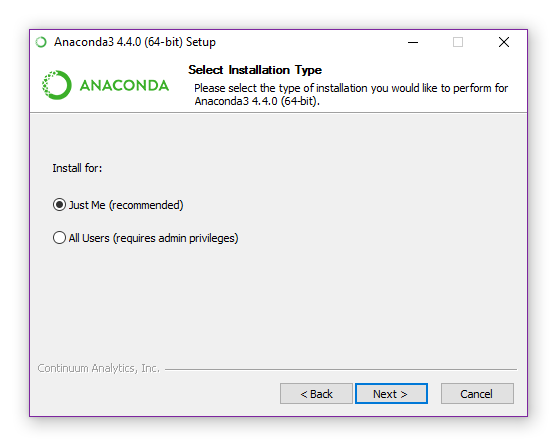
- The next window will let you choose to install just for yourself or for all users. Choose the former unless you plan to access Anaconda from other user accounts on the same computer. After making your choice, click Next.
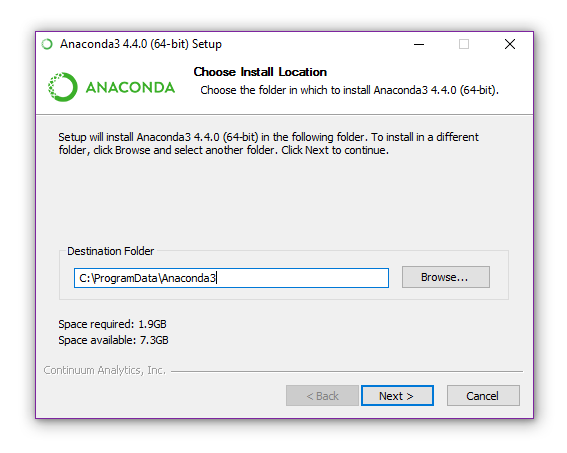
- Now you can choose where to install Anaconda. The default path will be fine in most cases. If you live in a non-English speaking country, ensure the path does not contain any special characters. Once you have selected the appropriate path, click Next.
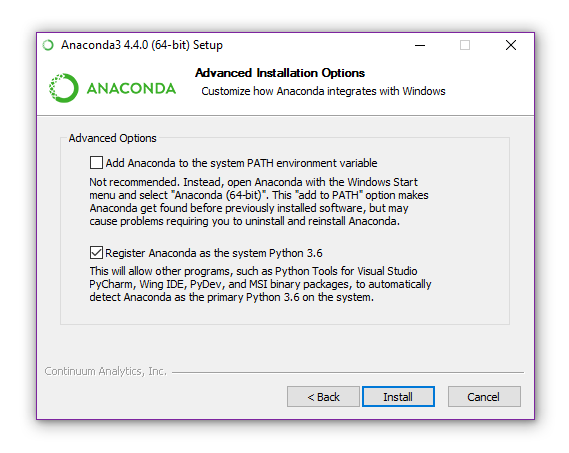
- The next page allows you to customize the integration options with Windows. Under normal circumstances, the default option should be fine. If you have another Python version you would like to keep as default then the bottom checkbox can be unticked. The first radio button modifies your global PATH; selecting it is generally not recommended unless you know what you’re doing. Finally, click Install and the installation process will begin.
Exploring Anaconda with Anaconda Navigator
Once the installation finishes, there will be an Anaconda folder in your start menu. Inside you will find a shortcut to Anaconda Navigator, which serves as a portal to the various software packages and functions included in the distribution. It will allow you to quickly and easily manage your packages, projects, and environments. More advanced configuration can be performed through the Anaconda prompt, a command-line interface which we will discuss in the next section.
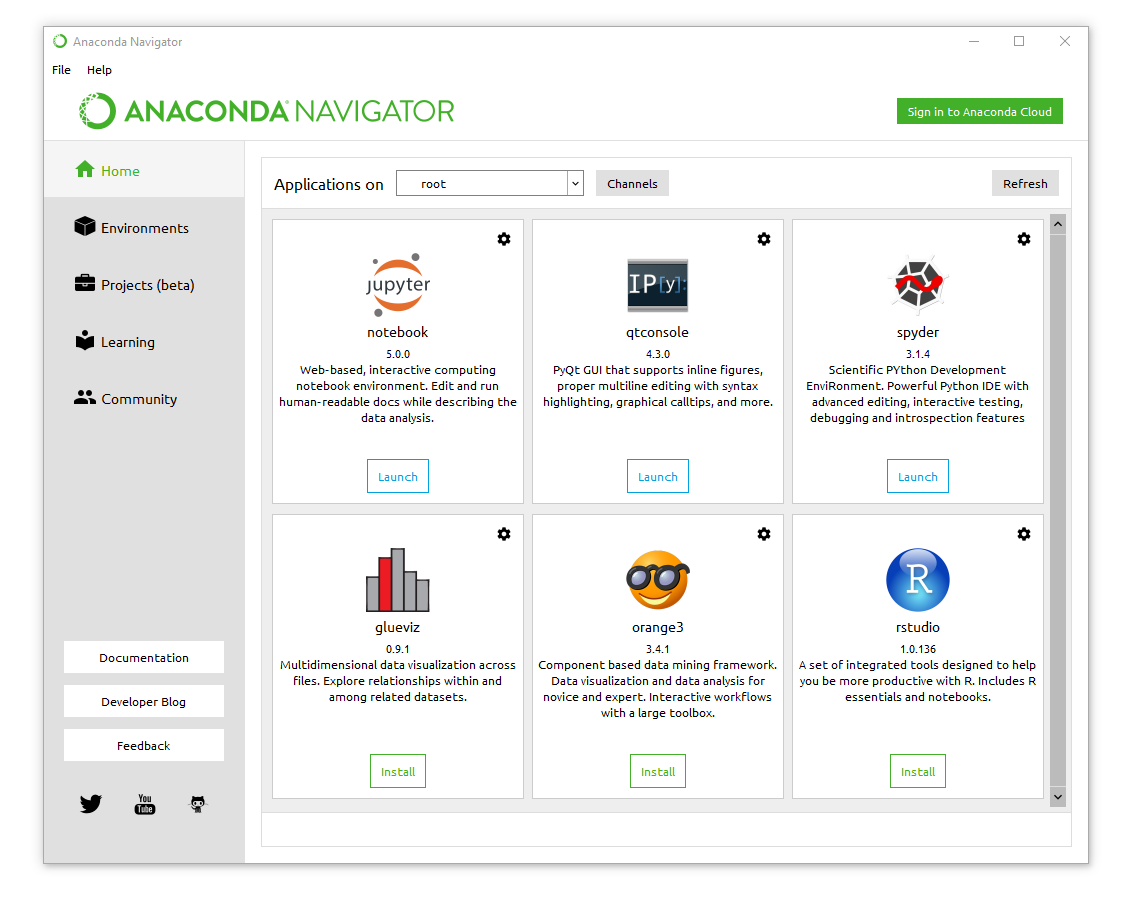
On the left side, you can see the five main tabs: Home, Environments, Projects, Learning, and Community.
Home
The home tab lists the applications currently installed through Anaconda. By default, these are Jupyter Notebook, Qt Console, and Spyder. Home also lets you install the visualization software GlueViz; data mining framework Orange; and, for those interested in R, RStudio. All applications can be installed, updated, or removed through the settings icon in the top right of each application box. You can also change the application to a specific version for compatibility reasons.
Environments
Anaconda enables you to manage your Python installation through environments. Each environment runs a specific Python version, with a limited number of packages. The specific version of the packages can be chosen during installation and more packages can be added to the environment at any time. Using environments allows you to run your Python code in a safe way, by reducing the chance of conflicts between packages. They can also be transferred between computers. By default there is only the root environment, running the latest Python version with all Anaconda packages included. More details on advanced management of environments using the Anaconda prompt will be given further in the post.
Projects
Would you like to share your personal projects with other users? With Anaconda Projects you can share them in the cloud and automate the deployment process. This includes the downloading of files, installation of packages, as well as setting environment variables and running additional files on the platforms of your choice.
Learning
Access to good information is valuable. In this tab, you’ll find a variety of learning resources including links to documentation, videos, training sessions, and webinars. The most important entries are the reference manuals of PyData’s main packages.
The community tab is there to help you reach out. It provides an overview of future events such as conferences, as well as links to various developer forums and blogs where you can get help from other PyData users.
Finally, in the top right corner, you can log in to the Anaconda Cloud where users can share packages, notebooks, projects and environments.
Advanced management with the Anaconda Prompt
While the Navigator provides good basic functionality, advanced package management is best performed through the command-line. Anaconda provides a special command prompt, Anaconda Prompt, which ensures all the necessary environment variables are properly set. We’ll be focusing on managing environments and packages with the conda command. If you’d like to learn more about the Windows command prompt, many tutorials are available online.
Conda
Python comes with a built-in package manager pip, capable of automatically installing Python packages. Many scientific packages, however, have dependencies beyond Python packages. Anaconda comes with its own generic package manager: conda, which can handle complex installation routines containing dependencies and commands unrelated to Python. Unlike pip, it also has the ability to handle environments, replacing the traditional virtualenv. In a conda environment you’ll be able to define exactly which packages and which versions you want to install. You can even change the Python version to use in the environment, in case of legacy packages. By using environments, you greatly reduce the chance of conflicts between your packages and can test various configurations without affecting your global installation.
You can get an overview of conda’s command-line options by typing the following command in the Anaconda prompt:
conda --help
which is equivalent to:
This will give you the following output:
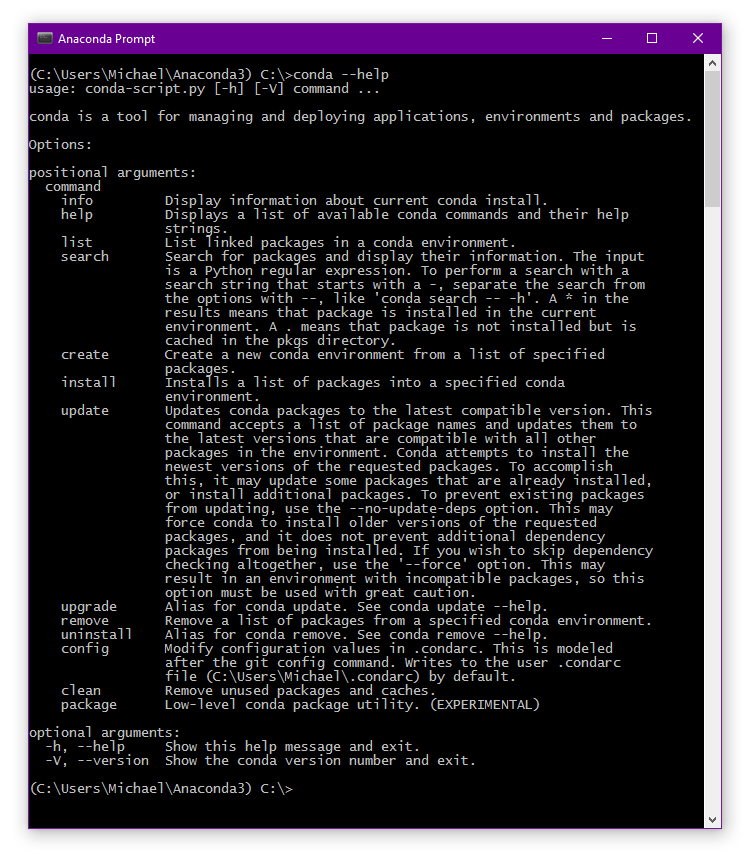
As you can see, the most important functions of conda are managing environments and packages. In the following sections, we’ll tell you how to use these functions in more detail. Note that you can always get more info about the specific command you want to execute by adding the -h flag at the end. This will give you a full overview of the available options, both in their long and short forms.
Enjoying this post? Learn data science with Dataquest!
- Learn from the comfort of your browser.
- Work with real-life data sets.
- Build a portfolio of projects.
Conda environments
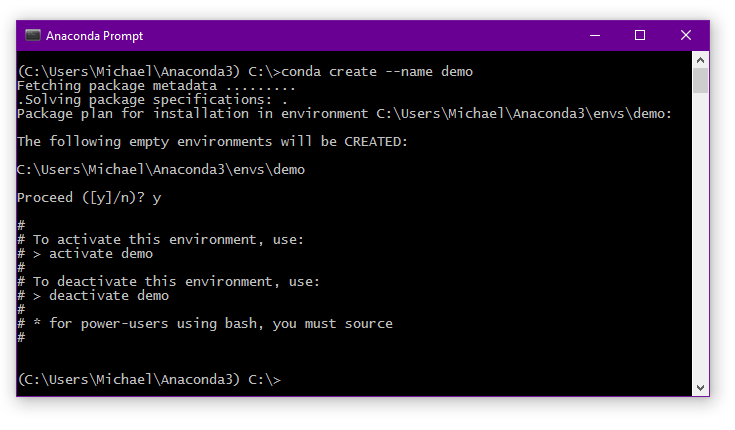
Let’s start by creating an environment called demo without any specific packages:
conda create --name demo
When asked to confirm, type y.
If you want to use a specific Python version in the environment you can add it in the command:
conda create --name demo python=2.7
Which in this case will create an environment using Python 2.7.
Similarly, if you already want to add some packages to the environment you can simply add them at the end of the line:
conda create --name demo2 python=2.7 scikit-learn statsmodels
The installed packages can be changed later, which we’ll discuss in the next section of this post.
Once the environment is created, it will show up in the environment list. You can access this list using either:
conda info --envs
or
conda env list
Both commands will give you the same output: the name of the environment and the path it is located. Your currently active environment will be marked by an asterisk. By default, this will be the ‘root’ environment, corresponding to your global Anaconda installation.
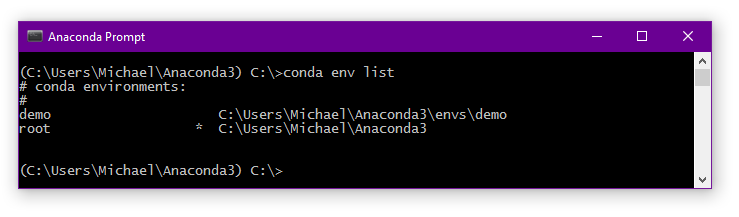
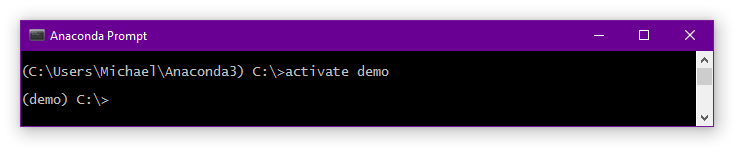
As you can see in the figure, we’re still in the root environment. Switching to the new demo environment can be done using the activate command:
activate demo
Your command-line window will now show the name of the environment at the beginning of the line.
Once you’re done, you can leave the environment by typing deactivate.
Now imagine you have fully set up your perfect environment, but you decide to make a change. The safest way to proceed is just to make an exact clone of your current environment. Let’s make an environment called demo2 which will be an exact clone of the demo environment:
conda create --name demo2 --clone demo
If we decide we don’t need it anymore we can just remove it:
conda remove --name demo2 --all
You can also make a backup of your environment, either for your own usage or to share with others. To do this, we’ll need to go back into the environment.
activate demo
We can then create an environment file of our current environment:
conda env export > demo.yml
which can be used to create an identical environment from the file as follows:
conda env create --file demo.yml
This is especially useful on another computer where you cannot clone your environment. Of course, you’ll have to make sure Anaconda Prompt is in the folder that contains your environment file.
Managing packages
Now that we’ve learned how to set up environments, let’s have a look at how to manage the packages within the environments. We already saw you can provide a list of packages to install when the environment is created:
conda create --name demo scikit-learn statsmodels
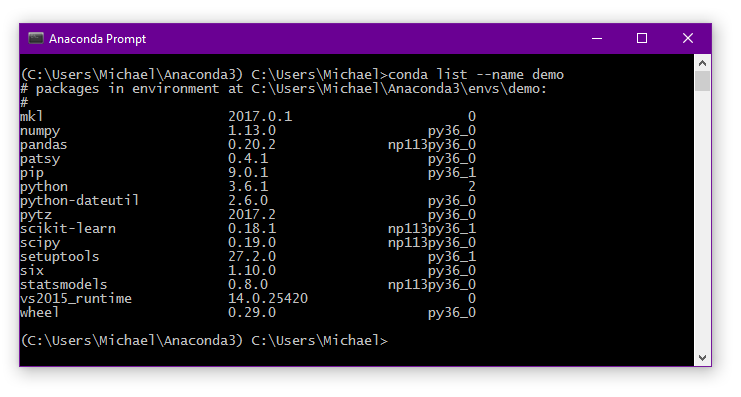
This will install not only the packages themselves, but also all dependencies. Once the environment is created you can view installed packages either using:
conda list
Within the environment or, in the case of the demo environment:
conda list --name demo
From the main Anaconda prompt.
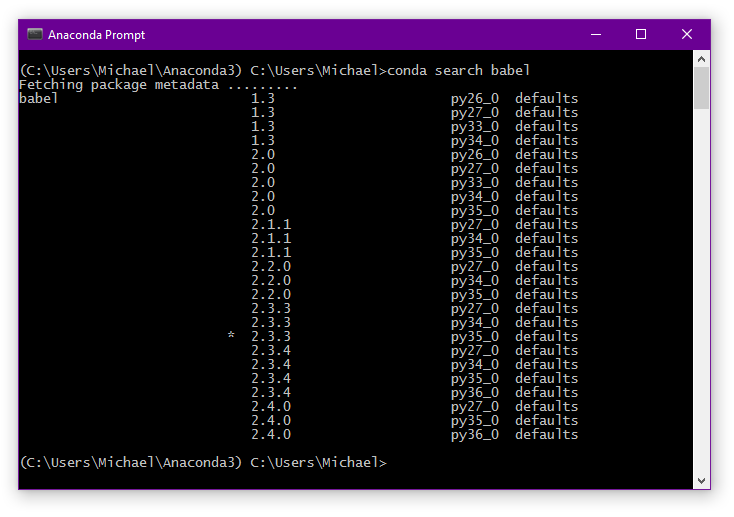
If you want to install a new package you can first search for it. For example, if we want to look for the babel package:
conda search babel
This will provide you with a list of packages containing the word babel and the available versions of each.
You can then install this package in the demo environment using the install command:
conda install --name demo babel
Omitting -n demo will install it in the currently active environment.
Later you can update the package using the update command:
conda update --name demo babel
You can even update conda itself:
conda update conda
If you decide you no longer need a package you can similarly remove it from your environment:
conda remove --name demo babel
Finally, what do you do if you cannot find the package (or package version) you’re looking for? A first option is to check the additional package channels provided by Anaconda.org. Go to Anaconda.org and use the search box to look for your package. For example, let’s install cartopy. Cartopy is a geographical plotting package being made to replace the deprecated basemap package included with Anaconda. If you search on Anaconda.org you will find it in the conda-forge channel.

It can be installed by running the following command where the -c flag indicates the channel name:
conda install --name demo --channel conda-forge cartopy
It can then be managed like any other package. What if even then you can’t find your package? Well, you can try other package managers such as pip. The latter can actually be installed and used within a conda environment:
conda install --name demo pip
Then you can use pip as normal within your environment. For example, installing the CPU version of Google’s Deep Learning library Tensorflow will require running the following pip command in your environment:
pip install --ignore-installed --upgrade tensorflow
If neither conda nor pip allows you to add your desired package you will have to check the accompanying documentation for manual installation instructions.
What’s next?
Now that you’ve completed this tutorial, you’ll be able to set up and use a PyData stack on your own Windows computer using Anaconda. You’ll also be able to manage environments and packages both using the graphical Anaconda Navigator and from the command-line using the conda package manager. Now you’re ready to start coding. Looking for inspiration? Check out our lessons and blog for code samples.