Docker is a powerful tool for spinning up isolated, reproducible application environment containers. This piece looks at just that – how to containerize a Flask app for local development along with delivering the application to a cloud hosting provider via Docker Compose and Docker Machine.
Updates:
- 11/16/2015: Updated to the latest versions of Docker – Docker client (v1.9.0), Docker compose (v1.5.0), and Docker Machine (v0.5.0)
- 04/25/2015: Fixed small typo, and updated the docker-compose.yml file to properly copy static files.
- 04/19/2015: Added a shell script for copying static files.
Interested in creating a similar environment for Django? Check out this blog post.
Local Setup
Along with Docker (v1.9.0) we’ll be using –
- Docker Compose (v1.5.0) – previously known as fig – for orchestrating a multi-container application into a single app, and
- Docker Machine (v0.5.0) for creating Docker hosts both locally and in the cloud.
Follow the directions here and here to install Docker Compose and Machine, respectively.
Running either Mac OS X or Windows, then your best bet is to install Docker Toolbox.
Test out the installs:
1 2 3 4 |
|
Next clone the project from the repository or create your own project based on the project structure found on the repo:
1 2 3 4 5 6 7 8 9 10 11 12 13 14 15 16 17 18 19 20 21 22 23 |
|
We’re now ready to get the containers up and running. Enter Docker Machine.
Docker Machine
To start Docker Machine, first make sure you’re in the project root and then simply run:
1 2 3 4 5 6 7 8 9 10 11 |
|
The create command setup a “machine” (called dev) for Docker development. In essence, it downloaded boot2docker and started a VM with Docker running. Now just point the Docker client at the dev machine via:
1
|
|
Run the following command to view the currently running Machines:
1 2 3 |
|
Next, let’s fire up the containers with Docker Compose and get the Flask app and Postgres database up and running.
Docker Compose
Take a look at the docker-compose.yml file:
1 2 3 4 5 6 7 8 9 10 11 12 13 14 15 16 17 18 19 20 21 22 23 24 25 26 27 28 29 30 31 32 33 34 35 36 37 38 |
|
Here, we’re defining four services – web, nginx, postgres, and data.
- First, the web service is built via the instructions in the Dockerfile within the “web” directory – where the Python environment is setup, requirements are installed, and the Flask app is fired up on port 8000. That port is then forwarded to port 80 on the host environment – e.g., the Docker Machine. This service also adds environment variables to the container that are defined in the .env file.
- The nginx service is used for reverse proxy to forward requests either to the Flask app or the static files.
- Next, the postgres service is built from the the official PostgreSQL image from Docker Hub, which install Postgres and runs the server on the default port 5432.
- Finally, notice how there is a separate volume container that’s used to store the database data, data. This helps ensure that the data persists even if the Postgres container is completely destroyed.
Now, to get the containers running, build the images and then start the services:
1 2 |
|
Grab a cup of coffee. Or two. Check out the Real Python courses. This will take a while the first time you run it.
We also need to create the database table:
1
|
|
Open your browser and navigate to the IP address associated with Docker Machine (docker-machine ip):
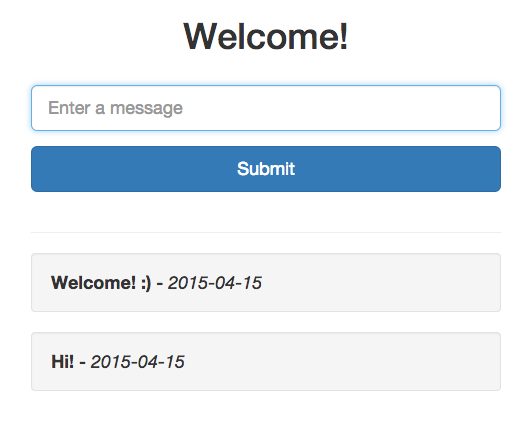
Nice!
To see which environment variables are available to the web service, run:
1
|
|
To view the logs:
1
|
|
You can also enter the Postgres Shell – since we forward the port to the host environment in the docker-compose.yml file – to add users/roles as well as databases via:
1
|
|
Once done, stop the processes via docker-compose stop.
Deployment
So, with our app running locally, we can now push this exact same environment to a cloud hosting provider with Docker Machine. Let’s deploy to a Digital Ocean droplet.
After you sign up for Digital Ocean, generate a Personal Access Token, and then run the following command:
1 2 3 4 |
|
This will take a few minutes to provision the droplet and setup a new Docker Machine called production:
1 2 3 4 5 6 7 8 9 10 |
|
Now we have two Machines running, one locally and one on Digital Ocean:
1 2 3 4 |
|
Then set production as the active machine and load the Docker environment into the shell:
1
|
|
Finally, let’s build the Flask app again in the cloud:
1 2 3 |
|
Grab the IP address associated with that Digital Ocean account from the control panel and view it in the browser. If all went well, you should see your app running.
Conclusion
Cheers!
- Grab the code from the Github repo (star it too!).
- Comment below with questions.
- Next time we’ll extend this workflow to include two more Docker containers running the Flask app and incorporate load balancing into the mix. Stay tuned!