Thus far, in our series of posts on Python development environments we’ve looked at Sublime Text and VIM:
In this post we’ll present another powerful editor for Python development – Emacs. While it’s an indisputable fact that Emacs is the best editor, we’ll (try to) keep an open mind and present Emacs objectively, from a fresh installation to a complete Python IDE so that you can make an informed decision when choosing your go-to Python IDE.
This is a guest blog post by Kyle Purdon, an Application Engineer at Bitly in Denver.
Installation and Basics
Installation
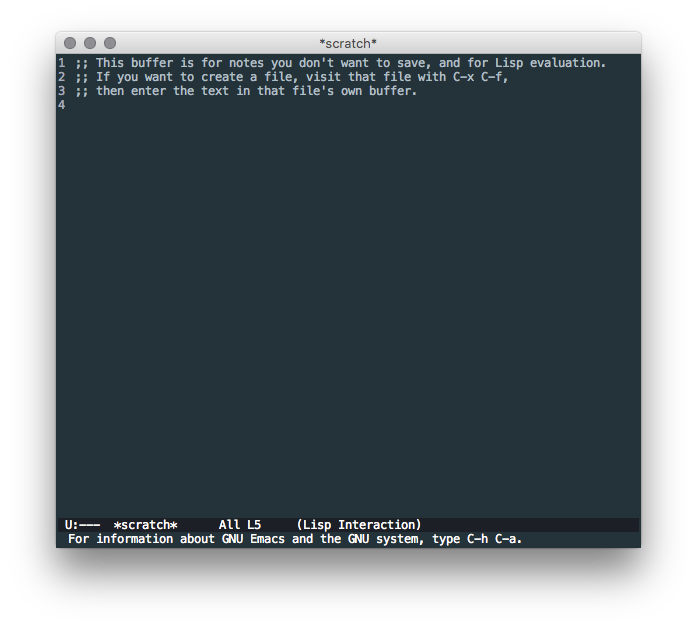
Installation of Emacs is a topic that does not need to be covered in yet another blog post. This Guide, provided by ErgoEmacs, will get you up and running with a basic Emacs installation on Linux, Mac, or Windows. Once installed, start the application and you will be greeted with the default configured Emacs:

Basic Emacs
Another topic that does not need to be covered again is the basics of using Emacs. The easiest way to learn Emacs is to follow the built-in tutorial. The topics covered in this post do not require that you know how to use Emacs yet; instead, each topic highlights what you can do after learning the basics.
To enter the tutorial, use your arrow keys to position the cursor over the words “Emacs Tutorial” and press Enter. You will then be greeted with the following passage:
1 2 3 4 5 6 7 8 9 |
|
So, key entries/commands like C-x C-s (which is used to save) will be shown throughout the remainder of the post. This command indicates that the CONTROL and X key are pressed at the same time, and then the CONTROL and S key. This is the basic form of interacting with Emacs. Please follow the built-in tutorial as well as the Guided Tour of Emacs to learn more.
Configuration and Packages
One of the great benefits of Emacs is the simplicity and power of configuration. The core of Emacs configuration is the Initialization File, init.el.
In a UNIX environment this file should be placed in $HOME/.emacs.d/init.el:
1
|
|
Meanwhile, in Windows, if the HOME environment variable is not set, this file should reside in C:/.emacs.d/init.el. See GNU Emacs FAQ for MS Windows > Where do I put my init file? for more info.
Configuration snippets will be presented throughout the post. So, create the init file now if you want to follow along. Otherwise you can find the complete file in the Conclusion.
Packages are used to customize Emacs, which are sourced from a number of repositories. The primary Emacs package repository is MELPA. All of the packages presented in this post will be installed from this repository.
Styling (Themes & More)
To begin, the following configuration snippet provides package installation and installs a theme package:
1 2 3 4 5 6 7 8 9 10 11 12 13 14 15 16 17 18 19 20 21 22 23 24 25 26 27 28 29 30 31 |
|
The first section of the configuration snippet, ;; INSTALL PACKAGES, installs two packages called better-defaults and material-theme. The better-defaults package is a collection of minor changes to the Emacs defaults that makes a great base to begin customizing from. The material-theme package provides a customized set of styles.
My preferred theme is material-theme, so we’ll be using that for the rest of the post.
The second section ;; BASIC CUSTOMIZATION:
- Disables the startup message (this is the screen with all the tutorial information). You may want to leave this out until you are more comfortable with Emacs.
- Loads the material theme.
- Enables line numbers globally.
Enabling something globally means that it will apply to all buffers (open items) in Emacs. So if you open a Python, markdown, and/or text file, they will all have line numbers shown. You can also enable things per mode – e.g., python-mode, markdown-mode, text-mode. This will be shown later when setting up Python.
Now that we have a complete basic configuration file we can restart Emacs and see the changes. If you placed the init.el file in the correct default location it will automatically be picked up.
As an alternative, you can start Emacs from the command-line with emacs -q --load <path to init.el>. When loaded, our initial Emacs window looks a bit nicer:
The following image shows some other basic features that come with Emacs out of the box – including simple file searching and split layouts:
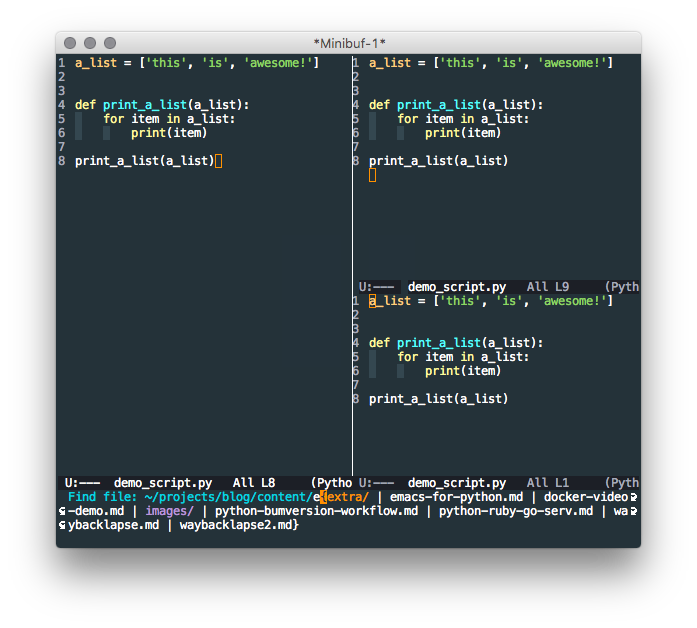
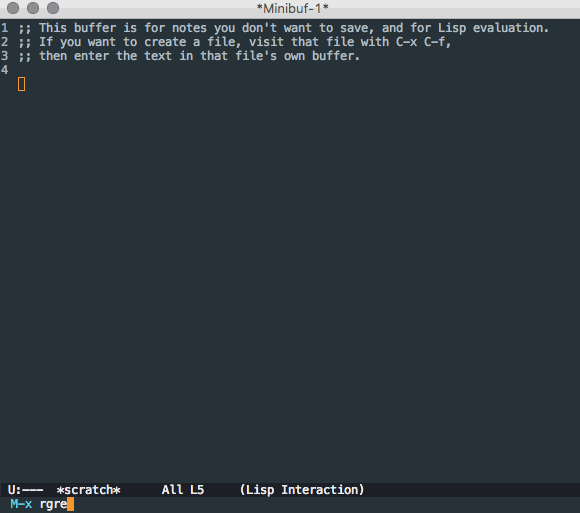
One of my favorite simple features of Emacs is being able to do a quick recursive-grep search – M-x rgrep For example, say you want to find all instances of the word python in any .md (markdown) in a given directory:
With this basic configuration complete we can begin to dive into configuring the environment for Python development!
Elpy – Python Development
Emacs is distributed with a python-mode (python.el) that provides indentation and syntax highlighting. However, to compete with Python-specific IDE’s (Integrated Development Environments), we’ll certainly want more. The elpy (Emacs Lisp Python Environment) package provides us with a near complete set of Python IDE features, including:
- Automatic Indentation,
- Syntax Highlighting,
- Auto-Completion,
- Syntax Checking,
- Python REPL Integration,
- Virtual Environment Support, and
- Much more!
To install and enable elpy we need to add a bit of configuration and install flake8 and jedi using your preferred method for installing Python packages (pip or conda, for example).
The following will install the elpy package:
1 2 3 4 |
|
Now just enable it:
1
|
|
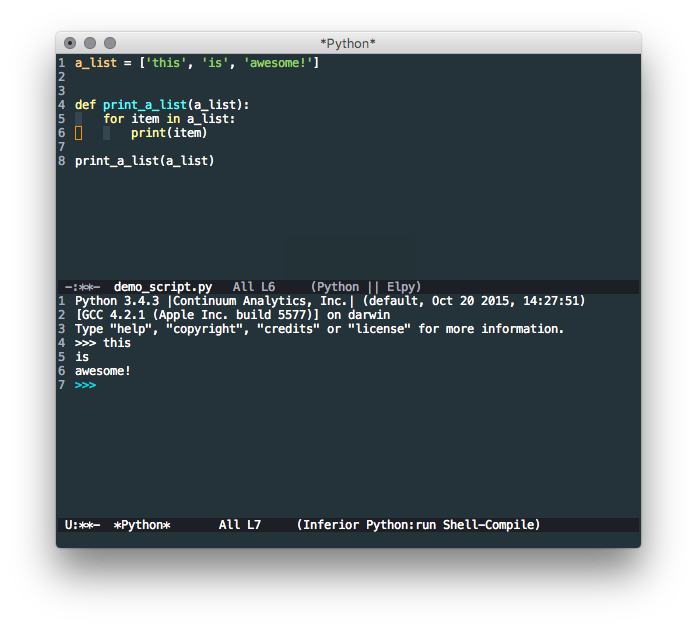
With the new configuration, we can restart Emacs and open up a Python file to see the new mode in action:
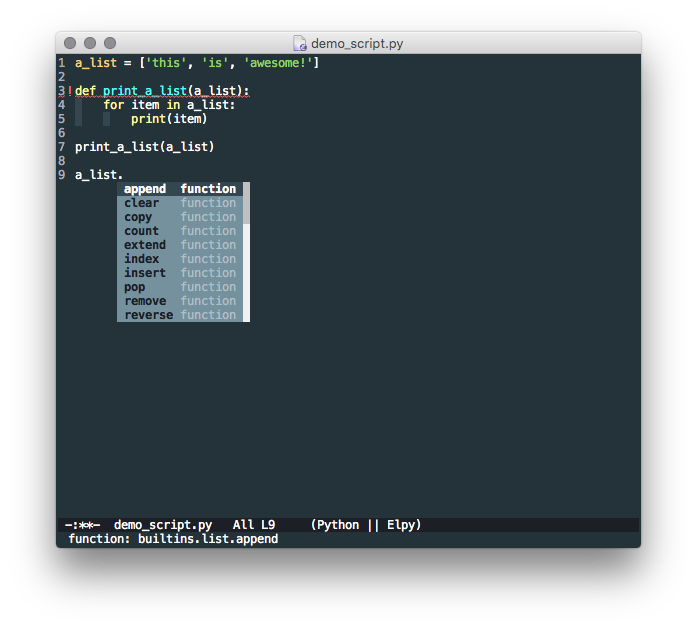
Shown in this image are the following features:
- Automatic Indentation (as you type and hit RET lines are auto-indented)
- Syntax Highlighting
- Syntax Checking (error indicators at line 3)
- Auto-Completion (list methods on line 9+)
In addition, let’s say we want to run this script. In something like IDLE or Sublime Text you’ll have a button/command to run the current script. Emacs is no different, we just type C-c C-c in our Python buffer and…
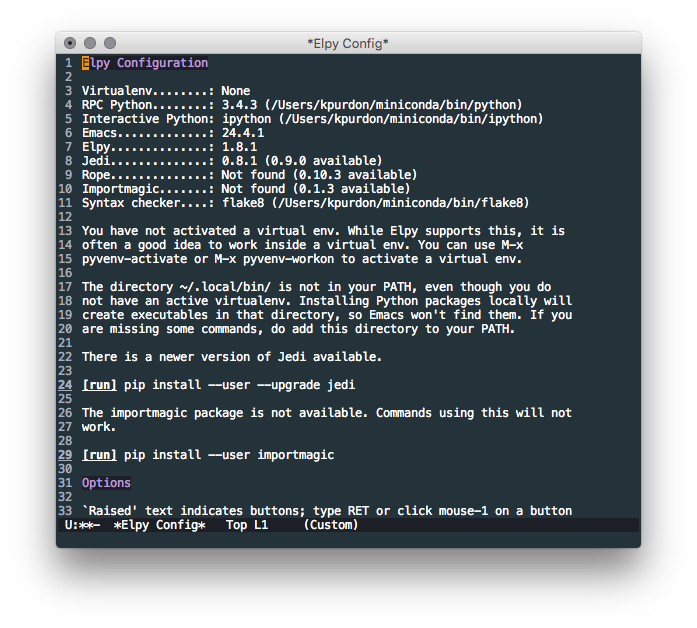
Often we’ll want to be running a virtual environment and executing our code using the packages installed there. To use a virtual environment in Emacs, we type M-x pyvenv-activate and follow the prompts. You can deactivate a virtualenv with M-x pyvenv-deactivate. Elpy provides an interface for debugging the environment and any issues you may encounter with elpy itself. By typing M-x elpy-config we get the following dialog, which provides valuable debugging information:
With that, all of the basics of a Python IDE in Emacs have been covered. Now let’s put some icing on this cake!
Additional Python Features
In addition to all the basic IDE features described above, Emacs provides some additional features for Python. While this is not an exhaustive list, PEP8 compliance (with autopep8) and integration with IPython/Jupyter will be covered. However, before that let’s cover a quick syntax checking preference.
Better Syntax Checking (Flycheck v. Flymake)
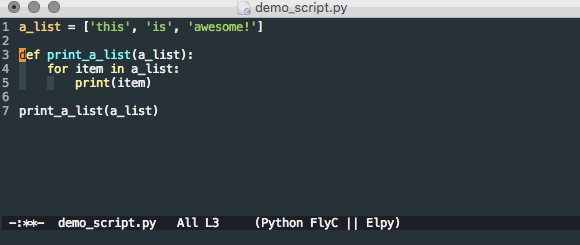
By default Emacs+elpy comes with a package called Flymake to support syntax checking. However, another Emacs package, Flycheck, is available and supports realtime syntax checking. Luckily switching out for Flycheck is simple:
1 2 3 4 5 |
|
and
1 2 3 |
|
Now we get realtime feedback when editing Python code:
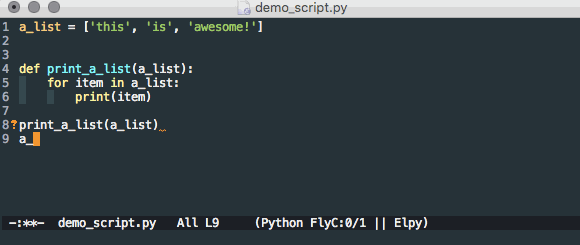
PEP8 Compliance (Autopep8)
Love it or hate it, PEP8 is here to stay. If you want to follow all or some of the standards, you’ll probably want an automated way to do so. The autopep8 tool is the solution. It integrates with Emacs so that when you save – C-x C-s – autopep8 will automatically format and correct any PEP8 errors (excluding any you wish to).
First, you will need to install the Python package autopep8 using your preferred method, then add the following Emacs configuration:
1 2 3 4 5 6 |
|
and
1 2 |
|
Now (after forcing some pep8 errors) when we save our demo Python file, the errors will automatically be corrected:
IPython/Jupyter Integration
Next up is a really cool feature: Emacs integration with the IPython REPL and Jupyter Notebooks. First, let’s look at swapping the standard Python REPL integration for the IPython version:
1
|
|
Now when we run our Python code with C-c C-c we will be presented with the IPython REPL:

While this is pretty useful on its own, the real magic is the notebook integration. We’ll assume that you already know how to launch a Jupyter Notebook server (if not check this out). Again we just need to add a bit of configuration:
1 2 3 4 5 6 7 |
|
The standard Jupyter web interface for notebooks is nice but requires us to leave Emacs to use:
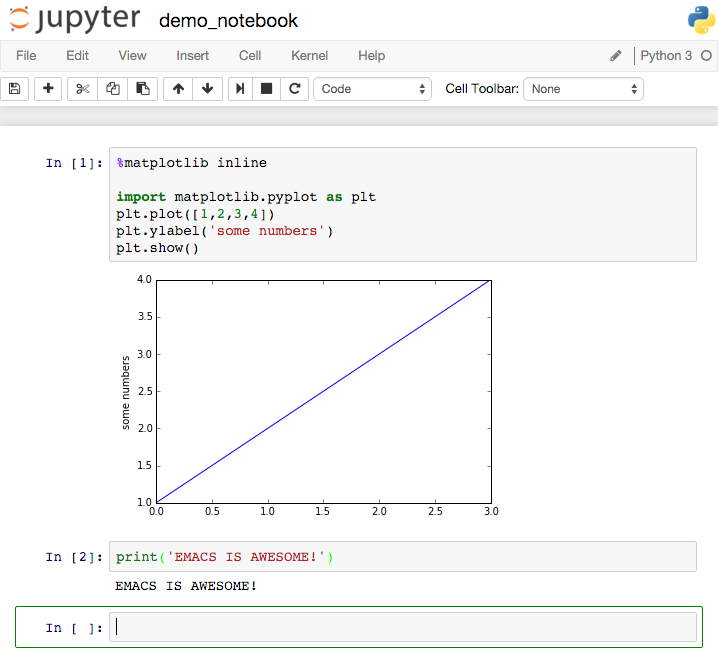
However, we can complete the exact same task by connecting to and interacting with the notebook server directly in Emacs.
Additional Emacs Features
Now that all of the basic Python IDE features (and some really awesome extras) have been covered, there are a few other things that an IDE should be able to handle. First up is git integration…
Git Integration (Magit)
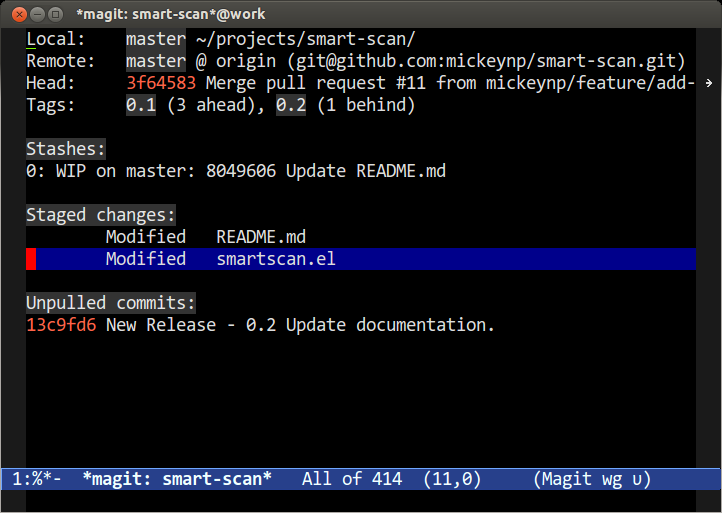
Magit is the most popular non-utility package on MELPA and is used by nearly every Emacs user who uses git. It’s incredibly powerful and far more comprehensive than we can cover in this post. Luckily Mastering Emacs has a great post covering Magit here. The following image is from the Mastering Emacs post and gives you a taste for what the git integration looks like in Emacs:
Other Modes
One of the major benefits of using Emacs over a Python-specific IDE is that you get compatibility with much more than just Python. In a single day I often work with Python, Golang, JavaScript, Markdown, JSON, and more. Never leaving Emacs and having complex support for all of these languages in a single editor is very efficient. You can check out my personal Emacs configuration here. It includes support for:
- Python
- Golang
- Ruby
- Puppet
- Markdown
- Dockerfile
- YAML
- Web (HTML/JS/CSS)
- SASS
- NginX Config
- SQL
In addition to lots of other Emacs configuration goodies.
Emacs In The Terminal
After learning Emacs you’ll want Emacs keybindings everywhere. This is as simple as typing set -o emacs at your bash prompt. However, one of the powers of Emacs is that you can run Emacs itself in headless mode in your terminal. This is my default environment. To do so, just start Emacs by typing emacs -nw at your bash prompt and you’ll be running a headless Emacs.
Conclusion
As you can see, Emacs is clearly the best editor… To be fair, there are a lot of great options out there for Python IDEs, but I would absolutely recommend learning either Vim or Emacs as they are by far the most versatile development environments possible. I said I’d leave you with the complete Emacs configuration, so here it is:
1 2 3 4 5 6 7 8 9 10 11 12 13 14 15 16 17 18 19 20 21 22 23 24 25 26 27 28 29 30 31 32 33 34 35 36 37 38 39 40 41 42 43 44 45 46 47 48 49 50 |
|
Hopefully this configuration will spark your Emacs journey!