
As data scientists, diving headlong into huge heaps of data is part of the mission. Sometimes, this includes massive corpuses of text. For instance, suppose we were asked to figure out who’s been emailing whom in the scandal of the Panama Papers — we’d be sifting through 11.5 million documents! We could do that manually and read every last email ourselves, or we could leverage the power of Python. After all, a vital raison d’être of code is to automate tasks.
Even so, coding up a script from scratch requires a lot of time and energy. This is where regular expressions come in. Also known as RE, regex, and regular patterns, they form a compact language that allows us to sort through and analyze text in a jiffy. Regex began in 1956, when Stephen Cole Kleene created it as a notation to describe the McCulloch and Pitts model of the human nervous system. In the 1960s, Ken Thompson added the notation to a text editor similar to Notepad for Windows, and regex has grown to prominence since then.
A key characteristic of regex is its economical script. We might even think of it as shortcuts through code. Without it, we would have to craft larger chunks of code for the same purpose.
You need basic Python knowledge for this tutorial. If you understand if-else statements, while and for loops, lists, and dictionaries, you’re set to make the most out of this tutorial. You also need a code editor like Visual Code Studio, PyCharm, or Atom. In addition, while we walk through every line of code so you never feel lost, knowing basic pandas would help. Check out our pandas tutorial if you need a refresher.
By the end of the tutorial, we’ll have some familiarity with how regex works, and be able to use its basic patterns and the functions provided by Python’s re module for string analysis. We’ll also experience how efficiently regex and the pandas library bring order to large, unorganised data sets.
Now, let’s take a look at what regex can do.
We will use the Fraudulent Email Corpus from Kaggle. It contains thousands of phishing emails sent between 1998 and 2007. They’re pretty entertaining to read. You can find the corpus here. We’ll first learn basic regex commands with a single email before we go on to slice and dice the entire Corpus.
First, prepare the data set by opening the text file, setting it to read-only, and reading it. We also assign it to a variable, fh (“file handle”).
fh = open(r"test_emails.txt", "r").read()
Notice that we precede the directory path with an `r`. This technique converts a string into a raw string, which helps to avoid conflicts caused by how some machines read characters, such as backslashes in directory paths on Windows. You may also notice that we’re not using the full Corpus right now. Instead, we’ve manually taken the first few emails out of the Corpus and put it into a test file. This is so that we don’t display all the thousands of lines of results in this tutorial every time we print something for a test. That would make for some annoyance. You can use the full Corpus, or use our [test file](/blog/notebooks/regex/test_emails.txt). Either way, your learning experience will be just fine. Now, suppose we want to find out who the emails are from. We could try raw Python on its own:
for line in fh.split("n"):
    if "From:" in line:
        print(line)
Or, we could use regex:
import re

for line in re.findall("From:.*", fh):
    print(line)
We’ll walk through this code. We first import Python’s `re` module. Then, we craft the code. It’s just one line shorter than raw Python in this simple example. However, regex will help your script remain economical as it grows. `re.findall()` returns a list of all instances of the pattern in the string. It’s one of the most popular functions in Python’s built-in `re` module. Let’s break it down. The function takes two arguments in the form of `re.findall(pattern, string)`. Here, `pattern` represents the substring we want to find, and `string` represents the main string we want to find it in. The main string can consist of multiple lines. `.*` are shorthand for string patterns. We’ll explain them in detail very, very soon. Suffice to say for now that they match the name and email address in the `From:` field. Let’s take our first look at some common regex patterns before we dive deeper. ## Common regex patterns The pattern we used with `re.findall()` above contains a fully spelt out string, `”From:”`. This is useful when we know precisely what we’re looking for, right down to the actual letters and whether or not they’re upper or lower case. If we don’t know the exact format of the strings we want, we’d be lost. Fortunately, regex has basic patterns that account for this scenario. Let’s look at the ones we use in this tutorial: * `w` matches alphanumeric characters, which means a-z, A-Z, and 0-9. It also matches the underscore, _, and the dash, -. * `d` matches digits, which means 0-9. * `s` matches whitespace characters, which include the tab, new line, carriage return, and space characters. * `S` matches non-whitespace characters. * `.` matches any character except the new line character `n`. With these regex patterns in hand, you’ll quickly understand our code above as we go on to explain it. ## Working with regex patterns We can now explain the use of `.*` in the line `re.findall(“From:.*”, text)` above. Let’s look at `.` first:
for line in re.findall("From:.", fh):
    print(line)
By adding a `.` next to `From:`, we look for one additional character next to it. Because `.` looks for any character except `n`, it captures the space character, which we cannot see. We can try more dots to verify this.
for line in re.findall("From:...........", fh):
    print(line)
It looks like adding dots does acquire the rest of the line for us. But, it’s tedious and we don’t know how many dots to add. This is where the asterisk symbol, `*`, plays a very useful role. `*` matches 0 or more instances of a pattern on its left. This means it looks for repeating patterns. When we look for repeating patterns, we say that our search is “greedy.” If we don’t look for repeating patterns, we can call our search “non-greedy” or “lazy.” Let’s construct a greedy search for `.` with `*`.
for line in re.findall("From:.*", fh):
    print(line)
Because `*` matches zero or more instances of the pattern indicated on its left, and `.` is on its left here, we are able to acquire all the characters in the `From:` field till the end of the line. This prints out the full line with beautifully succinct code. We might even go further and isolate only the name:
match = re.findall("From:.*", fh)

for line in match:
     print(re.findall("".*"", line))
Here, we use `re.findall()` to return a list of lines containing the pattern `”From:.*”` as we’ve done before. We assign it to the variable `match` for neatness. Next, we iterate through the list. In each cycle, we perform `re.findall` again. This time, the function starts by matching the first quotation mark. Notice that we use a backslash next to the first quotation mark. The backslash is a special character used for escaping other special characters. For instance, when we want to use a quotation mark as a string literal instead of a special character, we escape it with a backslash like this: `”`. If we do not escape the pattern above with backslashes, it would become `””.*””`, which the Python interpreter would read as a period and an asterisk between two empty strings. It would produce an error and break the script. Hence, it’s crucial that we escape the quotation marks here with backslashes. After the first quotation mark is matched, `.*` acquires all the characters in the line until the next quotation mark, also escaped in the pattern. This gets us just the name, within quotation marks. Each name is also printed within square brackets because `re.findall` returns matches in a list. What if we want the email address instead?
match = re.findall("From:.*", fh)

for line in match:
     print(re.findall("wS*@.*w", line))
Looks simple enough, doesn’t it? Only the pattern is different. Let’s walk through it. Here’s how we match just the front part of the email address:
for line in match:
     print(re.findall("wS*@", line))
Emails always contain an @ symbol, so we start with it. The part of the email before the @ symbol might contain alphanumeric characters, which means `w` is required. However, because some emails contain a period or a dash, that’s not enough. We add `S` to look for non-whitespace characters. But, `wS` will get only two characters. Add `*` to look for repetitions. The front part of the pattern thus looks like this: `wS*@`. Now for the pattern behind the @ symbol:
for line in match:
     print(re.findall("@.*", line))
The domain name usually contains alphanumeric characters, periods, and a dash sometimes. This is simple, a `.` would do. To make it greedy, we extend the search with a `*`. This allows us to match any character till the end of the line. If we look at the line closely, we see that each email is encapsulated within angle brackets, . Our pattern, `.*`, includes the closing bracket, >. Let’s remedy it:
for line in match:
     print(re.findall("@.*w", line))
Email addresses end with an alphanumeric character, so we cap the pattern with `w`. Hence, the rear of the @ symbol is `.*w`, which means that the pattern we want is a group of any type of characters that ends with an alphanumeric character. This excludes >. Our full email address pattern thus looks like this: `wS*@.*w`. That was quite a bit to work through! It does take a short while to get used to regex, but, once you get a handle on its patterns, you’ll be able to code for string analysis a lot faster. Next, we’ll run through some common `re` functions that will be useful when we start reorganizing the Corpus. ## Common regex functions `re.findall()` is undeniably useful, and the `re` module provides more equally convenient functions. These include: – `re.search()` – `re.split()` – `re.sub()` We’ll take a gander at these one by one before using them to bring some order to the unwieldy mass of the Corpus. ### re.search() While `re.findall()` matches all instances of a pattern in a string and returns them in a list, `re.search()` matches the first instance of a pattern in a string, and returns it as a `re` match object.
match = re.search("From:.*", fh)
print(type(match))
print(type(match.group()))
print(match)
print(match.group())
Like `re.findall()`, `re.search()` also takes two arguments. The first is the pattern to match, and the second is the string to find it in. Here, we’ve assigned the results to the `match` variable for neatness. Because `re.search()` returns a `re` match object, we can’t display the name and email address by printing it directly. Instead, we have to apply the `group()` function to it first. We’ve printed both their types out in the code above. As we can see, `group()` converts the match object into a string. We can also see that printing `match` displays properties beyond the string itself, whereas printing `match.group()` displays only the string. ### re.split() Suppose we need a quick way to get the domain name of the email addresses. We could do it with three regex operations, like so:
address = re.findall("From:.*", fh)
for item in address:
    for line in re.findall("wS*@.*w", item):
        username, domain_name = re.split("@", line)
        print("{}, {}".format(username, domain_name))
The first line is familiar. We return a list of strings, each containing the contents of the `From:` field, and assign it to a variable. Next, we iterate through the list to find the email addresses. At the same time, we iterate through the email addresses and use the `re` module’s `split()` function to snip each address in half, with the @ symbol as the delimiter. Finally, we print it. ### re.sub() Another handy `re` function is `re.sub()`. As the function name suggests, it substitutes parts of a string. An example:
sender = re.search("From:.*", fh)
address = sender.group()
email = re.sub("From", "Email", address)
print(address)
print(email)
Here, we’ve already seen the tasks on the first and second lines performed before. On the third line, we apply `re.sub()` on `address`, which is the full `From:` field in the email header. `re.sub()` takes three arguments. The first is the substring to substitute, the second is a string we want in its place, and the third is the main string itself. ## Regex with pandas Now that we have the basics of regex in hand, we can try something much more sophisticated. However, we need to combine regex with the pandas Python data analysis library. Pandas is immeasurably useful for organising data into neat tables, also known as dataframes, and for understanding it from different angles. Combined with regex’s economical code, it’s like carving soft butter with an extra sharp knife. Don’t worry if you’ve never used pandas before. We walk through the code every step of the way so you never feel lost. As we mentioned in the introduction, if you’d like to learn the library in detail, do visit our [pandas tutorial](https://www.dataquest.io/blog/pandas-python-tutorial/). We can get the pandas library through [Anaconda](https://docs.continuum.io/anaconda/) or pip. Check out the [installation guide](http://pandas.pydata.org/pandas-docs/stable/install.html) for details. ### Sorting emails with regex and pandas The Corpus is a single text file containing thousands of emails. We’ll use regex and pandas to sort the parts of each email into appropriate categories so that the Corpus can be more easily read or analysed. We’ll sort each email into the following categories: * `sender_name` * `sender_address` * `recipient_address` * `recipient_name` * `date_sent` * `subject` * `email_body` Each of these categories will become a column in our pandas dataframe or table. This is useful because it lets us work on each column on its own. For instance, we could write code to find out which domain names the emails come from, instead of coding to isolate the email addresses from the other parts first. Essentially, categorising the important parts of our data set allows us to write much more concise code to acquire granular information later on. In turn, concise code reduces the number of operations our machines have to do, which speeds up our analytical process, especially when working with massive data sets. ## Preparing the script We’ve played through a simpler script above. Let’s start from scratch so it’s clear how all of it comes together.
import re
import pandas as pd
import email

emails = []

fh = open(r"test_emails.txt", "r").read()
We first import the `re` and `pandas` modules as standard practice dictates, right at the top of the script. We import Python’s `email` package as well, which is especially needed for the body of the email. The body of the email is rather complicated to work with using regex alone. It might even require enough cleaning up to warrant its own tutorial. So, we use the well-developed `email` package to save some time and let us focus on learning regex. Next, we create an empty list, `emails`, which will store dictionaries. Each dictionary will contain the details of each email. We print the results of our code to the screen frequently to illustrate where code goes right or wrong. However, because there are thousands of emails in the data set, this prints thousands of lines to the screen and clogs up this tutorial page. We certainly don’t want to make you scroll down thousands of lines of results over and over again. Thus, as we’ve done at the beginning of the tutorial, we open and read a shorter version of the Corpus. We prepared it by hand just for the purposes of this tutorial. You can use the actual data set at home though. Every time we run a `print()` function, you’ll print thousands of lines to the screen in barely a few seconds. Now, we begin applying regex.
contents = re.split(r"From r", fh)
contents.pop(0)
We use the `re` module’s split function to split the entire chunk of text in `fh` into a list of separate emails, which we assign to the variable `contents`. This is important because we want to work on the emails one by one, by iterating through the list with a for loop. But, how do we know to split by the string `”From r”`? We know this because we looked into the file before we wrote the script. We didn’t have to peruse the thousands of emails in there. Just the first few, to see what the structure of the data looks like. As it so happens, each email is preceded by the string `”From r”`. We’ve taken a screenshot of what the text file looks like:
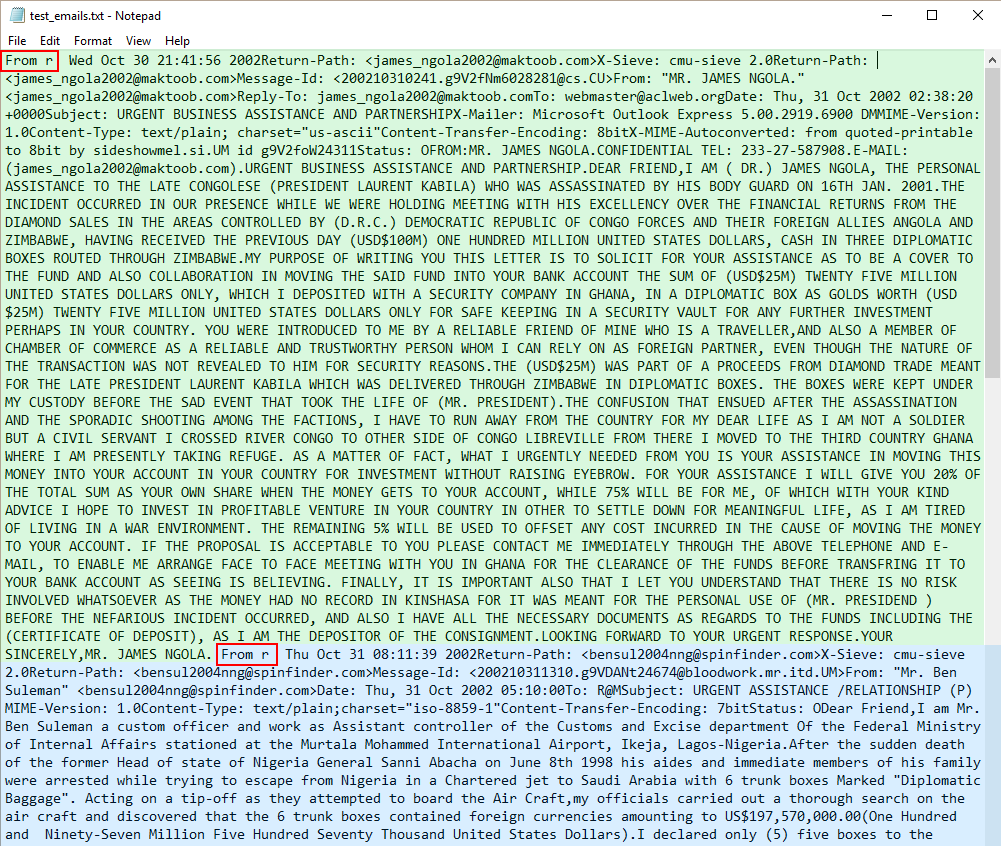
Emails start with “From r”
The green block is the first email. The blue block is the second email. As we can see, both emails start with `”From r”`, highlighted with red boxes. One reason we use the Fraudulent Email Corpus in this tutorial is to show that when data is disorganised, unfamiliar, and comes without documentation, we can’t rely solely on code to sort it out. It would require a pair of human eyes. As we’ve just shown, we had to look into the Corpus itself to study its structure. In addition, such data may require a lot of cleaning up, as does this Corpus. For instance, even though we count 3977 emails in this set using the full script we’re about to construct for this tutorial, there are actually more. Some emails are not preceded by `”From r”`, and so are not split into their own. We leave our data set as it is for now, though, lest this tutorial never ends. Notice also that we use `contents.pop(0)` to get rid of the first element in the list. That’s because a `”From r”` string precedes the first email. When that string is split, it produces an empty string at index 0. The script we’re about to write is designed for emails. If it works on an empty string, it might throw up errors. Getting rid of the empty string lets us avoid these errors from breaking our script. ## Getting every name and address with a for loop Next, we work with the emails in the `contents` list.
for item in contents:
    emails_dict = {}
In the code above, we use a `for` loop to iterate through `contents` so we can work with each email in turn. We create a dictionary, `emails_dict`, that will hold all the details of each email, such as the sender’s address and name. In fact, these are the first items we find. This is a three-step process. It begins by finding the `From:` field.
for item in contents: # First two lines again so that Jupyter runs the code.
    emails_dict = {}

# Find sender's email address and name.

    # Step 1: find the whole line beginning with "From:".
    sender = re.search(r"From:.*", item)
With Step 1, we find the entire `From:` field using the `re.search()` function. The `.` means any character except `n`, and `*` extends it to the end of the line. We then assign this to the variable `sender`. But, data isn’t always straightforward. It can contain surprises. For instance, what if there’s no `From:` field? The script would throw an error and break. We pre-empt errors from this scenario in Step 2.
    # Step 2: find the email address and name.
    if sender is not None:
        s_email = re.search(r"wS*@.*w", sender.group())
        s_name = re.search(r":.*<", sender.group())
    else:
        s_email = None
        s_name = None
To avoid errors resulting from missing `From:` fields, we use an `if` statement to check that `sender` isn’t `None`. If it is, we assign `s_email` and `s_name` the value of `None` so that the script can move on instead of breaking unexpectedly. Although this tutorial makes working with regex (and pandas below) look quite straightforward, your actual experience won’t be as clean. For instance, we look like we naturally know to use if-else statements to check for data that might or might not exist. In truth, the reason we know is that we tried the script out again and again on the Corpus while writing it. Writing code is an iterative process. It’s worth noting that even if tutorials seem sensibly linear, actual practice involves a lot more experimentation.
Enjoying this post? Learn data science with Dataquest!
- Learn from the comfort of your browser.
- Work with real-life data sets.
- Build a portfolio of projects.
In Step 2, we use a familiar regex pattern from before, `wS*@.*w`, which matches the email address. We use a different tactic for the name. Each name is bounded by the colon, `:`, of the substring `”From:”` on the left, and by the opening angle bracket, `
    print("sender type: " + str(type(sender)))
    print("sender.group() type: " + str(type(sender.group())))
    print("sender: " + str(sender))
    print("sender.group(): " + str(sender.group()))
    print("n")
Note that we’re not using `sender` as the string to search for in each application of `re.search()`. We’ve printed out the types for `sender` and `sender.group()` so that we can see the difference. It looks like `sender` is an `re` match object, which we can’t search with `re.search()`. However, `sender.group()` is a string, precisely what `re.search()` was built for. Let’s see what `s_email` and `s_name` look like.
    print(s_email)
    print(s_name)
Again, we have match objects. Every time we apply `re.search()` to strings, it produces match objects. We have to turn them into string objects. Before we do this, recall that if there is no `From:` field, `sender` would have the value of `None`, and so too would `s_email` and `s_name`. Hence, we have to check for this scenario again so that the script doesn’t break unexpectedly. Let’s see how to construct the code with `s_email` first.
    # Step 3A: assign email address as string to a variable.
    if s_email is not None:
        sender_email = s_email.group()
    else:
        sender_email = None

    # Add email address to dictionary.
    emails_dict["sender_email"] = sender_email
In Step 3A, we use an `if` statement to check that `s_email` is not `None`, otherwise it would throw an error and break the script. Then, we simply convert the `s_email` match object into a string and assign it to the `sender_email` variable. We add this to the `emails_dict` dictionary, which will make it incredibly easy for us to turn the details into a pandas dataframe later on. We do almost exactly the same for `s_name` in Step 3B.
    # Step 3B: remove unwanted substrings, assign to variable.
    if s_name is not None:
        sender_name = re.sub("s*<", "", re.sub(":s*", "", s_name.group()))
    else:
        sender_name = None

    # Add sender's name to dictionary.
    emails_dict["sender_name"] = sender_name
Just as we did before, we first check that `s_name` isn’t `None` in Step 3B. Then, we use the `re` module’s `re.sub()` function twice before assigning the string to a variable. First, we remove the colon and any whitespace characters between it and the name. We do this by substituting `:s*` with an empty string `””`. Then, we remove whitespace characters and the angle bracket on the other side of the name, again substituting it with an empty string. Finally, after assigning the string to `sender_name`, we add it to the dictionary. Let’s check out our results.
    print(sender_email)
    print(sender_name)
Perfect. We’ve isolated the email address and the sender’s name. We’ve also added them to the dictionary, which will come into play soon. Now that we’ve found the sender’s email address and name, we do exactly the same set of steps to acquire the recipient’s email address and name for the dictionary. First, we find the the `To:` field.
recipient = re.search(r"To:.*", item)
Next, we pre-empt the scenario where `recipient` is `None`.
    if recipient is not None:
        r_email = re.search(r"wS*@.*w", recipient.group())
        r_name = re.search(r":.*<", recipient.group())
    else:
        r_email = None
        r_name = None
If `recipient` isn’t `None`, we use `re.search()` to find the match object containing the email address and the recipient’s name. Otherwise, we pass `r_email` and `r_name` the value of `None`. Then, we turn the match objects into strings and add them to the dictionary.
    if r_email is not None:
        recipient_email = r_email.group()
    else:
        recipient_email = None

    emails_dict["recipient_email"] = recipient_email

    if r_name is not None:
        recipient_name = re.sub("s*<", "", re.sub(":s*", "", r_name.group()))
    else:
        recipient_name = None

    emails_dict["recipient_name"] = recipient_name
Because the structure of the `From:` and `To:` fields are the same, we can use the same code for both. We need to tailor slightly different code for the other fields. ## Getting the date of the email Now for the date the email was sent.
for item in contents: # First two lines again so that Jupyter runs the code.
    emails_dict = {}

    date_field = re.search(r"Date:.*", item)
We acquire the `Date:` field with the same code for the `From:` and `To:` fields. And, just as we do for those two fields, we check that the `Date:` field, assigned to the `date_field` variable, is not `None`.
    if date_field is not None:
        date = re.search(r"d+sw+sd+", date_field.group())
    else:
        date = None

    print(date_field.group())
We’ve printed out `date_field.group()` so that we can see the structure of the string more clearly. It includes the day, the date in DD MMM YYYY format, and the time. We want just the date. The code for the date is largely the same as for names and email addresses but simpler. Perhaps the only puzzler here is the regex pattern, `d+sw+sd+`. The date starts with a number. Hence, we use `d` to account for it. However, as the DD part of the date, it could be either one or two digits. Here is where `+` becomes important. In regex, `+` matches 1 or more instances of a pattern on its left. `d+` would thus match the DD part of the date no matter if it is one or two digits. After that, there’s a space. This is accounted for by `s`, which looks for whitespace characters. The month is made up of three alphabetical letters, hence `w+`. Then it hits another space, `s`. The year is made up of numbers, so we use `d+` once more. The full pattern, `d+sw+sd+`, works because it is a precise pattern bounded on both sides by whitespace characters. Next, we do the same check for a value of `None` as before.
    if date is not None:
        date_sent = date.group()
        date_star = date_star_test.group()
    else:
        date_sent = None

    emails_dict["date_sent"] = date_sent
If `date` is not `None`, we turn it from a match object into a string and assign it to the variable `date_sent`. We then insert it into the dictionary. Before we go on, we should note a crucial point. `+` and `*` seem similar but they can produce very different results. Let’s use the date string here as an example.
    date = re.search(r"d+sw+sd+", date_field.group())

    # What happens when we use * instead?
    date_star_test = re.search(r"d*sw*sd*", date_field.group())

    date_sent = date.group()
    date_star = date_star_test.group()

    print(date_sent)
    print(date_star)
If we use `*`, we’d be matching zero or more occurrences. `+` matches one or more occurrences. We’ve printed the results for both scenarios. It’s a big difference. As you can see, `+` acquires the full date whereas `*` gets a space and the digit `1`. Next up, the subject line of the email. ## Getting the email subject As before, we use the same code and code structure to acquire the information we need.
for item in contents: # First two lines again so that Jupyter runs the code.
    emails_dict = {}

    subject_field = re.search(r"Subject: .*", item)

    if subject_field is not None:
        subject = re.sub(r"Subject: ", "", subject_field.group())
    else:
        subject = None

    emails_dict["subject"] = subject
We’re becoming more familiar with the use of regex now, aren’t we? It’s largely the same code as before, except that we substitute `”Subject: “` with an empty string to get only the subject itself. ## Getting the body of the email The last item to insert into our dictionary is the body of the email.
    full_email = email.message_from_string(item)
    body = full_email.get_payload()
    emails_dict["email_body"] = body
Separating the header from the body of an email is an awfully complicated task, especially when many of the headers are different in one way or another. Consistency is seldom found in raw unorganised data. Luckily for us, the work’s already been done. Python’s `email` package is highly adept at this task. Remember that we’ve already imported the package earlier. Now, we apply its `message_from_string()` function to `item`, to turn the full email into an `email` Message object. A Message object consists of a header and a payload, which correspond to the header and body of an email. Next, we apply its `get_payload()` function on the Message object. This function isolates the body of the email. We assign it to the variable `body`, which we then insert into our `emails_dict` dictionary under the key `”email_body”`. ### Why the email package and not regex for the body You may ask, why use the `email` package rather than regex? This is because there’s no good way to do it with regex at the moment that doesn’t require significant amounts of cleaning up. It would mean another sheet of code that probably deserves its own tutorial. It’s worth checking out how we arrive at decisions like this one. However, we need to understand what square brackets, `[ ]`, mean in regex before we can do that. `[ ]` matches any character placed inside them. For instance, if we want to find `”a”`, `”b”`, or `”c”` in a string, we can use `[abc]` as the pattern. The patterns we discussed above apply as well. `[ws]` would find either alphanumeric or whitespace characters. The exception is `.`, which becomes a literal period within square brackets. Now, we can better understand how we made the decision to use the email package instead. A peek at the data set reveals that email headers stop at the strings `”Status: 0″` or `”Status: R0″`, and end before the string `”From r”` of the next email. We could thus use `Status:s*w*n*[sS]*Fromsr*` to acquire only the email body. `[sS]*` works for large chunks of text, numbers, and punctuation because it searches for either whitespace or non-whitespace characters. Unfortunately, some emails have more than one `”Status:”` string and others don’t contain `”From r”`, which means that we would split the emails into more or less than the number of dictionaries in the emails list. They would not match with the other categories we already have. It becomes problematic when working with pandas. Hence, we elected to leverage the `email` package. ## Create the list of dictionaries Finally, append the dictionary, `emails_dict`, to the `emails` list:
emails.append(emails_dict)
You might want to print the `emails` list at this point to see how it looks. You can also run `print(len(emails_dict))` to see how many dictionaries, and therefore emails, are in the list. As we mentioned before, the full Corpus contains 3977. Our little test file contains seven. Here’s the code in full:
import re
import pandas as pd
import email

emails = []

fh = open(r"test_emails.txt", "r").read()

contents = re.split(r"From r",fh)
contents.pop(0)

for item in contents:
    emails_dict = {}

    sender = re.search(r"From:.*", item)

    if sender is not None:
        s_email = re.search(r"wS*@.*w", sender.group())
        s_name = re.search(r":.*<", sender.group())
    else:
        s_email = None
        s_name = None

    if s_email is not None:
        sender_email = s_email.group()
    else:
        sender_email = None

    emails_dict["sender_email"] = sender_email

    if s_name is not None:
        sender_name = re.sub("s*<", "", re.sub(":s*", "", s_name.group()))
    else:
        sender_name = None

    emails_dict["sender_name"] = sender_name

    recipient = re.search(r"To:.*", item)

    if recipient is not None:
        r_email = re.search(r"wS*@.*w", recipient.group())
        r_name = re.search(r":.*<", recipient.group())
    else:
        r_email = None
        r_name = None

    if r_email is not None:
        recipient_email = r_email.group()
    else:
        recipient_email = None

    emails_dict["recipient_email"] = recipient_email

    if r_name is not None:
        recipient_name = re.sub("s*<", "", re.sub(":s*", "", r_name.group()))
    else:
        recipient_name = None

    emails_dict["recipient_name"] = recipient_name

    date_field = re.search(r"Date:.*", item)

    if date_field is not None:
        date = re.search(r"d+sw+sd+", date_field.group())
    else:
        date = None

    if date is not None:
        date_sent = date.group()
    else:
        date_sent = None

    emails_dict["date_sent"] = date_sent

    subject_field = re.search(r"Subject: .*", item)

    if subject_field is not None:
        subject = re.sub(r"Subject: ", "", subject_field.group())
    else:
        subject = None

    emails_dict["subject"] = subject

    # "item" substituted with "email content here" so full email not displayed.

    full_email = email.message_from_string(item)
    body = full_email.get_payload()
    emails_dict["email_body"] = "email body here"

    emails.append(emails_dict)

# Print number of dictionaries, and hence, emails, in the list.
print("Number of emails: " + str(len(emails_dict)))

print("n")

# Print first item in the emails list to see how it looks.
for key, value in emails[0].items():
    print(str(key) + ": " + str(emails[0][key]))
We’ve printed out the first item in the `emails` list, and it’s clearly a dictionary with key and value pairs. Because we used a `for` loop, every dictionary has the same keys but different values. We’ve substituted `item` with `”email content here”` so that we don’t print out the entire mass of the email and clog up our screens. If you’re printing this at home using the actual data set, you’ll see the entire email. ## Manipulating data with pandas With dictionaries in a list, we’ve made it infinitely easy for the pandas library to do its job. Each key will become a column title, and each value becomes a row in that column. All we have to do is apply the following code:
import pandas as pd # Module imported above, imported again as reminder.
emails_df = pd.DataFrame(emails)
With this single line, we turn the `emails` list of dictionaries into a dataframe using the pandas `DataFrame()` function. We assign it to a variable too. That’s it. We now have a sophisticated pandas dataframe. This is essentially a neat and clean table containing all the information we’ve extracted from the emails. Let’s look at the first few rows.
pd.DataFrame.head(emails_df, n=3)
The `dataframe.head()` function displays just the first few rows rather than the entire data set. It takes one argument. An optional argument allows us to specify how many rows we want displayed. Here, `n=3` lets us view three rows. We can also find precisely what we want. For instance, we can find all the emails sent from a particular domain name. However, let’s learn a new regex pattern to improve our precision in finding the items we want. The pipe symbol, `|`, looks for characters on either side of itself. For instance, `a|b` looks for either `a` or `b`. `|` might seem to do the same as `[ ]`, but they really are different. Suppose we want to match either `”crab”`, `”lobster”`, or `”isopod”`. Using `crab|lobster|isopod` would make more sense than `[crablobsterisopod]`, wouldn’t it? The former would look for each whole word, whereas the latter would look for every single letter. Now, let’s use `|` to find all the emails sent from one or another domain name.
emails_df[emails_df["sender_email"].str.contains("maktoob|spinfinder")]
We’ve used a rather lengthy line of code here. Let’s start from the inside out. `emails_df[‘sender_email’]` selects the column labelled `sender_email`. Next, `str.contains(maktoob|spinfinder)` returns `True` if the substring `”maktoob”` or `”spinfinder”` is found in that column. Finally, the outer `emails_df[]` returns a view of the rows where the `sender_email` column contains the target substrings. Nifty! We can view emails from individual cells too. To do this, we go through four steps. In Step 1, we find the index of the row where the `”sender_email”` column contains the string `”@maktoob”`. Notice how we use regex to do this.
# Step 1: find the index where the "sender_email" column contains "@maktoob.com".
index = emails_df[emails_df["sender_email"].str.contains(r"wS*@maktoob.com")].index.values
In Step 2, we use the index to find the email address, which the `loc[]` method returns as a Series object with several different properties. We print it out below to see what it looks like.
# Step 2: use the index to find the value of the cell in the "sender_email" column.
# The result is returned as pandas Series object
address_Series = emails_df.loc[index]["sender_email"]
print(address_Series)
print(type(address_Series))
In Step 3, we extract the email address from the Series object as we would items from a list. You can see that its type is now class.
# Step 3: extract the email address, which is at index 0 in the Series object.
address_string = address_Series[0]
print(address_string)
print(type(address_string))
Step 4 is where we extract the email body.
# Step 4: find the value of the "email_body" column where the "sender email" column is address_string.
print(emails_df[emails_df["sender_email"] == address_string]["email_body"].values)
In Step 4, `emails_df[‘sender_email’] == “[email protected]“` finds the row where the `sender_email` column contains the value `”[email protected]“`. Next, `[’email_body’].values` finds the value of the `email_body` column in that same row. Finally, we print out the value. As you can see, we can work with regex in many ways and it plays splendidly with pandas too. ## Other resources Regex has grown tremendously since it leaped from biology to engineering all those years ago. Today, regex is used across different programming languages, where there are some variations beyond its basic patterns. We’ve exercised it in Python in this tutorial but, if you’re so inclined, you can start exploring its differences with this [Stack Overflow](https://stackoverflow.com/questions/4644847/list-of-all-regex-implementations) post. Wikipedia has a [table](https://en.m.wikipedia.org/wiki/Comparison_of_regular_expression_engines#Part_1) comparing the different regex engines. There is a lot more to regex than a tutorial can reveal. For a thorough reference, check out Python’s [documentation](https://docs.python.org/3/library/re.html) for its `re` module. Google has a [quicker reference](https://developers.google.com/edu/python/regular-expressions). If you require data sets to experiment with, [Kaggle](https://www.kaggle.com/) and [StatsModels](http://www.statsmodels.org/devel/datasets/index.html#available-datasets) are useful. Here’s a [Regex cheatsheet](https://github.com/dmikalova/sublime-cheat-sheets/blob/master/cheat-sheets/Regular%20Expressions.cheatsheet). It’s designed for Sublime but still convenient for most. Finally, if you found this tutorial helpful you’ll like Dataquest’s [regex course](https://www.dataquest.io/m/82/regular-expressions/6/counting-simple-matches-in-the-data-set-with-re).