If you’re writing a web application, then you’re probably thinking about making HTTP calls to your server to get data to populate the dynamic parts of your application.
The goal of this article is to show you how to use Python 3, Flask, and Connexion to build useful REST APIs that can include input and output validation, and provide Swagger documentation as a bonus. Also included is a simple but useful single page web application that demonstrates using the API with JavaScript and updating the DOM with it.
The REST API you’ll be building will serve a simple people data structure where the people are keyed to the last name, and any updates are marked with a new timestamp.
This data could be represented in a database, saved in a file, or be accessible through some network protocol, but for us an in-memory data structure works fine. One of the purposes of an API is to decouple the data from the application that uses it, hiding the data implementation details.
Free Bonus: Click here to download a copy of the “REST API Examples” Guide and get a hands-on introduction to Python + REST API principles with actionable examples.
What REST Is
Before you get started creating an API server, I want to talk about REST a little bit. There’s lots of information about REST available through some quick Google searches, and my intent is not to duplicate that here.
I just want to share how I view REST and use it to build APIs. I see REST as a set of conventions taking advantage of the HTTP protocol to provide CRUD (Create, Read, Update, and Delete) behavior on things and collections of those things. The CRUD behavior maps nicely to the HTTP protocol method verbs like this:
| Action | HTTP Verb | Description |
|---|---|---|
| Create | POST |
Create a new, unique thing |
| Read | GET |
Read the information about a thing or collection of things |
| Update | PUT |
Update the information about an existing thing |
| Delete | DELETE |
Delete a thing |
You can perform these actions on a thing or resource. It’s useful to think about a resource as something a noun can be applied to: a person, an order for something, a person’s address. This idea of a resource lines up nicely with a URL (Unique Resource Locator).
A URL should identify a unique resource on the web, something that will work with the same thing over and over again for the same URL. With these two ideas, we have a way to take common application actions on something uniquely identified on the web. This is a very useful way of working.
This idea goes a long way towards creating clean APIs and performing the actions many applications want from the API.
What REST Is Not
Because REST is useful and helps map out how we might want to interact with a web based API, it’s sometimes used for things that don’t really fit well. There are lots of cases where what we want to do is perform some work or take an action directly. An example might be performing a string substitution, which granted is a silly thing to make an API for, but let’s go with it for now. Here’s a URL that might be constructed to provide this:
/api/substituteString/<string>/<search_string>/<sub_string>
Here, string is the string to make the substitution in, search_string is the string to replace, and sub_string is the string to replace search_string with. This can certainly be tied to some code in the server that does the intended work. But this has some problems in REST terms.
One problem that comes to mind is that this URL doesn’t point to a unique resource, so what it returns is entirely dependent on the path variable sections. Also, there is no concept of CRUD against this URL. It really only needs one HTTP method, and the method name conveys nothing about the action to take.
As an API, it’s not great either. The meaning of the path variables is dependent on their position in the URL. This could be addressed by changing the URL to use a query string instead, like this:
/api/substituteString?string=<string>&search_string=<search_string>&sub_string=<sub_string>
But the URL portion /api/substituteString isn’t a thing (noun) or collection of things at all: it’s an action (verb).
This doesn’t fit well in the REST conventions, and trying to force it to do so makes for a poor API. What the above really represents is an RPC, or Remote Procedure Call. Thinking about this as an RPC makes much more sense.
The beauty is that both REST and RPC conventions can coexist in an API without any problems! By keeping in mind the intention of each, you can use both to compliment each other in your API design. There are many situations where it would be useful to perform CRUD operations on something. There are also many situations where it would be useful to take an action with a thing (as a parameter) but not necessarily affect the thing itself.
The People REST API
For our example program, you’re going to create a REST API providing access to a collection of people with CRUD access to an individual person within that collection. Here’s the API design for the people collection:
| Action | HTTP Verb | URL Path | Description |
|---|---|---|---|
| Create | POST |
/api/people |
Defines a unique URL to create a new person |
| Read | GET |
/api/people |
Defines a unique URL to read a collection of people |
| Read | GET |
/api/people/Farrell |
Defines a unique URL to read a particular person in the people collection |
| Update | PUT |
/api/people/Farrell |
Defines a unique URL to update an existing order |
| Delete | DELETE |
/api/orders/Farrell |
Defines a unique URL to delete an existing person |
Getting Started
First, you’ll create a simple web server using the Flask Micro Framework. To get started, create a directory where you can create the code. You should also work in a virtualenv so you can install modules later on, which you’ll need to do. In addition, create a templates directory.
The Python code below gets a very basic web server up and running, and responding with Hello World for a request for the home page:
from flask import (
    Flask,
    render_template
)

# Create the application instance
app = Flask(__name__, template_folder="templates")

# Create a URL route in our application for "/"
@app.route('/')
def home():
    """
    This function just responds to the browser ULR
    localhost:5000/

    :return:        the rendered template 'home.html'
    """
    return render_template('home.html')

# If we're running in stand alone mode, run the application
if __name__ == '__main__':
    app.run(debug=True)
You should also create a home.html in the templates folder, as this is what will be served to a browser when navigating to the URL '/'. Here is the contents of the home.html file:
<!DOCTYPE html>
<html lang="en">
<head>
    <meta charset="UTF-8">
    <title>Application Home Page</title>
</head>
<body>
    <h2>
        Hello World!
    </h2>
</body>
</html>
You’ll notice the HTML file is named home.html rather than index.html. This is intentional because having an index.html file in the templates directory causes problems once you import the Connexion module in your program.
You can run your application with this command line in the directory containing the server.py file with the Python VirtualEnv active:
python server.py
When you run this application, a web server will start on port 5000, which is the default port used by Flask. If you open a browser and navigate to localhost:5000, you should see Hello World! displayed. Right now, this is useful to see the web server is running. You’ll extend the home.html file later to become a full single page web application using the REST API you’re developing.
In your Python program, you’ve imported the Flask module, giving the application access to the Flask functionality. You then created a Flask application instance, the app variable. Next, you connected the URL route '/' to the home() function by decorating it with @app.route('/'). This function calls the Flask render_template() function to get the home.html file from the templates directory and return it to the browser.
All of the example code is available from a link provided at the end of this article.
Using Connexion to Add a REST API Endpoint
Now that you’ve got a working web server, let’s add a REST API endpoint. To do this, you’ll use the Connexion module, which is installed using pip:
$ pip install connexion
This makes the Connexion module available to your program. The Connexion module allows a Python program to use the Swagger specification. This provides a lot of functionality: validation of input and output data to and from your API, an easy way to configure the API URL endpoints and the parameters expected, and a really nice UI interface to work with the created API and explore it.
All of this can happen when you create a configuration file your application can access. The Swagger site even provides an online configuration editor tool to help create and/or syntax check the configuration file you will create.
Adding Connexion to the Server
There are two parts to adding a REST API URL endpoint to your application with Connexion. You’ll add Connexion to the server and create a configuration file it will use. Modify your Python program like this to add Connexion to the server:
from flask import render_template
import connexion

# Create the application instance
app = connexion.App(__name__, specification_dir='./')

# Read the swagger.yml file to configure the endpoints
app.add_api('swagger.yml')

# Create a URL route in our application for "/"
@app.route('/')
def home():
    """
    This function just responds to the browser ULR
    localhost:5000/
    :return:        the rendered template 'home.html'
    """
    return render_template('home.html')

# If we're running in stand alone mode, run the application
if __name__ == '__main__':
    app.run(host='0.0.0.0', port=5000, debug=True)
You’ve added a couple of things to incorporate Connexion into the server. The import connexion statement adds the module to the program. The next step is creating the application instance using Connexion rather than Flask. Internally, the Flask app is still created, but it now has additional functionality added to it.
Part of the app instance creation includes the parameter specification_dir. This informs Connexion what directory to look in for its configuration file, in this case our current directory. Right after this, you’ve added the line:
app.add_api('swagger.yml')
This tells the app instance to read the file swagger.yml from the specification directory and configure the system to provide the Connexion functionality.
The Swagger Configuration File
The file swagger.yml is a YAML or JSON file containing all of the information necessary to configure your server to provide input parameter validation, output response data validation, URL endpoint definition, and the Swagger UI. Here is part of the swagger.yml defining the GET /api/people endpoint your REST API will provide:
consumes:
  - "application/json"
produces:
  - "application/json"

basePath: "/api"

# Paths supported by the server application
paths:
  /people:
    get:
      operationId: "people.read"
      tags:
        - "People"
      summary: "The people data structure supported by the server application"
      description: "Read the list of people"
      responses:
        200:
          description: "Successful read people list operation"
          schema:
            type: "array"
            items:
              properties:
                fname:
                  type: "string"
                lname:
                  type: "string"
                timestamp:
                  type: "string"
This file is organized in a hierarchical manner: the indentation levels represent a level of ownership, or scope.
For example, paths defines the beginning of where all the API URL endpoints are defined. The /people value indented under that defines the start of where all the /api/people URL endpoints will be defined. The get: indented under that defines the section of definitions associated with an HTTP GET request to the /api/people URL endpoint. This goes on for the entire configuration.
Here are the meanings of the fields in this section of the swagger.yml file:
This section is part of the global configuration information:
consumes:tells Connexion what MIME type is expected by the API.produces:tells Connexion what content type is expected by the caller of the API.basePath: "/api"defines the root of the API, kind of like a namespace the REST API will come from.
This section begins the configuration of the API URL endpoint paths:
paths:defines the section of the configuration containing all of the API REST endpoints./people:defines one path of your URL endpoint.get:defines the HTTP method this URL endpoint will respond to. Together with the previous definitions, this creates theGET /api/peopleURL endpoint.
This section begins the configuration of the single /api/people URL endpoint:
operationId: "people.read"defines the Python import path/function that will respond to an HTTPGET /api/peoplerequest. The"people.read"portion can go as deep as you need to in order to connect a function to the HTTP request. Something like"<package_name>.<package_name>.<package_name>.<function_name>"would work just as well. You’ll create this shortly.tags:defines a grouping for the UI interface. All the CRUD methods you’ll define for the people endpoint will share this tag definition.summarydefines the UI interface display text for this endpoint.description:defines what the UI interface will display for implementation notes.
This section defines the section of the configuration of a successful response from the URL endpoint:
response:defines the beginning of the expected response section.200:defines the section for a successful response, HTTP status code 200.description:defines the UI interface display text for a response of 200.schema:defines the response as a schema, or structure.type:defines the structure of the schema as an array.items:starts the definition of the items in the array.properties:defines the items in the array as objects having key/value pairs.fname:defines the first key of the object.type:defines the value associated withfnameas a string.lname:defines the second key of the object.type:defines the value associated withlnameas a string.timestamp:defines the third key of the object.type:defines the value associated withtimestampas a string.
Handler for People Endpoint
In the swagger.yml file, you configured Connexion with the operationId value to call the people module and the read function within the module when the API gets an HTTP request for GET /api/people. This means a people.py module must exist and contain a read() function. Here is the people.py module you will create:
from datetime import datetime

def get_timestamp():
    return datetime.now().strftime(("%Y-%m-%d %H:%M:%S"))

# Data to serve with our API
PEOPLE = {
    "Farrell": {
        "fname": "Doug",
        "lname": "Farrell",
        "timestamp": get_timestamp()
    },
    "Brockman": {
        "fname": "Kent",
        "lname": "Brockman",
        "timestamp": get_timestamp()
    },
    "Easter": {
        "fname": "Bunny",
        "lname": "Easter",
        "timestamp": get_timestamp()
    }
}

# Create a handler for our read (GET) people
def read():
    """
    This function responds to a request for /api/people
    with the complete lists of people

    :return:        sorted list of people
    """
    # Create the list of people from our data
    return [PEOPLE[key] for key in sorted(PEOPLE.keys())]
In this code, you’ve created a helper function called get_timestamp() that generates a string representation of the current timestamp. This is used to create your in-memory structure and modify the data when you start modifying it with the API.
You then created the PEOPLE dictionary data structure, which is a simple names database, keyed on the last name. This is a module variable, so its state persists between REST API calls. In a real application, the PEOPLE data would exist in a database, file, or network resource, something that persists the data beyond running/stopping the web application.
Then you created the read() function. This is called when an HTTP request to GET /api/people is received by the server. The return value of this function is converted to a JSON string (recall the produces: definition in the swagger.yml file). The read() function you created builds and returns a list of people sorted by last name.
Running your server code and navigating in a browser to localhost:5000/api/people will display the list of people on screen:
[
  {
    "fname": "Kent",
    "lname": "Brockman",
    "timestamp": "2018-05-10 18:12:42"
  },
  {
    "fname": "Bunny",
    "lname": "Easter",
    "timestamp": "2018-05-10 18:12:42"
  },
  {
    "fname": "Doug",
    "lname": "Farrell",
    "timestamp": "2018-05-10 18:12:42"
  }
]
Congratulations, you’ve created a nice API and are on your way to building out a complete one!
The Swagger UI
Now you have a simple web API running with a single URL endpoint. At this point, it would be reasonable to think, “configuring this with the swagger.yml file was cool and all, but what did it get me?”
You’d be right to think that. We haven’t taken advantage of the input or output validation. All that swagger.yml gave us was a definition for the code path connected to the URL endpoint. However, what you also get for the extra work is the creation of the Swagger UI for your API.
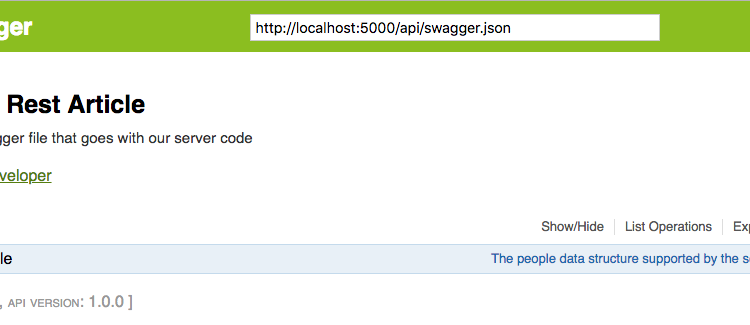
If you navigate to localhost:5000/api/ui, the system will bring up a page that looks something like this:
This is the initial Swagger interface and shows the list of URL endpoints supported at our localhost:5000/api endpoint. This is built automatically by Connexion when it parses the swagger.yml file.
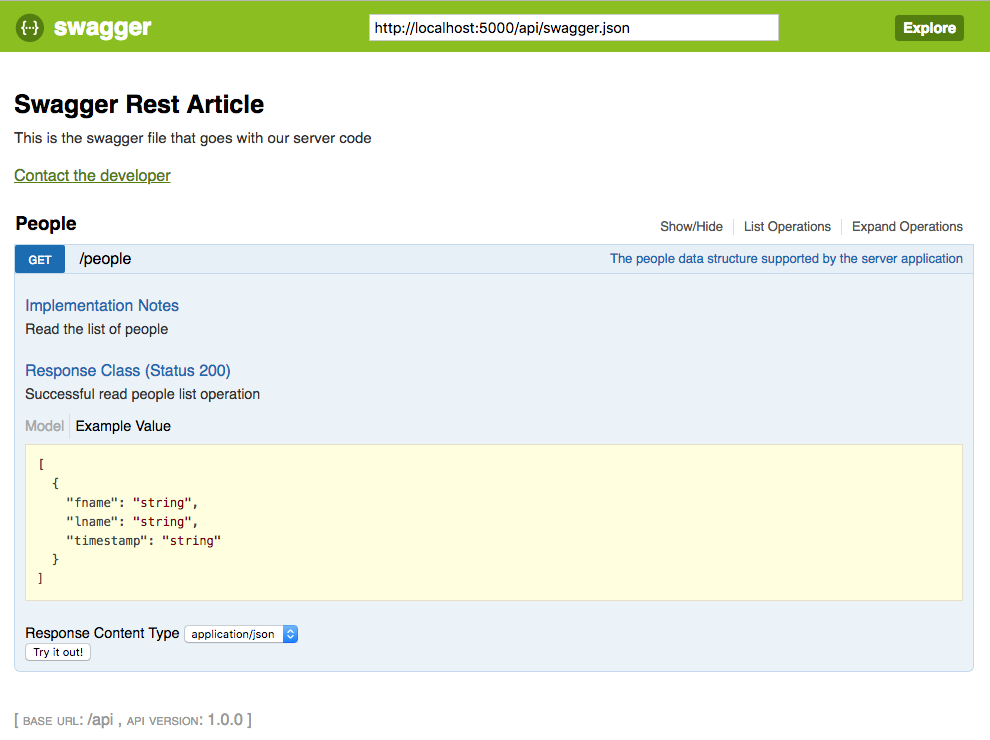
If you click on the /people endpoint in the interface, the interface will expand to show a great deal more information about your API and should look something like this:
This displays the structure of the expected response, the content-type of that response, and the description text you entered about the endpoint in the swagger.yml file.
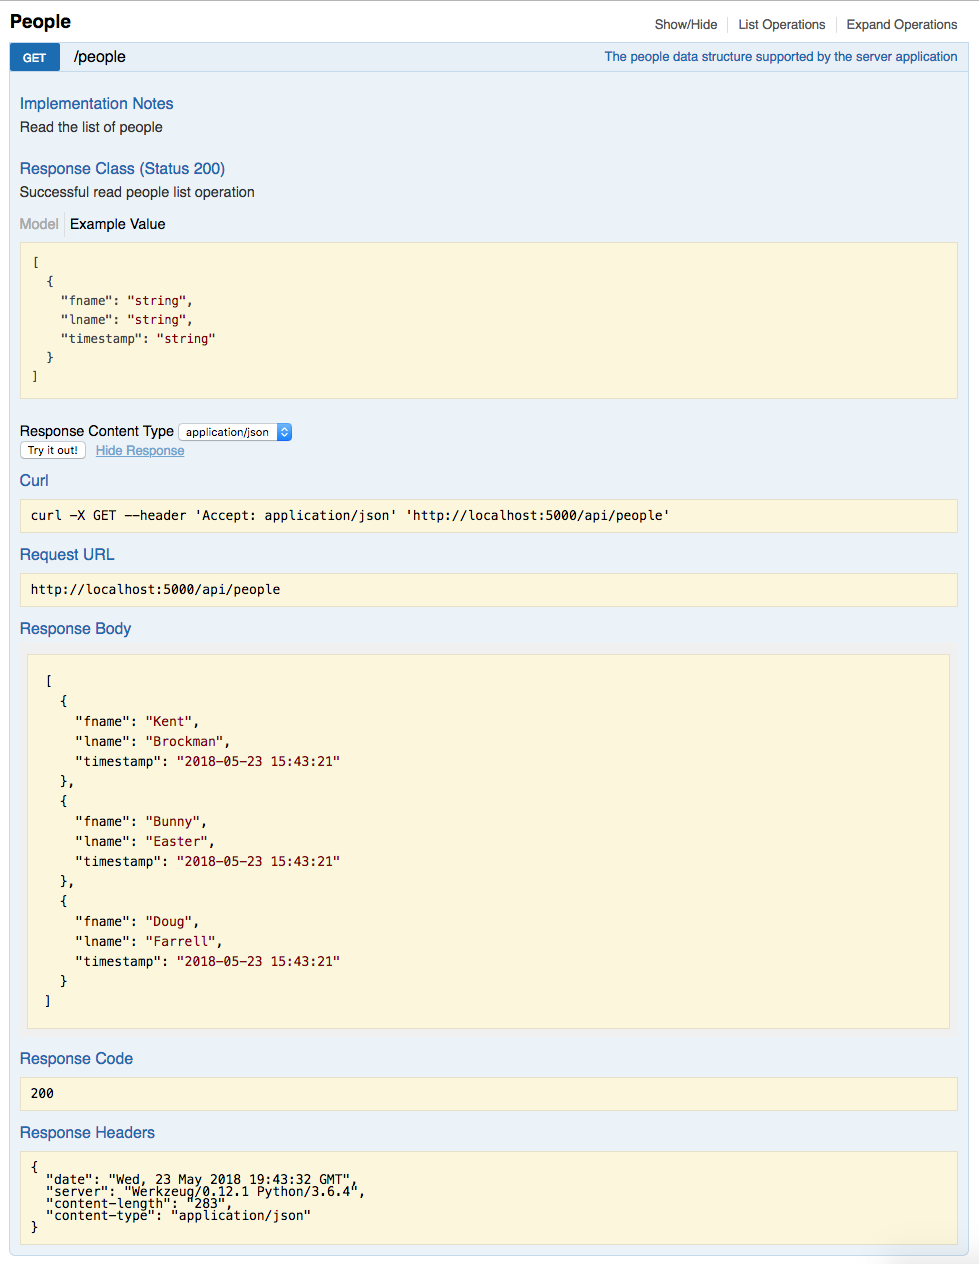
You can even try the endpoint out by clicking the Try It Out! button at the bottom of the screen. That will further expand the interface to look something like this:
This can be extremely useful when the API is complete as it gives you and your API users a way to explore and experiment with the API without having to write any code to do so.
Building an API this way is very useful to me at work. Not only is the Swagger UI useful as a way to experiment with the API and read the provided documentation, but it’s also dynamic. Any time the configuration file changes, the Swagger UI changes as well.
In addition, the configuration offers a nice, clean way to think about and create the API URL endpoints. I know from experience that APIs can develop in a sometimes random manner over time, making finding the code that supports the endpoints, and coordinating them, difficult at best.
By separating the code from the API URL endpoint configuration, we decouple one from the other. This alone has been very useful to me in my work building API systems supporting single page web applications.
Building Out the Complete API
Our original goal was to build out an API providing full CRUD access to our people structure. As you recall, the definition of our API looks like this:
| Action | HTTP Verb | URL Path | Description |
|---|---|---|---|
| Create | POST |
/api/people |
Defines a unique URL to create a new person |
| Read | GET |
/api/people |
Defines a unique URL to read a collection of people |
| Read | GET |
/api/people/Farrell |
Defines a unique URL to read a particular person in the people collection |
| Update | PUT |
/api/people/Farrell |
Defines a unique URL to update an existing order |
| Delete | DELETE |
/api/orders/Farrell |
Defines a unique URL to delete an existing person |
To achieve this, you’ll extend both the swagger.yml and people.py files to fully support the API defined above. For the sake of brevity, only a link will be provided for both files:
The Swagger UI Completed
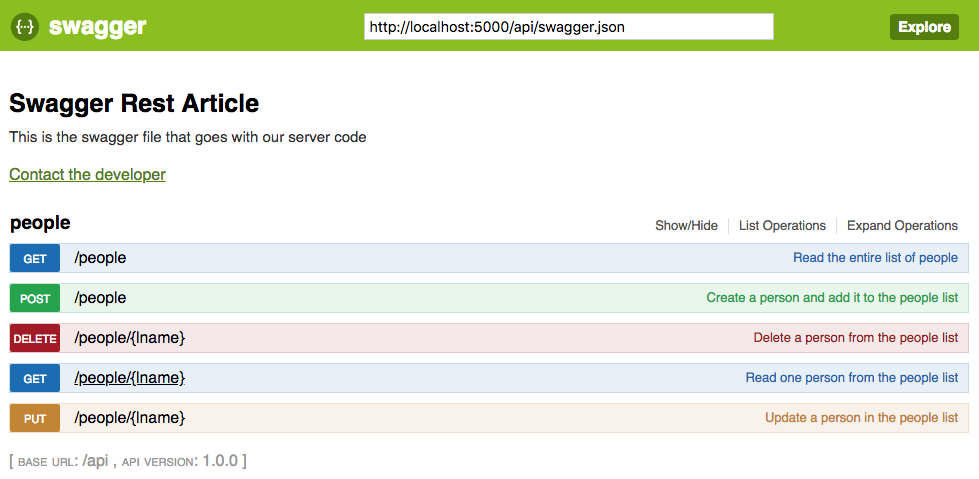
Once you’ve updated the swagger.yml and people.py files to complete the people API functionality, the Swagger UI system will update accordingly and look something like this:
This UI allows you to see all of the documentation you’ve included in the swagger.yml file and interact with all of the URL endpoints making up the CRUD functionality of the people interface.
Demonstration Single-Page Application
You’ve got a working REST API with a great Swagger UI documentation/interaction system. But what do you do with it now? The next step is to create a web application demonstrating the use of the API in a semi-practical manner.
You’ll create a web application that displays the people on screen as well as allows the user to create new people, update existing people, and delete people. This will all be handled by AJAX calls from JavaScript to the people API URL endpoints.
To begin, you need to extend the home.html file to look like this:
<!DOCTYPE html>
<html lang="en">
<head>
    <meta charset="UTF-8">
    <title>Application Home Page</title>
    <link rel="stylesheet" href="https://cdnjs.cloudflare.com/ajax/libs/normalize/8.0.0/normalize.min.css">
    <link rel="stylesheet" href="static/css/home.css">
    <script
      src="http://code.jquery.com/jquery-3.3.1.min.js"
      integrity="sha256-FgpCb/KJQlLNfOu91ta32o/NMZxltwRo8QtmkMRdAu8="
      crossorigin="anonymous">
    </script>
</head>
<body>
    <div class="container">
        <h1 class="banner">People Demo Application</h1>
        <div class="section editor">
            <label for="fname">First Name
                <input id="fname" type="text" />
            </label>
            <br />
            <label for="lname">Last Name
                <input id="lname" type="text" />
            </label>
            <br />
            <button id="create">Create</button>
            <button id="update">Update</button>
            <button id="delete">Delete</button>
            <button id="reset">Reset</button>
        </div>
        <div class="people">
            <table>
                <caption>People</caption>
                <thead>
                    <tr>
                        <th>First Name</th>
                        <th>Last Name</th>
                        <th>Update Time</th>
                    </tr>
                </thead>
                <tbody>
                </tbody>
            </table>
        </div>
        <div class="error">
        </div>
    </div>
</body>
<script src="static/js/home.js"></script>
</html>
The above HTML code extends the home.html file to pull in the external normalize.min.css file, which is a CSS reset file to normalize the formatting of elements across browsers.
It also pulls in the external jquery-3.3.1.min.js file to provide the jQuery functionality you’ll use to create the single-page application interactivity.
The HTML code above creates the static framework of the application. The dynamic parts appearing in the table structure will be added by JavaScript at load time and as the user interacts with the application.
Static Files
In the home.html file you’ve created, there are references to two static files: static/css/home.css and static/js/home.js. To add these, you’ll need to add the following directory structure to the application:
static/
│
├── css/
│   └── home.css
│
└── js/
    └── home.js
Because a directory named static will automatically be served by the Flask application, any files you place in the css and js folders will be available to the home.html file. For the sake of brevity, here are links to the home.css and home.js files:
JavaScript File
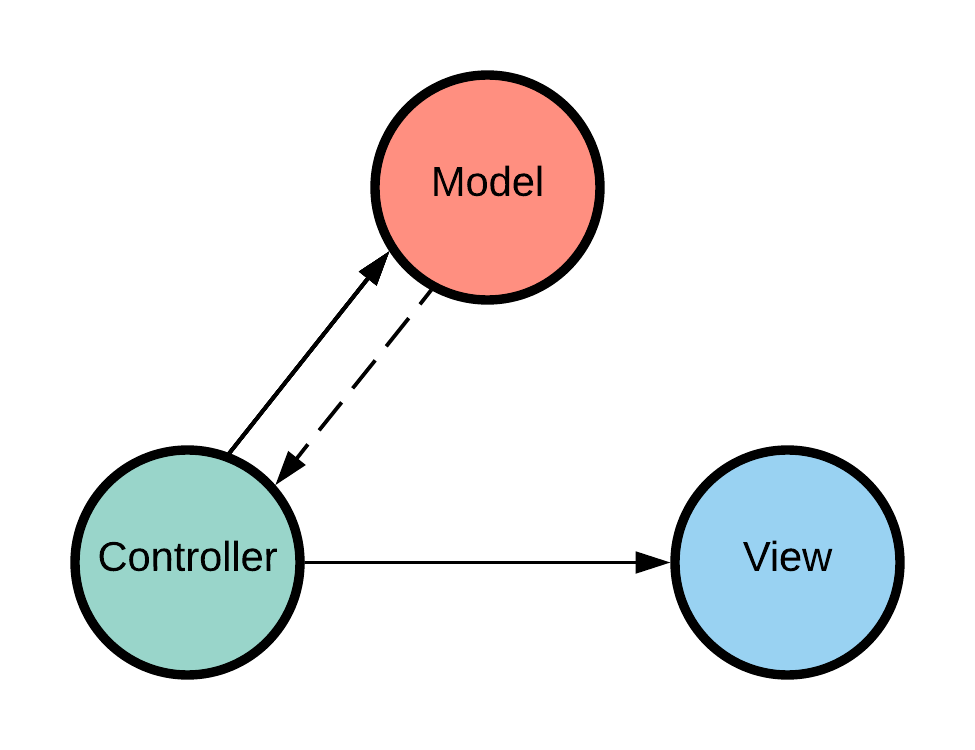
As was mentioned, the JavaScript file provides all the interaction with and updates to the web application. It does this by breaking up the necessary functionality into three parts by using the MVC (Model / View / Controller) design pattern.
Each object is created by a self-invoking function returning its own API for use by the other pieces. For instance, the Controller is passed the instances of the Model and View as parameters in its instantiation. It interacts with those objects through their exposed API methods.
The only other connection is between the Model and Controller by means of custom events on the AJAX method calls:
- The Model provides the connection to the people API. Its own API is what the Controller calls to interact with the server when a user interaction event requires it.
- The View provides the mechanism to update the web application DOM. Its own API is what the Controller calls to update the DOM when a user interaction event requires it.
- The Controller provides all the event handlers for user interaction with the web application. This allows it to make calls to the Model to make requests to the people API, and to the View to update the DOM with new information received from the people API.
It also handles the custom events generated by the asynchronous AJAX requests made by the Model to the people API.
Here is a diagram of the MVC structure used in the home.js file:
The idea is that the Controller has a strong link to both the Model and the View. The Model has a weak link (the custom events) to the Controller and no connection to the View at all. The weak link from the Model to the Controller reduces coupling and dependence, which is useful in this case.
Demo Application
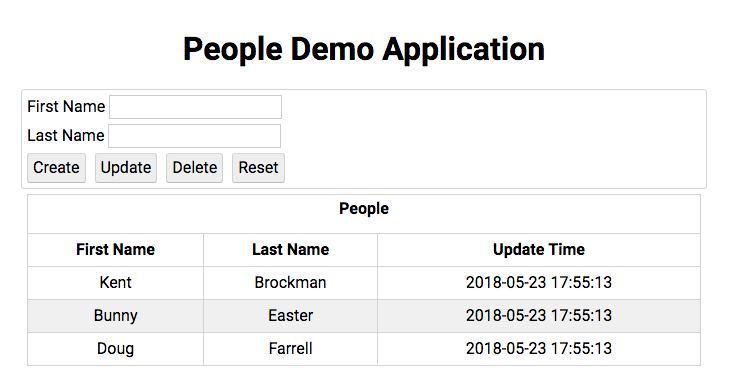
When created, the web application will look like this in the browser:
The Create button allows the user to create a new person in the people structure on the server. When you enter a First and Last Name and hit Create, the Controller calls the Model to make a request to the POST /api/people URL endpoint. This will verify that the last name doesn’t already exist. If it doesn’t, it will create a new person in the people structure.
This generates a custom event in the Model that causes the Controller to call the Model again to request a GET /api/people, which will return the complete list of people sorted. The Controller then passes that onto the View to redraw the table of people.
Double clicking on any row in the table will populate the First and Last Name fields in the editor section of the application. At this point, the user can either update or delete the person.
To update successfully, the user must change something about the First Name. The Last Name must remain the same as it’s the lookup key for the person to update. When Update is clicked, the Controller calls the Model to make a request to the PUT /api/people/{lname} URL endpoint. This will verify that the Last Name does currently exist. If so, it will update that person in the people structure.
This generates a custom event in the Model that causes the Controller to call the Model again to request a GET /api/people, which will return the complete list of people sorted. The Controller then passes that onto the View to redraw the table of people.
To delete successfully, the user need only click Delete. When Delete is clicked, the Controller calls the Model to make a request to the DELETE /api/people/{lname} URL endpoint. This will verify that the last name does currently exist. If so, it will delete that person from the people structure.
This generates a custom event in the Model that causes the Controller to call the Model again to request a GET /api/people, which will return the complete list of people sorted. The Controller then passes that onto the View to redraw the table of people.
Try making intentional errors in the editor, like misspelling a Last Name, and see the errors generated by the API represented on the web application.
Example Code
All of the example code for this article is available here. There are four versions of the code, each in a version_# directory, where # ranges from 1 to 4. The four versions correspond to the article sections in this manner:
version_1: This version contains the initial web server that serves up thehome.htmlfile.version_2: This version contains the web server with Connexion added and the first people API URL endpoint.version_3: This version contains the completed people API with all supported URL endpoints.version_4: This version contains the completed API and a single page web application to demonstrate it.
Free Bonus: Click here to download a copy of the “REST in a Nutshell” Guide with a hands-on introduction to REST API principles and examples.
Conclusion
In this tutorial, you saw how relatively easy it is to create a comprehensive REST API with Python. With the Connexion module and some additional configuration work, a useful documentation and interactive system can be put in place, making your API a much more enjoyable experience for your users to interface with and understand.
[ Improve Your Python With 🐍 Python Tricks 💌 – Get a short & sweet Python Trick delivered to your inbox every couple of days. >> Click here to learn more and see examples ]
